I received an urgent technical report from a client in Egypt yesterday. He stated: "Vivian, the injection gate on the bottle bottom is offset by 4mm. The bottles are unstable on the filling line." I asked for specific cavity data. He confirmed: "Only Cavity #3 shows this defect." This isolated the variable immediately. It was not a global heating issue; it was a localized mechanical failure. He inspected the stretch rod in Cavity #3 and found a 2mm deflection. After replacement, the eccentricity was resolved. Gate eccentricity is a precise indicator of process misalignment. Today, I share my 6-step engineering protocol to diagnose and fix this.
1. Understanding "Eccentricity": Why the injection point drifts away.
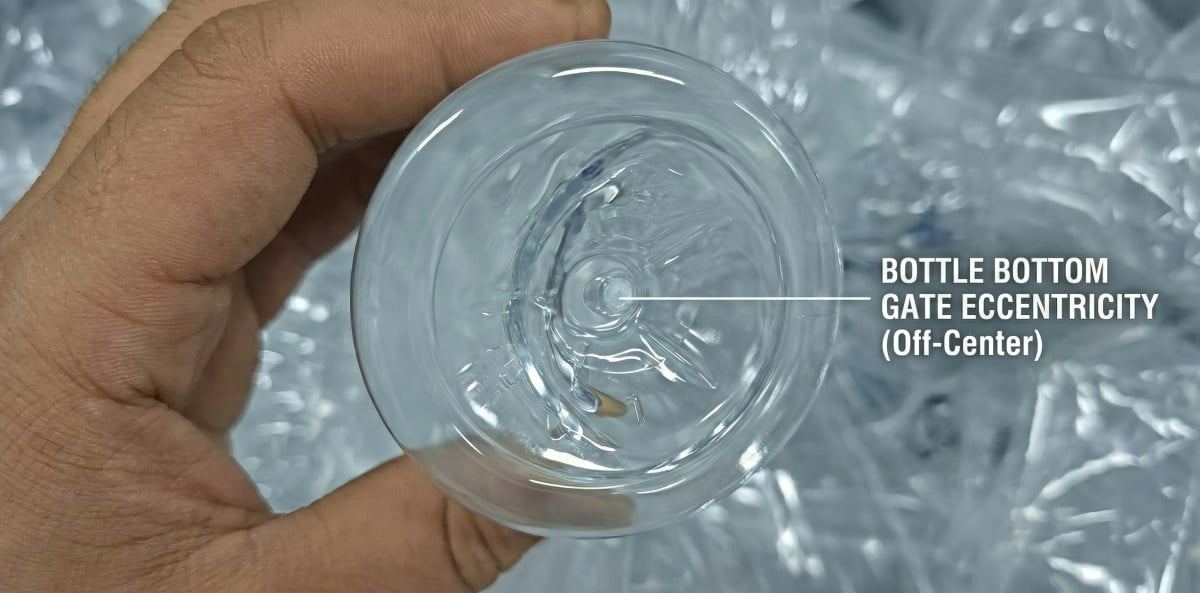
Problem: You produce 10,000 bottles, but a percentage of them fail the vertical stability test. The injection gate is displaced from the geometric center of the base (Punt).
Agitation: Operators often blame the blow mold design. However, the mold is a static steel component. Displacement occurs due to dynamic variables.
Solution: You must understand that eccentricity is the result of a force imbalance between the Stretch Rod (Mechanical Path) and the Material Distribution (Thermal Resistance).
Eccentricity (Off-Center Gate) occurs when the stretch rod deviates from the preform's central axis during the stretching phase, or when uneven wall thickness causes differential heating. To fix it, you must align the mechanical rod path and ensure the preform's thermal profile is symmetrical.
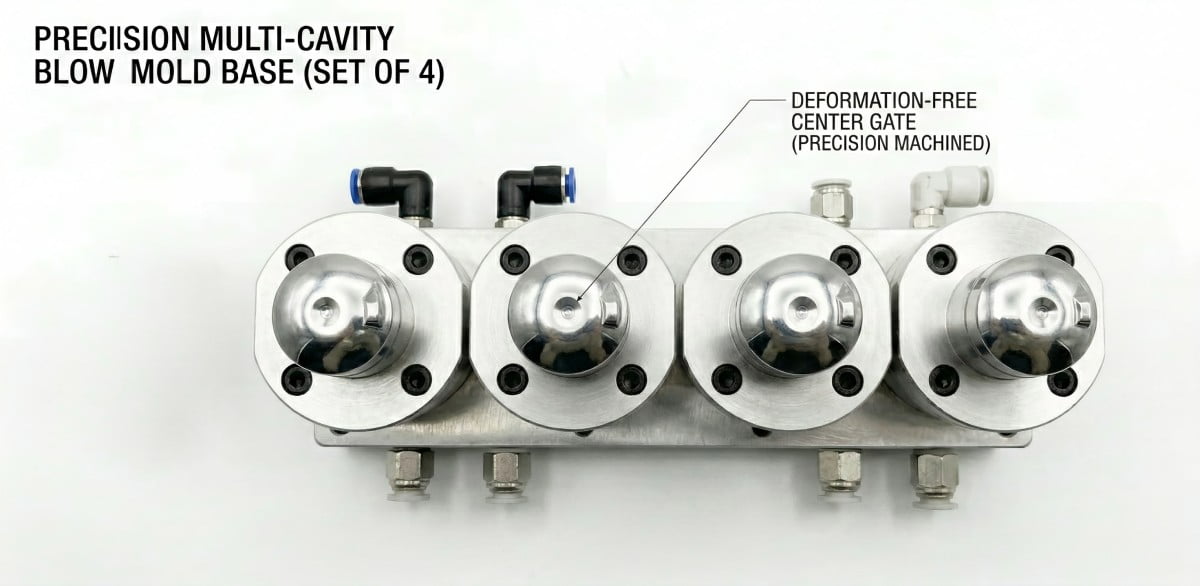
In my 20 years of precision mold engineering in Guangdong province, a hub of manufacturing excellence, I have established that the bottle bottom is the "black box" recorder of the blowing process. The "Gate" must align perfectly with the center of the bottom mold.
If the gate shifts, it indicates one of two failure modes:
- Mechanical Deflection: The stretch rod physically forced the material off-center.
- Thermal Path of Least Resistance: One side of the preform wall was thinner (and thus hotter/softer). The stretch rod naturally slides into the softer material, pulling the gate away from the center.
Diagnostic Rule:
Perform a cross-section analysis of the bottle base.
- Gate Off-Center + Uneven Wall Thickness: The root cause is Thermal/Material Distribution.
- Gate Off-Center + Even Wall Thickness: The root cause is Mechanical Rod Alignment.
| Defect Term | Visual Symptom | Root Cause Category |
|---|---|---|
| Eccentricity | Gate offset from punt center | Rod Alignment / Preform Concentricity |
| Rocker Bottom | Gate protrudes, unstable base | Overheating / Low Blowing Pressure |
| Gate Fold | Material folded near injection point | Impact Velocity / Late Pre-blow |
2. Step 1: Input Quality Control (IQC) – Preform Wall Thickness Concentricity
Problem: Machine parameters are optimized, yet the gate consistently drifts to the same vector.
Agitation: The defect persists despite changes in the oven profile.
Solution: Verify the input quality. A preform with uneven wall thickness will inevitably result in an eccentric bottle.
Preform quality must be verified by measuring the Wall Thickness Concentricity. If the difference between opposite wall sections exceeds 0.1mm, the thinner side will absorb heat faster, creating a "hot spot" that attracts the stretch rod, causing the gate to drift.
I once audited a production line in Foshan attempting to blow 5L oil bottles. The gate offset was consistent at 5mm. We suspected the preform mold quality.
We did not rely on visual checks or rolling tests. We performed a Destructive Test.
- We cut the preform cross-section using a precision saw.
- We measured the wall thickness at 4 quadrants (0°, 90°, 180°, 270°).
- Side A (0°): 3.0mm
- Side B (180°): 2.7mm
- Deviation: 0.3mm.
The Physics of Failure:
Inside the reheat oven, the thinner Side B (2.7mm) heats up significantly faster than Side A.
When the stretch rod engages, it encounters resistance from the colder Side A and zero resistance from the hotter Side B.
The rod follows the path of least resistance and slides toward Side B.
Result: The gate is pulled off-center toward the thin wall.
Standard: Reject any preform batch with a concentricity error > 0.15mm.
3. Step 2: The Stretch Rod – The #1 Mechanical Suspect.
Problem: The preform concentricity is perfect, but the bottle remains eccentric.
Agitation: Thermal adjustments yield no improvement.
Solution: Inspect the straightness and alignment of the stretch rod.
The stretch rod is the primary mechanical guide for the material; it must be perfectly straight and concentric with the mold cavity. If the rod is bent due to a previous crash, or if the linear bearing is worn, it will mechanically force the gate away from the center.
This was the specific issue with my Egyptian client.
The stretch rod is a slender steel shaft operating at high velocity. If a preform is injected too cold, the impact force can cause the rod to buckle or bend slightly.
A deviation of just 1.0mm at the rod tip can result in a 3.0mm offset in the final bottle base.
Inspection Protocol:
- Static Check: Remove the preforms. Lower the rod manually.
- Visual Alignment: Observe the rod tip as it enters the blow mold.
- Does it maintain equal distance from the locking ring on all sides?
- Does it align with the geometric center of the bottom mold?
- Run-out Check: Move the rod up and down. If the rod vibrates or oscillates, the linear bushings/bearings are worn. A vibrating rod cannot maintain centering during high-speed operation.
Rod Tip Condition:
Ensure the rod tip is not worn flat. A flattened tip increases friction and the likelihood of slipping on the smooth PET surface.
4. Step 3: Oven Spindles – Rotation Stability and Run-out.
Problem: The gate is off-center, but the direction of the offset is random (inconsistent).
Agitation: Random defects are difficult to tune because the variable is unstable.
Solution: Inspect the oven chain spindles for bearing failure or run-out.
Oven spindles must rotate smoothly to ensure uniform heat distribution (360°) around the preform. If a spindle wobbles or seizes, one side of the preform will be overheated while the opposite side remains cold, causing the stretch rod to drift toward the hot zone.
The "Hot/Cold Side" Phenomenon:
If a spindle bearing is seized, the preform may momentarily stop rotating while passing a heating lamp.
- Sector A: Exposed to lamps for 0.5s longer -> Overheated (Soft).
- Sector B: Facing away from lamps -> Underheated (Hard).
When this thermally unbalanced preform enters the mold, the stretch rod will be pushed away from the hard side and slide into the soft side.
Result: Eccentricity caused by thermal asymmetry.
Diagnostic:
Observe the rotation of preforms in the oven. Any preform that appears to "wobble" or "hesitate" indicates a defective spindle. These must be replaced immediately to ensure process capability.
5. Step 4: Pre-Blow Settings – Timing and Aerodynamics.
Problem: The rod is straight, material is uniform, but the gate is still offset.
Agitation: Mechanical and material checks have passed.
Solution: Optimize the "Pre-Blow" (Low Pressure) activation timing.
Pre-blow pressure creates an aerodynamic "air cushion" that centers the material around the stretch rod tip. If the pre-blow is activated too late (delayed), the rod contacts the glass-smooth PET surface without air support, leading to slippage and misalignment.
The Function of Pre-Blow:
The primary purpose of pre-blow (8-10 bar) is not just initial expansion, but Rod Stabilization.
The air pressure inflates the preform slightly, creating a separation layer or "centering force" that keeps the material equidistant from the rod.
The "Late Activation" Error:
If pre-blow is delayed, the rod descends into a tight, non-inflated preform. Friction is high.
Upon contacting the gate area, the lack of internal pressure allows the rod tip to slide across the slick PET surface.
Result: The rod slips 2-3mm off-center before the high-pressure blow locks the material in place.
Corrective Action:
Advance the Pre-Blow timing.
Ensure the airflow begins simultaneously with the rod's extension into the body section.
Every bottle design requires a specific timing curve to match the stretch ratio.
6. Step 5: Bottom Mold Inspection – Leveling and Debris.
Problem: The gate is consistently off-center in one specific direction (e.g., always biased +Y axis).
Agitation: Rod alignment is verified, yet the deviation persists.
Solution: Check the physical installation and leveling of the bottom mold (Punt).
The bottom mold must be installed on a perfectly clean surface to ensure the centering ring aligns with the mold axis. If PET debris or contaminants are trapped under the base plate, the bottom mold will sit at a tilt, causing misalignment.
In our Guangdong facility, we machine bottom molds from heavy S136 steel.
During production, if a bottle bursts, plastic fragments can fall into the bottom mold lifting mechanism.
If a fragment is trapped under the base plate, clamping the mold will cause it to tilt.
Even a 0.5-degree tilt at the base translates to a significant offset at the gate.
Maintenance Protocol:
- Disassemble: Remove the bottom mold from the carrier.
- Clean: Remove all grease, scale, and plastic particles from the mating surfaces.
- Re-torque: Install the bolts using a torque wrench in a "Star Pattern" to ensure even pressure distribution.
- Hose Check: Ensure cooling water hoses are not applying lateral tension to the floating bottom mold.
7. Step 6: Mold Cavity Alignment – Parting Line Offset.
Problem: The bottom mold impacts the cavity wall during closing (Audible clunk/collision).
Agitation: This causes wear on the mold components.
Solution: Check the Interlock Guide Pins and the concentricity of the mold halves.
Mold alignment relies on precision Interlock Guide Pins to ensure the two cavity halves close concentrically. If these pins are worn or the clamping unit is loose, the mold halves will be offset, creating an oval aperture that forces the bottom mold out of center.
The Parting Line Check:
Inspect the closed mold. Run a fingernail across the parting line on the exterior.
- Smooth: Good alignment.
- Step/Ridge: Misalignment (Offset).
If the mold halves are offset (e.g., Left side is 0.1mm higher than Right side), the circular opening for the bottom mold becomes elliptical. The bottom mold cannot self-center in an ellipse. It will be forced off-axis.
Result: The gate is pushed off-center by the mold geometry itself.
Regularly lubricate guide pins and replace bushings if any play is detected.
8. Summary: Precision Engineering for Centering.
Fixing an off-center gate is a process of elimination based on engineering principles.
We must isolate Mechanical variables from Thermal variables.
The Vivian Protocol Recap:
- Material: Check Preform Wall Concentricity (Cut & Measure).
- Mechanics: Check Stretch Rod Straightness (Run-out).
- Thermal: Check Spindle Rotation (Wobble).
- Process: Check Pre-Blow Timing (Advance if late).
- Installation: Check Bottom Mold Base (Debris).
- Alignment: Check Mold Guide Pins (Parting Line Offset).
Don't adjust the oven profile until you have verified the rod alignment.
Don't adjust the rod until you have verified the preform concentricity.
FAQ: Technical Troubleshooting Queries
Q1: Can I correct off-center gates by increasing the preform temperature?
No. This is risky. Increasing the overall temperature makes the material softer, which may cause the rod to slip more easily if the alignment is imperfect. Address the mechanical alignment first.
Q2: What is the industry standard for gate eccentricity tolerance?
For standard water bottles, <1.0mm is generally acceptable. For CSD (Carbonated Soft Drinks) or Hot Fill applications, eccentricity must be <0.5mm. Excessive eccentricity in pressure vessels creates a stress concentration point, leading to burst failures.
Q3: Why does the gate drift toward the handle on handle-ware bottles?
The handle area of the preform is significantly thicker than the non-handle side. The rod naturally drifts toward the thinner (hotter) side opposite the handle. You must use "Differential Heating" (Preferential Heating) to increase the temperature of the thick handle side to balance the material flow resistance.
Q4: Is a pointed stretch rod tip better for centering?
Not necessarily. A pointed tip risks puncturing the gate or sticking. A radiused (rounded) tip is preferred for most PET applications as it allows for controlled material distribution without stress whitening, provided the pre-blow is timed correctly.
Q5: My bottom mold fails to center during closing. Why?
Check the O-ring or seal on the bottom mold piston. If the O-ring is damaged or lacks lubrication, it creates uneven friction, causing the bottom mold to tilt as it ascends.
Master Troubleshooting Table: Off-Center Gates
| Observation | Likely Root Cause | Corrective Action |
|---|---|---|
| All Cavities Off-Center | Preform Batch Defect | Measure wall concentricity; Change batch |
| Single Cavity Off-Center | Bent Stretch Rod | Replace rod in the specific cavity |
| Gate Moves Randomly | Spindle/Chain Run-out | Replace spindle bearings |
| Gate Off + White Haze | Pre-Blow Too Late | Advance pre-blow timing (10ms steps) |
| Gate Off + Thin Wall Side | Uneven Heating Profile | Check oven lamps / Adjust zone heating |
| Gate Off + Parting Line Step | Mold Misalignment | Check Guide Pins and Bushings |
If you are struggling with persistent eccentricity, or if your current tooling lacks the precision to hold tolerance, contact us. At PETmold, we engineer molds with the highest grade S136 steel to ensure superior alignment and longevity. Visit petmolder.com to review our technical specifications.
-300x300.jpg)
-1-300x300.jpg)