Hello. I am Vivian, the founder of PETmolder.com. I have worked in mold manufacturing in Zhongshan, China for 20 years. In the market, square PET bottles belong to the premium level. They cost more. The preform mold requires a heavier weight. They are much harder to blow than round bottles.
I saw a client from Saudi Arabia. He paid an ad agency to design a square bottle. It looked beautiful on paper. The neck transitioned to the body at a sharp 90-degree angle. He brought the drawing to me. I told him: "Stop. Do not cut this steel." This design cannot demold. The plastic will get stuck inside.
Many designers make this mistake. They draw sharp lines. But plastic does not obey drawings. Plastic obeys physics. Today, my team and I will explain the nightmare of blowing square bottles. We want to help you avoid bad designs. Stop wasting money on molds that are destined to fail.
1. Why do 90-degree sharp corners cause your bottles to explode during the drop test?
I saw a square bottle explode when dropped from 1 meter. Water spilled everywhere. The corners split open. The design used sharp 90-degree angles. This is a mistake. You must add a radius to the corners.
PET plastic naturally expands into a sphere. Forcing it into a 90-degree square corner causes extreme "material thinning" at the edge. The sharp corner becomes the weakest point of the bottle. You cannot use a pure 90-degree angle. You must design a minimum corner radius of R3 to R5.
Deep Dive: The Physics of Corners
In my workshop, I test bottles every day. A round bottle shares the internal pressure equally. A square bottle does not. The corners take all the stress.
When high-pressure air blows the plastic, the PET bubble grows in a circle. It hits the flat walls of the square blowing mold first. The plastic stops stretching and cools down there.
Then, the air forces the remaining plastic into the four deep corners. The plastic has to stretch extra far to reach the tips. This causes extreme "material thinning." The corner wall becomes as thin as paper.
The Danger of the 90-Degree Angle:
My Saudi client wanted a 90-degree angle. I told him this is a disaster.
- The plastic cannot reach a perfect 90-degree tip.
- The sharp metal corner acts like a knife. It creates a high stress concentration.
- The bottle cannot demold (release) smoothly. It gets stuck and scratches.
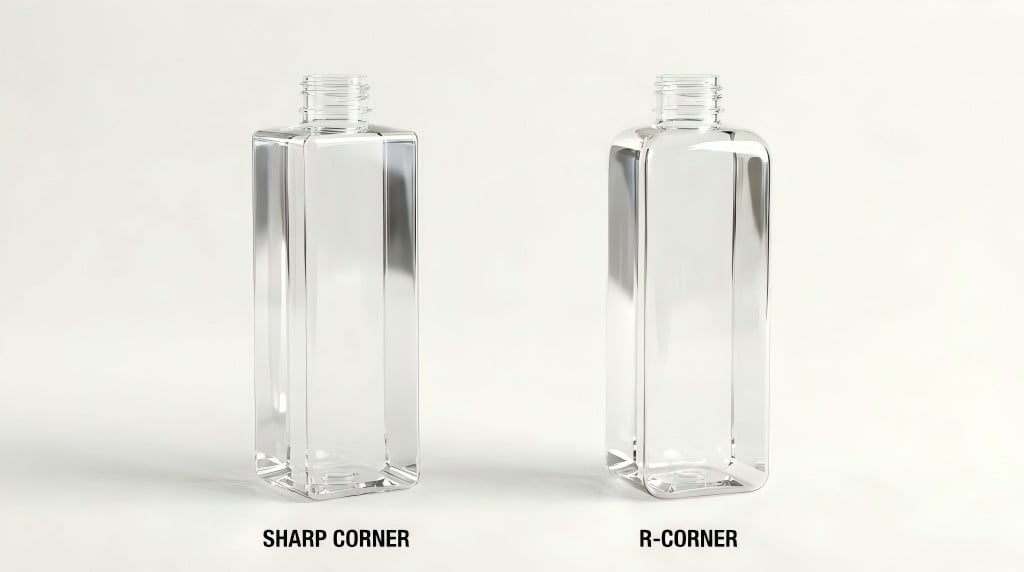
The Solution: The R-Angle:
Stop fighting physics. Good bottle design uses an "R-angle" (Radius).
You must curve the corner. A radius of R3 (3mm) to R5 (5mm) is the minimum for a safe stretch. The plastic flows smoothly around the curve. The corner stays thick and strong. It survives the drop test.
Corner Design Comparison
| Feature | 90-Degree Sharp Corner | R3 to R5 Radius Corner |
|---|---|---|
| Plastic Stretching | Extreme thinning | Smooth distribution |
| Stress Concentration | High (Cracks easily) | Low (Impact resistant) |
| Demolding | Hard (Scratches bottle) | Easy |
| Look | Ultra-modern (But fails) | Premium & Safe |
Do not let your ad agency draw 90-degree corners. You will pay for expensive scrap.
2. How do top brands use "Preferential Heating" to prevent paper-thin square corners?
I took a client to visit a top-tier international beverage plant. He saw their square bottles had very thick corners. They passed strict drop tests. When he used his own standard machine to blow square bottles, the corners were always paper-thin. Do not just blame machine settings. You must understand high-end "Preferential Heating" technology.
In standard machines, preforms rotate and heat evenly. This causes the flat walls of a square mold to steal the plastic, leaving the corners thin. Top-tier machines like Sidel and Krones use "Preferential Heating." The machine targets four hot stripes directly at the corners. More hot plastic flows to the corners, keeping them thick.
Deep Dive: The Secret of Hot Stripes
Square bottle production faces a huge physics problem. The distance from the center of the base to the flat walls is short. The distance from the center to the four corners is long.
In a standard blowing machine, the preform rotates fast inside the oven. It gets absolutely even heat. When the air blows the plastic, the plastic hits the flat walls first and stops stretching. Most of the plastic stays on the flat surfaces. The tiny amount of leftover plastic travels a long distance to the corners and becomes paper-thin.
The Big Brand Solution: Preferential Heating
Stop thinking about square bottles with round bottle logic. Premium brands and complex custom bottle makers use a special technology called "Preferential Heating."
Famous blowing machine giants, like Sidel and Krones, equip their high-end machines with this feature.
- Lock the Rotation: The machine locks the preform in the oven. It stops it from spinning 360 degrees.
- Hot and Cold Stripes: The machine applies specific "striped" heat to the preform. It creates four extra-hot vertical lines (hot zones) and four slightly cooler lines (cold zones).
- Precise Alignment: When the preform enters the square mold, the machine's robotic arm ensures these four "hot stripes" align perfectly with the four corners of the square mold.
Hot plastic stretches further and flows better than cold plastic. Therefore, a large amount of thick plastic is pushed directly into the deep corners. The flat surfaces stay rigid. The corners become extremely strong.
Vivian's Advice for Standard Factories:
"Preferential Heating" equipment is extremely expensive. Usually, only big factories with huge budgets buy them. If your factory uses a standard blowing machine, you cannot make precise "hot stripes."
Do not try to blow thin-walled square bottles directly on standard machines. Your alternative solution is: Increase the Preform Weight. You must use a preform that is 15% to 20% heavier than a round bottle. You must use the extra material to force-fill the corners. Understanding high-end technology helps you adjust your current process better.
3. Why do the flat sides of your square bottle cave in (sink) after cooling down?
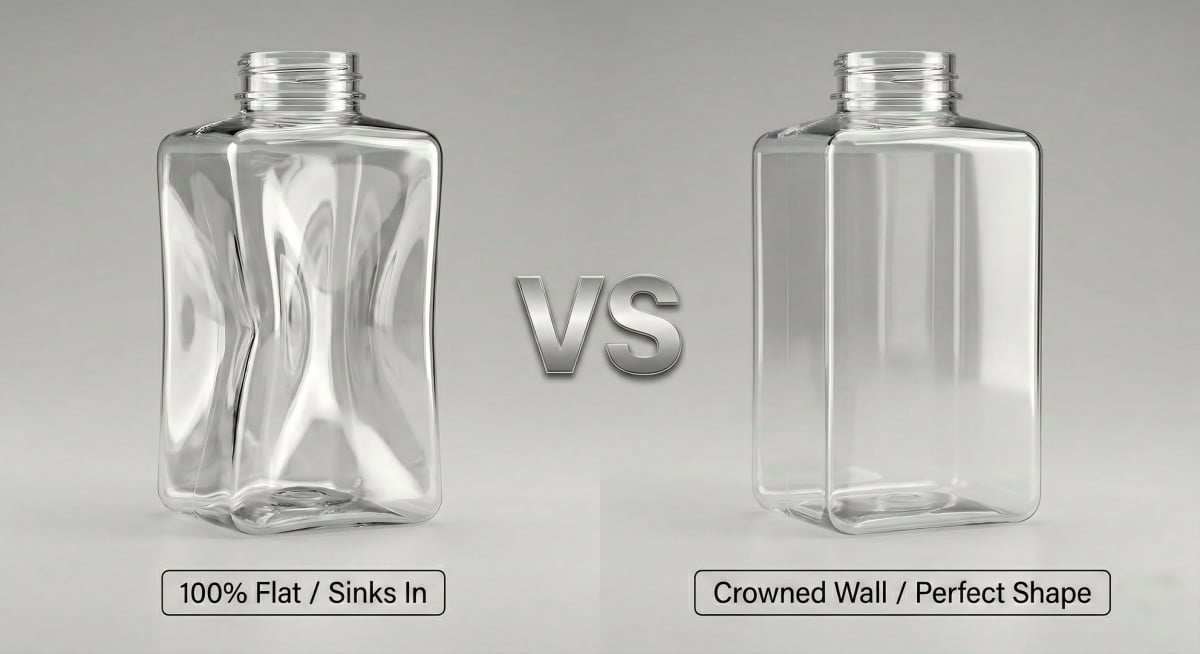
I saw a beautiful square bottle ruined after one hour. The flat sides sank inward. They looked like crushed cans. Large flat areas shrink easily. You must add a crown to the design.
Designers love perfectly flat, mirror-like side panels. But large flat plastic surfaces have no structural strength. As the hot PET cools, it shrinks and caves inward. We call this "sinking." You must design a slight "Crown" (a convex curve of 1-2mm outwards) or add ribs to prevent collapse.
Deep Dive: Stop Drawing Flat Mirrors
PET shrinks when it cools. In a round bottle, the circle shape absorbs the shrink. In a square bottle, a big flat wall has no defense.
When the bottle leaves the mold, it is warm. The pressure inside drops. The plastic cools and contracts. A perfectly flat panel pulls itself inward. It looks terrible. It looks like someone squeezed the bottle.
The Structural Solution:
Stop designing perfectly flat walls.
You must trick the human eye. We design a "Crown." A crown is a very slight outward curve. We push the center of the flat wall outwards by just 1mm to 2mm.
To the human eye, it looks perfectly flat. But physically, it is an arch. An arch is structurally strong. When the bottle cools and shrinks, the wall flattens out perfectly. It does not cave in.
Add Ribs:
If the bottle is very large (like a 5L cooking oil bottle), a crown is not enough. You must add horizontal ribs. Ribs act like a skeleton. They stop the shrink.
Panel Design Comparison
| Panel Design | Structural Strength | Post-Cooling Result | Look |
|---|---|---|---|
| Perfectly Flat | None | Caves inward (Sinks) | Looks like scrap |
| 1.5mm Crown | Good | Flattens perfectly | Looks premium |
| Ribbed Panel | Excellent | Holds shape | Industrial/Strong |
Do not approve a perfectly flat 3D drawing. The plastic will shrink and ruin your product.
4. How do blocked corner vents lead to "unformed" round corners on your square bottle?
In my workshop, I saw a square bottle that looked melted. The bottom corners were round, not square. The air inside the mold was trapped. You must double the venting.
High-pressure air traps atmospheric air inside the deep corners of the blow mold. If the corner vents are poorly designed or clogged, the PET cannot reach the metal wall. The result is a bottle that looks like a melted square. Square molds need double the venting capacity compared to round molds.
Deep Dive: Venting the Dead Zones
Square molds have "Dead Zones." The four corners at the bottom of the bottle are dead zones.
When 40-bar air pushes the plastic into the mold, it pushes the air inside the cavity ahead of it. The trapped air rushes into the four corners.
If your mold has bad vents, this trapped air compresses. It acts like a hard rubber ball. The hot PET hits this air ball and stops. It cannot touch the cold aluminum corner.
The Melted Corner Defect:
Your bottle comes out. The sides are flat, but the corners are round. The details are gone. It looks like cheap, melted plastic.
Double Venting is Required:
Stop buying cheap molds with standard vents. Square bottles need special care.
- A round bottle might need 0.05mm vents around the base.
- A square bottle needs extra venting channels cut exactly into the corner tips.
- Keep the vents clean. Oil and dust block corner vents fast.
If your corners look soft, your mold is choking. Let the air out.
5. Why does improper parting line placement create a visible "scar" across your bottle face?
I saw a luxury shampoo bottle. A thick, ugly line ran right through the front label area. The lazy mold designer put the parting line on the flat face. You must hide the line on the corners.
In round bottles, the parting line is easily hidden. For square bottles, if the mold designer is lazy and puts the parting line directly on the flat surface, it ruins the label area. It looks cheap. We design the mold to place the parting line exactly on the diagonal corners.
Deep Dive: Hide the Scar
The parting line is where the two halves of the mold close. It always leaves a tiny mark on the bottle. We call this the seam or the scar.
In a round bottle, the seam is just a line on a curved surface. You barely see it.
In a square bottle, the flat panels are the absolute star of the show. You put your expensive label there. You want it to look like glass.
The Lazy Designer's Mistake:
Cheap mold makers cut the mold straight down the middle of the flat faces. It is easy for them to machine. But it is a disaster for you. The parting line cuts your label in half. The bottle looks cheap.
The Premium Mold Solution:
Stop accepting bad mold splits. We rotate the bottle design inside the mold steel. We make the mold close along the diagonal axis.
The parting line runs exactly down two opposite corners. The sharp edge of the corner completely hides the seam line. The four flat faces remain 100% clean and mirror-smooth. Your label goes on flawlessly.
6. How does the square base "Rocker Effect" make your bottles unstable on the shelf?
I heard from a supermarket manager. His new square juice bottles were falling over on the shelves. The bottoms were bulging out. Flat bases do not work. You must use an inverted push-up base.
A completely flat square base will bulge outwards due to internal pressure, heat, or carbonation. This makes the bottle rock like a rocking chair. It falls over. A professional square mold base MUST have an inverted push-up (concave center) and structural feet (chime) to keep the bottle perfectly stable.
Deep Dive: The Rocker Effect
Designers love drawing flat bottoms on square bottles. They think it looks clean. But a flat plastic bottom is a disaster.
When you fill the bottle with warm liquid, or if gas pressure builds up, the flat bottom has no strength. It bows outward. The center of the base drops below the corners.
We call this the "Rocker Effect." Put the bottle on a table. Push it with your finger. It rocks back and forth. It is unstable. Customers will knock it over.
Vivian's Base Design Rules:
Stop making flat bottoms. You must design a structural base.
- The Push-Up: The center of the base must curve upward into the bottle (concave). This resists the pressure.
- The Chime: The bottle must stand on an outer ring or four defined feet. The center must never touch the table.
- Draft Angles: The base design needs aggressive draft angles so the thick plastic releases from the mold without getting stuck.
A stable bottle sells. A rocking bottle gets returned to the factory.
7. Why is automatic labeling a disaster for square bottles with zero draft angles?
I saw a packaging line stop. The labels on the square bottles had massive wrinkles. The bottle sides were 100% parallel. The labeling machine failed. You must design a label recess and draft angle.
If square bottle sides are 100% parallel (0-degree draft angle), standard wrap-around labelers will leave massive wrinkles at the corners. The label gets stuck. We need to design specific labeling recesses (indented pockets) and slight draft angles into the blow mold to ensure fast, wrinkle-free packaging.
Deep Dive: Think About the Next Step
Blowing the bottle is only step one. Step two is packaging.
Square bottles are notoriously hard to label. On a round bottle, the label rolls on smoothly. On a square bottle, the label has to turn sharp corners.
The Zero-Draft Mistake:
If the flat wall is perfectly vertical (zero draft), the labeling machine rollers push the label. The label gets caught on the corner edge. It creates a wrinkle. You have to slow the machine down. You lose money.
The Packaging Solution:
Stop ignoring the labeling machine.
- Label Recess: We cut a shallow step (0.5mm deep) into the flat wall. The label sits inside this pocket. This protects the edge of the label from peeling off.
- Draft Angle: We give the flat wall a tiny slope (0.5 to 1 degree). This helps the labeler apply the label smoothly.
Before you approve the mold, ask your labeling machine supplier: "Can your machine handle this corner radius?" Work together.
8. Why a 20-year factory always demands a Simulation test before cutting steel for square molds?
I saw a factory lose $10,000. They cut a 10-cavity square mold based on a drawing. The bottles failed. They had to scrap the mold. Do not guess. You must run a Simulation test and a Pilot Mold.
Square bottles are too complex for guesswork. Before we spend $10,000 on a multi-cavity square mold, we run thickness distribution simulations and cut a single-cavity Pilot Mold. This guarantees the corners will not crack, the weight is optimized, and the stretch limit is safe. Simulation saves your investment.
Deep Dive: Stop Gambling with Steel
Round bottles are easy to predict. Square bottles are wild. The corners stretch differently every time.
New clients always rush me. "Vivian, make the 8-cavity mold now. We need bottles."
I say no. I will not gamble with your money.
Step 1: Computer Simulation (Mold Flow)
We put the preform and the square bottle design into our simulation software. We watch how the plastic stretches. The software shows us if the corners will get too thin. We fix the drawing before we touch the steel.
Step 2: The Pilot Mold
We cut just ONE cavity out of aluminum. We put it on the machine. We test different preforms. We test the heating profile. We drop the bottle. We test the labeling.
Only when the Pilot bottle is perfect do we cut the multi-cavity production mold.
This process adds 10 days to the timeline. But it saves months of anxiety. Do it right the first time.
FAQ: 5 Core Questions About Square PET Bottles for Buyers
Q1: Do square bottles cost more to produce than round bottles?
Yes. Square bottles require heavier preforms to ensure the corners stay thick. The blowing cycle time is also slower because corners take longer to cool.
Q2: Can I blow a square bottle on a normal PET blowing machine?
It is very difficult. A normal machine will make the corners too thin. If you do not have a "Preferential Heating" machine, you must increase the preform weight to ensure corner thickness.
Q3: What is the sharpest corner I can make on a square bottle?
The absolute limit is an R3 (3mm) radius. Anything sharper than that will cause extreme plastic thinning, stuck bottles in the mold, and drop test failures.
Q4: Why does my square bottle look crushed in the center?
Large flat panels shrink as they cool. You need to redesign the mold with a slight "Crown" (1-2mm convex curve) or add supporting ribs to the flat area.
Q5: How do I stop the parting line from ruining my label?
Specify in your mold order that the parting line MUST run along the diagonal corners, absolutely not down the center of the flat faces.
Summary Table: Square Bottle Defects, Causes, and Buyer's Guide
| Defect Symptom | Root Cause | Vivian's Design & Factory Solution |
|---|---|---|
| Exploding Corners | 90-degree angle causes extreme thinning. | Use R3 to R5 corner radius. Never use pure 90 degrees. |
| Paper-Thin Corners | Standard even heating starves corners. | High-end machines use Preferential Heating; Standard machines must increase weight by 15%-20%. |
| Crushed/Sunken Walls | Flat plastic shrinks and collapses. | Design a 1-2mm outward "Crown" or add ribs. |
| Melted/Round Corners | Trapped air blocks plastic from reaching corners. | Double the mold venting in corner areas. |
| Ugly Seam on Face | Lazy mold split design. | Force the mold maker to place parting lines on diagonal corners. |
| Rocking Base (Unstable) | Flat base bows out under heat/pressure. | Use an inverted push-up base with a structural chime. |
| Wrinkled Labels | Zero draft angles block the labeler. | Add a label recess and a 0.5° draft angle. |
| Wasted Mold Budget | Guessing without testing the steel. | Force the supplier to run software simulation and a single-cavity Pilot Mold. |
Are you planning to launch a premium square bottle? Do not let design flaws ruin your project. Contact Vivian for factory service today.