Early this morning, I received a frantic phone call from a new client in Indonesia. He had just received our new mold shipment and started production immediately. However, he sounded frustrated. "Vivian," he said, "I installed your new mold, but every single bottle is coming out white and hazy. My previous mold never had this problem. Is there a defect in your mold design?"
I asked him to send me a photo of the defective bottles. The bottles were covered in a milky white "pearlescence," a classic sign of stress whitening. I then asked a critical question: "Did you adjust your machine parameters for this new mold?" He replied, "No. I was producing 500ml bottles before, and this new mold is also for 500ml bottles, so I kept the settings the same."
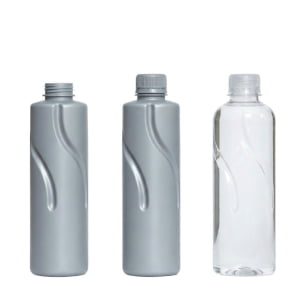
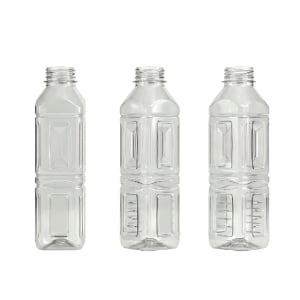
This was the root of the problem. I explained to him that while the volume was the same, the bottle design was completely different. His previous bottle was a lightweight 16g ribbed design, while the new mold was for a premium 24g smooth, round bottle. The wall thickness of a 24g preform is significantly thicker than a 16g preform. You cannot heat a thick preform using the same energy settings as a thin one. If the preform is not hot enough, the plastic is too hard to stretch. When the machine forces it to stretch, the molecular structure tears microscopically, creating that white haze.
I told him, "I cannot give you a magic number for the temperature setting because your factory's ambient temperature and humidity are different from mine. You must test it. Take 2 or 3 preforms, heat them, and squeeze them with your hand. If they feel rubbery and soft, they are ready. If they are stiff, they will turn white."
This misunderstanding is common. Operators often blame the "hard" variable (the mold) when the issue lies with the "soft" variables (process parameters). Today, my team and I have compiled this comprehensive 6-step guide to help you systematically troubleshoot pearlescence, ensuring you solve the problem efficiently without blaming the wrong equipment.
Understanding "Stress Whitening": Why a logical diagnosis saves production time.
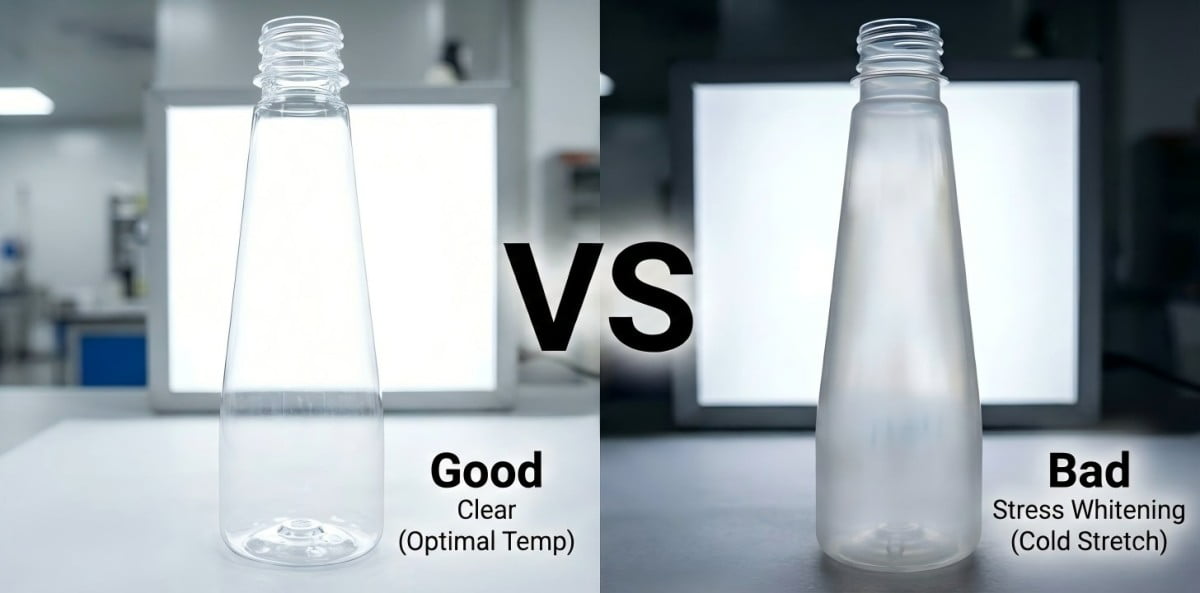
In the PET blow molding industry, "Pearlescence" or "Stress Whitening" is the visual manifestation of Cold Stretching.
PET (Polyethylene Terephthalate) is a semi-crystalline thermoplastic. It has a specific "Glass Transition Temperature" (Tg). When PET is heated above its Tg (typically around 100°C - 110°C for blowing), it enters a rubber-like state where the molecular chains can uncoil and stretch smoothly. This is what gives PET bottles their clarity and strength (biaxial orientation).
However, if you try to stretch the material when it is below this optimal temperature range, the molecular chains do not uncoil; they break and craze. These microscopic fractures scatter light, appearing to the human eye as a pearl-like white haze.
The diagnosis must always follow a logical sequence: Material -> Machine Parameters -> Heating Profile -> Mold.
Many technicians make the mistake of immediately stopping the machine to polish or check the mold. This is a waste of time. A steel mold does not change its temperature or dimensions randomly. The issue is almost always how the plastic is being prepared before it hits the mold. By following a strict troubleshooting protocol, you can fix the issue in minutes by adjusting a lamp setting, rather than losing hours removing a mold.
Step 1: Preform Inspection – Identifying Moisture and Aging.
Before you touch the machine screen, look at your raw material. The condition of the preform is the foundation of bottle clarity. If the foundation is weak, no amount of heating or pressure will fix it.
1. The Moisture Factor (Hydrolysis)
PET is hygroscopic, meaning it loves to absorb water from the air. If your preforms have been stored in a humid warehouse in Indonesia or Thailand without proper sealing, they have likely absorbed moisture.
When wet PET is reheated in the blow molding oven, a chemical reaction called Hydrolysis occurs. The water molecules degrade the PET polymer chains, reducing the molecular weight.
- Symptoms: The bottle will look hazy, but it might also feel brittle. You might see bubbles or a rough surface texture.
- Test: Take a preform from a freshly opened, sealed gaylord (box) and run it. If the haze disappears, your old stock is wet.
2. The Aging Factor (IV Drop)
Preforms have a shelf life. If you are using "Old Stock" that has been sitting for 6 to 12 months, the Intrinsic Viscosity (IV) of the material may have degraded. Aged preforms often become stiffer and require higher temperatures to stretch.
- Symptoms: The preform feels harder to stretch even at standard temperatures.
- Action: Check the production date on the preform box. If they are old, you may need to increase the overall oven temperature by 2-3% to compensate for the material's resistance.
| Defect Type | Visual Characteristic | Root Cause | Immediate Solution |
|---|---|---|---|
| Pearlescence | Milky, iridescent white | Cold Stretching | Increase Lamp Temperature |
| Opalescence | Solid, chalky white | Overheating (Crystallization) | Decrease Lamp Temperature |
| Hydrolysis | Haze with bubbles | Moisture | Dry preforms or use fresh stock |
Step 2: Machine Parameters – Optimizing the "Pre-Blow" Timing.
If your preforms are fresh and dry, the next suspect is the mechanical timing of your blow molding machine. Specifically, the relationship between the Stretch Rod and the Pre-Blow Air.
The stretching process is a race. The metal stretch rod pushes the preform down physically, while the low-pressure air (Pre-Blow) inflates it to keep the plastic off the rod.
If your Pre-Blow Timing is too late, the stretch rod will travel down a significant distance before any air enters the preform.
- Result: The rod physically drags and forces the plastic to stretch without the "air cushion." Since the plastic is in contact with the cold metal rod for too long, it cools down rapidly from the inside. When it is finally forced to expand, it is too cold, resulting in stress whitening, particularly near the gate or the neck shoulder.
Optimization Strategy:
You need to advance the Pre-Blow timing. The air should enter the preform almost immediately after the stretch rod begins its descent.
- Check your "Pre-Blow Delay" setting. Reduce it by 0.1 or 0.2 seconds.
- Ensure the "Pre-Blow Pressure" is sufficient (usually 8-10 bar). If the pressure is too low, the balloon won't expand fast enough to separate from the rod.
By syncing the air and the rod, you ensure the material stretches naturally via pneumatic force, rather than being dragged mechanically.
Step 3: Heating Profile – The Critical Temperature Balance.
This is the most common cause of pearlescence and exactly where my Indonesian client failed. The relationship between preform wall thickness and heat penetration is critical physics that cannot be ignored.
The "Thick Wall" Challenge:
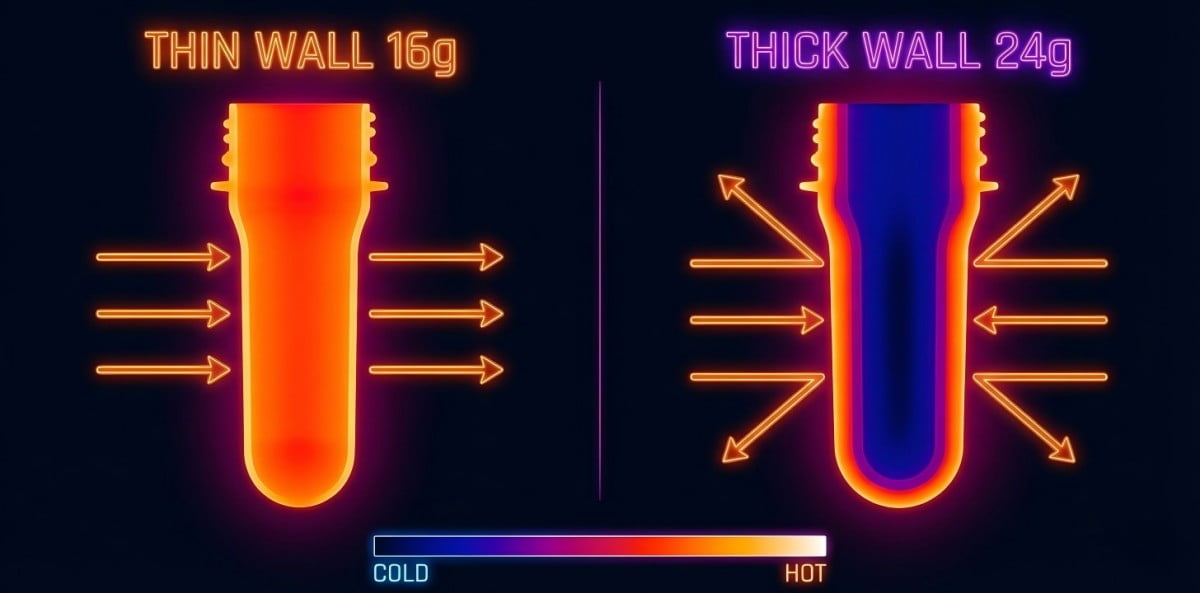
My client moved from a 16g preform (Thin Wall) to a 24g preform (Thick Wall).
- Thin Wall: Heat penetrates quickly to the core.
- Thick Wall: The outer surface heats up fast, but the inner core remains cold. Plastic is a poor conductor of heat.
If you run a 24g preform with 16g settings, the outside might be 100°C, but the inside core might only be 85°C. When the stretch rod pushes against the bottom, it is pushing against that cold 85°C core. The material resists, tears, and turns white.
How to Adjust the Profile:
You cannot simply turn up the voltage on all lamps globally. If you do that, the outside surface will burn (crystallize) before the inside gets hot.
- Soak Time: You need to slow down the machine or allow more time for "heat soaking." The heat needs time to travel from the skin to the core.
- Zone Tuning: Identify where the white haze is on the bottle.
- Haze on the Shoulder: Increase heat in Zone 1 and Zone 2 (Top lamps).
- Haze on the Body: Increase heat in Zone 3 and Zone 4 (Middle lamps).
- Haze on the Bottom: Increase heat in the lower zones.
- Fan Management: Check the oven ventilation fans. If the fans are blowing too hard, they might be cooling the preform surface too much, fighting against the lamps.
The "Thumb Test" Protocol:
I teach all my clients this low-tech method. It requires no expensive sensors.
- Step 1: Disconnect the blowing station (or set to "heating only").
- Step 2: Run a few preforms through the oven.
- Step 3: Wearing heat-resistant gloves, pick up a preform immediately as it exits the oven.
- Step 4: Squeeze the body. It should feel like a soft rubber boot or a firm silicone gel. It should yield to your touch.
- Step 5: If it feels like a hard garden hose or rigid plastic, it is too cold. Do not even bother turning on the blowing air. Go back and adjust the lamps.
| Preform Type | Heating Strategy | Common Mistake |
|---|---|---|
| Thin Wall | Fast heat, High Power | Overheating causes crystallization (Opalescence) |
| Thick Wall | Slow heat, Long Soak Time | Heating too fast causes hot skin/cold core (Pearlescence) |
| Colored | Reduce Power (Absorbs fast) | Using clear preform settings causes burning |
Step 4: Chiller & Water Temperature – Ensuring Consistent Cooling.
While heating is the primary suspect for haze, the cooling system plays a vital supporting role. The PET blow mold needs to be kept at a stable temperature to ensure the bottle sets correctly, but "Thermal Shock" can sometimes mimic stress whitening.
If your chiller is set too low (e.g., 5°C or 6°C), the temperature difference between the hot plastic (100°C) and the cold mold is extreme. When the plastic hits the mold wall, it freezes instantly. While this is generally good for cycle time, if the stretching wasn't 100% complete before contact, the sudden freeze can lock in stress marks.
Optimal Settings:
- For standard PET bottles, we recommend a mold temperature of 10°C to 15°C.
- Check the flow rate. A blocked water channel in the mold means one cavity might be running at 40°C (too hot, causing sticking/haze) while others are cold.
- If you see haze appearing on only one cavity out of four, check the water hoses for that specific cavity. It is likely a cooling flow issue, not a machine parameter issue.
Step 5: High-Pressure Air – Verifying Pressure Stability.
The final blowing stage requires high-pressure air (typically 30-35 Bar for water/juice, 35-40 Bar for CSD) to force the plastic into the mold corners.
If your high-pressure compressor is undersized or malfunctioning, the pressure might drop to 25 Bar during the cycle.
- The Effect: The plastic moves too slowly towards the mold wall.
- The Haze: As the plastic expands slowly, it loses heat to the air inside the cavity. By the time it finally touches the mold wall, its temperature has dropped below the Tg. The final millimeter of stretching happens when the plastic is cold, resulting in a hazy surface finish or undefined details (e.g., a blurry logo).
Troubleshooting:
Watch the pressure gauge on the machine during the blowing cycle. It should remain stable. If you see the needle drop significantly when the valve opens, your air supply is insufficient. You may need an accumulator tank to buffer the pressure supply.
Step 6: Inspecting the PET Blow Mold – Venting and Cleaning.
We finally arrive at the mold. Why is this step 6 and not step 1? Because a high-quality mold made of S136 Stainless Steel or 7075 Aviation Aluminum is extremely stable. Unless you dropped it or hit it with a hammer, the cavity dimensions do not change.
However, there is one mold-related factor that causes haze: Venting.
As the bottle expands, the air inside the mold must escape. We cut microscopic vent slots (0.05mm) on the parting lines and bottom. Over time, these vents get clogged with PET dust, oligomers, and lubricant grease.
The "Air Cushion" Effect:
If the vents are blocked, the air gets trapped between the hot plastic and the cold steel. This trapped air acts as an insulator. The plastic cannot touch the cooling metal.
- Result: The plastic stays hot (Heat Buildup). It doesn't cool down properly. This usually causes "Heat Haze" (which looks slightly different from stress whitening—it's more milky and less pearlescent) or poor surface finish.
Maintenance Action:
You do not need to remove the mold to fix this.
- Inspect the parting lines and bottom vents. Are they black or filled with white powder?
- Use a soft brass brush or a specialized mold cleaner to clear the vents.
- Do not use hard steel tools (like screwdrivers) to clean vents. You will scratch the mirror finish of the S136 steel, and that scratch will appear on every bottle you produce forever.
| Mold Material | Venting Characteristics | Cleaning Frequency |
|---|---|---|
| S136 Stainless Steel | High precision, holds sharp edges | Low (Self-cleaning to some extent) |
| 7075 Aluminum | Good thermal conductivity | Medium (Softer metal, be gentle) |
| P20 Steel (Low Grade) | Prone to rust and clogging | High (Needs constant maintenance) |
Summary: A Systematic Protocol for Efficient Troubleshooting.
For factory managers and operators, troubleshooting should not be a guessing game. It should be a disciplined protocol. When my Indonesian client finally adjusted his heating profile—increasing the overall temperature and giving the 24g preform more soak time—the bottles came out crystal clear. The mold was perfect; the process was the problem.
By following this 6-step guide: Material Check -> Pre-Blow Timing -> Heating Profile -> Chiller -> Air Pressure -> Mold Venting, you can diagnose 95% of pearlescence issues within 15 minutes. This approach minimizes downtime, reduces scrap rate, and protects your expensive mold equipment from unnecessary disassembly and damage.
FAQs
Q1: If I increase the heating temperature, will the pearlescence disappear immediately?
A: Generally, yes. Pearlescence is caused by cold stretching. Increasing the lamp temperature softens the material, allowing it to stretch without breaking the molecular chains. However, be careful not to overheat, or the bottle will turn chalky white (crystallization).
Q2: Why does the white haze only appear on one side of the bottle?
A: This indicates uneven heating. Check if the preform is spinning correctly in the oven. If a spindle is jammed and the preform doesn't rotate, one side gets hot (clear/burnt) and the other side stays cold (hazy). It could also be a blown lamp in the oven affecting only one zone.
Q3: Can increasing the high-pressure blowing air fix pearlescence?
A: No. High pressure helps define the bottle shape (logo, ribs), but it cannot fix cold plastic. If the material is too cold, 40 bar of pressure will not remove the haze. You must solve the temperature issue in the oven first.
Q4: My preforms are new, but I still get haze. Could it be the design?
A: It is possible. If the "Stretch Ratio" is too high, even hot plastic will stress whiten. For example, stretching a short preform into a very tall bottle (Axial Ratio > 3.5) or a narrow preform into a wide jar (Hoop Ratio > 4.5) will overstress the material limits. In this case, you need a different preform design.
Q5: How do I distinguish between "Cold Haze" and "Moisture Haze"?
A: "Cold Haze" (Pearlescence) is usually shiny and iridescent, like the inside of an oyster shell. "Moisture Haze" (Hydrolysis) is usually dull, uniform, and often accompanied by tiny bubbles in the bottle wall. Also, a wet preform bottle will shatter easily if dropped, whereas a cold-stretched bottle remains relatively strong.
If you are facing persistent quality issues or need assistance optimizing your production line for new bottle designs, please do not hesitate to contact the technical engineering team at petmolder.com. We are here to help you achieve the perfect bottle.