I am Vivian. I have 20 years of experience in PET mold manufacturing in Zhongshan, China. Preform molds need high precision. They have complex mechanical structures. Many water plant owners buy preforms first. They buy preform molds later. I have a client in South Africa. He runs an 8000 PCS/H pure water line. He bought preforms from China for 5 years. He did not buy a mold. He told me he lacked experienced engineers. This is a smart choice. You need an experienced operator. A bad operator ruins the mold. You waste money. I heard from another client in Thailand. He has two experienced engineers. He produces his own preforms. An experienced engineer is very important. You must find a good mold factory. You must inspect the mold correctly. Today, my team and I share our FAT checklist. We show you what data to ask for. We show you how to test the samples.
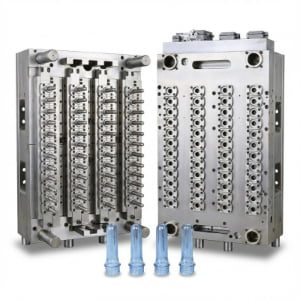
This FAT checklist teaches you how to inspect a 48-cavity preform mold before delivery. You must test weight variation, concentricity, gate vestige, neck finish, and flash. You must demand the Vision Measuring Machine report and the machine parameter sheet. Do not trust your eyes.
We use preform mold equipment every day. We know the mechanical secrets. We see many mistakes in other factories. We want to help you stop these mistakes. You must use strict inspection standards. You must check every physical detail. You must secure your financial investment.
1. The "Visual Check" Fallacy: Why precision tools matter more than the naked eye.
I saw buyers lose money. They look at T1 samples. They say the samples look good. This is a mistake. You must use precision tools to check the mold. This saves your money.
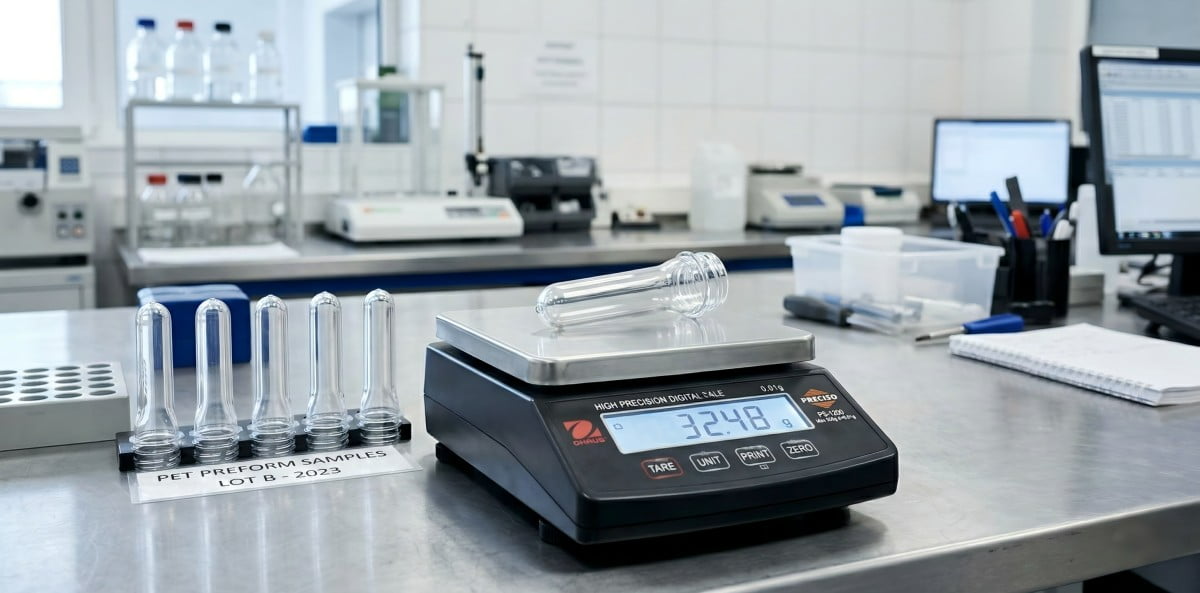
A visual check is not enough for a 48-cavity preform mold. You cannot see a 0.1g weight difference or wall thickness errors with your eyes. You must use a 0.01g electronic scale, a micrometer, and actual caps. Do not trust your eyes; trust precision measurement tools.
Buyers receive 48 pieces of T1 preforms. The factory sends them in a box. The buyer opens the box. The buyer looks at the plastic. The plastic is clear. The plastic has no white spots. The buyer thinks the mold is good. The buyer signs the paper. The buyer pays the money. Stop doing this. This is a big mistake.
Your eyes cannot see dimensional tolerance. Your eyes cannot see small weight changes. Your eyes cannot see wall thickness errors. These small errors cause big problems. You put the preform into the machine. The machine runs. The machine makes bad bottles. You waste PET resin. You waste electricity. You lose production time.
You must use precision tools. You must buy an electronic scale. The scale must measure 0.01g. You must buy a micrometer. The micrometer measures metal thickness. You must use real bottle caps. You use these tools to check the T1 samples.
We use S136 stainless steel for our molds. S136 stainless steel holds precise dimensions. Cheap steel changes shape. Cheap steel bends under high pressure. You cannot see this bend. The micrometer finds the bend. The micrometer shows the true dimensional tolerance.
We test 48 cavities. Every cavity must be the same. The hot runner pushes the plastic. The plastic fills the steel cavities. The steel cools the plastic. We take the plastic out. We measure every piece. We use the 0.01g scale. We record the numbers. We look for differences. A difference means a problem. A difference means the hot runner is bad. A difference means the cooling channels are bad.
Do not trust pictures. Do not trust videos of clear plastic. You must measure the parts. You must hold the parts. You must weigh the parts. You must cut the parts. This is the only way. This is professional QC work. You follow this rule. You protect your factory. You stop buying bad molds.
2. Step 1: Weight Variation & Tolerances – Finding the Hot Runner Imbalance.
I heard from my client about soft bottles. Light preforms cause this problem. You must weigh one full shot of 48 cavities to find hot runner imbalance. You must reject light preforms.
To check weight variation, you must weigh one full shot of 48 cavities. Small 10g-20g preforms need a ±0.1g to ±0.15g tolerance. Large 110g-150g preforms allow a ±1.0g tolerance. If you need a positive tolerance for a 16.0g preform, a 15.9g weight is a failure.
You must ask the factory for one full shot. One full shot means one cycle of the machine. The machine opens. 48 preforms fall out. You need these exact 48 preforms. Every preform must have a cavity number. The cavity number is on the neck ring. You read the number. You weigh the preform. You write down the weight.
You test small preforms. You test 10g to 20g water preforms. The dimensional tolerance is very strict. The cavity weight difference must be small. The difference must stay between ±0.1g and ±0.15g. This is a strict rule. A bad hot runner cannot do this. A bad hot runner pushes more plastic to the center. A bad hot runner pushes less plastic to the edges. The center preforms get heavy. The edge preforms get light. You must find this problem.
You test large preforms. You test 5L bottle preforms. The weight is 110g to 150g. The rule changes. The dimensional tolerance is bigger. The allowed difference is ±1.0g. Large plastic parts cool differently. The steel handles more heat. The contract states this rule. You read the contract. You check the scale.
We must talk about positive tolerance. This is a very important rule. You order a 16g preform. You want hard bottles. You want strong top-load strength. You tell the factory to use positive tolerance. This means the bottom limit is 16.0g. The preform can be 16.1g. The preform can be 16.15g. The preform cannot be 15.9g. The preform cannot be 15.8g.
You weigh the 48 preforms. You see a 15.8g preform. The cavity difference is small. The preforms weigh 15.8g, 15.9g, and 15.85g. You think this is good. Don't do this. This is a failure. The weight is under 16.0g. The preform is too light.
Light preforms cause bad bottles. You blow the bottle. The bottle walls get very thin. The bottle feels soft in your hand. The top-load strength drops. You put boxes of bottles on a pallet. The bottom bottles crush. The water spills. You lose money.
You must check the hot runner system. A good hot runner balances the plastic flow. A good hot runner uses good heating coils. A good hot runner keeps the temperature even. You weigh the parts. You check the balance. You secure the positive tolerance. You guarantee the top-load strength.
| Preform Type | Target Weight | Acceptable Tolerance Range | Failure Condition (Positive Tolerance) |
|---|---|---|---|
| Small Water Preform | 16.0g | ±0.1g to ±0.15g | Under 16.0g (e.g., 15.8g) |
| Medium Juice Preform | 35.0g | ±0.2g to ±0.25g | Under 35.0g (e.g., 34.7g) |
| Large 5L Bottle Preform | 130.0g | ±1.0g | Under 130.0g (e.g., 128.5g) |
3. Step 2: Concentricity Check – Cutting the preform to measure wall thickness.
In my workshop, we cut preforms every day. Bad concentricity ruins the blowing process. You must cut the preform and measure the wall thickness to stop blowing failures.
To check concentricity, you must cut open preforms from the center and edges of the mold. Use a micrometer to measure four sides. The wall thickness difference must be under 0.1mm. High eccentricity causes uneven heating in the blowing machine and creates bad bottles.
You must check the mold core. The core shapes the inside of the preform. The cavity shapes the outside of the preform. The core must sit exactly in the middle of the cavity. We call this concentricity. Bad concentricity means the core is off-center. We call this misalignment.
You must test this. You pick random preforms. You pick preforms from the center of the mold. You pick preforms from the edges of the mold. You take a saw. You cut the preform horizontally. You cut the cylinder. You look at the cross-section.
You take your micrometer. You measure the wall thickness. You measure the top side. You measure the bottom side. You measure the left side. You measure the right side. You write down the numbers. You compare the numbers.
The numbers must be very close. The difference must be under 0.1mm. This is a strict standard. A good mold uses S136 stainless steel for the core. S136 stainless steel resists bending. The core stays straight under high injection pressure. The wall thickness stays even.
What happens with bad concentricity? The wall thickness difference is over 0.1mm. One side is thick. One side is thin. You put this bad preform into the PET blow mold machine. The machine uses a 2-step process. First, the machine heats the preform. The heating lamps shine on the plastic.
The thin side absorbs heat fast. The thin side gets very hot. The thick side absorbs heat slowly. The thick side stays cold. The preform goes into the blowing mold. High-pressure air enters the preform. The hot thin side stretches too much. The cold thick side stretches too little.
The final bottle has uneven walls. One side is paper-thin. One side is thick and heavy. The bottle fails the drop test. The bottle breaks easily. Stop buying molds with bad core alignment.
You must check the locking mechanism. Good molds have taper locks. Taper locks hold the core in the center. The core cannot move. The mold closes. The taper lock aligns the core and cavity. You cut the preform. You measure the wall. You verify the taper lock. You secure your blowing process window. You stop bad bottles.
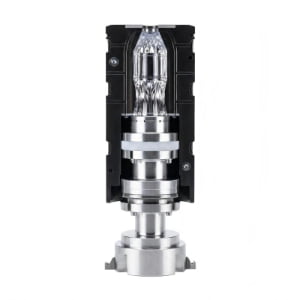
4. Step 3: Gate Vestige – Evaluating the Valve Pin cooling efficiency.
I saw bad gate vestige break stretch rods. Long plastic strings cause machine stops. You must check the injection point to evaluate the valve pin cooling efficiency.
Gate vestige shows the cooling efficiency of the valve pin. A good valve pin system makes a flat gate. A long gate or plastic string is a defect. It stops preforms from stacking well. It makes the stretch rod slip during blowing. It causes center crystallization.
You must check the bottom of the preform. You look at the injection point. We call this point the gate vestige. The hot runner injects the plastic here. The valve pin closes the hole. The cooling water cools the plastic. The machine opens. The preform drops.
You touch the gate vestige. You look at the gate vestige. A good gate vestige is smooth. A good gate vestige is flat. A good valve pin cuts the plastic clean. Good cooling channels freeze the plastic fast. This is the correct way.
You see a long plastic bump. You see a plastic string. This is bad gate vestige. Do not accept this. This means the valve pin system is bad. This means the cooling efficiency is low. The plastic stays hot too long. The valve pin pulls hot plastic out. This creates the string.
Bad gate vestige causes many problems. You put preforms in a big box. The preforms stack on top of each other. Long gates scratch other preforms. Long gates block the preforms. The preforms do not stack smooth. You waste space in the box.
The biggest problem happens in the blowing machine. The preform goes into the blowing mold. The stretch rod comes down. The stretch rod pushes the bottom of the preform. The stretch rod needs a flat center. The long gate blocks the stretch rod. The stretch rod slips. The stretch rod hits the side. This ruins your bottle design. The stretch rod bends. The machine stops.
Bad cooling causes another problem. The center stays hot. The plastic turns white. We call this center crystallization. White plastic is weak plastic. White plastic cracks under pressure. You fill the bottle with water. The bottom cracks. The water leaks.
You must check the cooling design. The mold must have water channels near the gate. The water must be cold. The flow rate must be high. The factory must use S136 stainless steel for good heat transfer. You check the gate. You verify the cooling. You secure the production line. You stop machine jams.
| Gate Vestige Condition | Cause | Blowing Machine Result | Verdict |
|---|---|---|---|
| Flat and Smooth | Good valve pin timing & excellent cooling | Stretch rod hits center perfectly | Pass |
| Long Plastic Bump | Slow cooling or bad valve pin close timing | Stretch rod slips, misalignment | Fail |
| Plastic String / Tailing | Hot plastic pulled by pin | Tangling in hoppers, scratches | Fail |
| White Center (Crystallized) | Very poor local cooling | Bottom cracking during drop test | Fail |
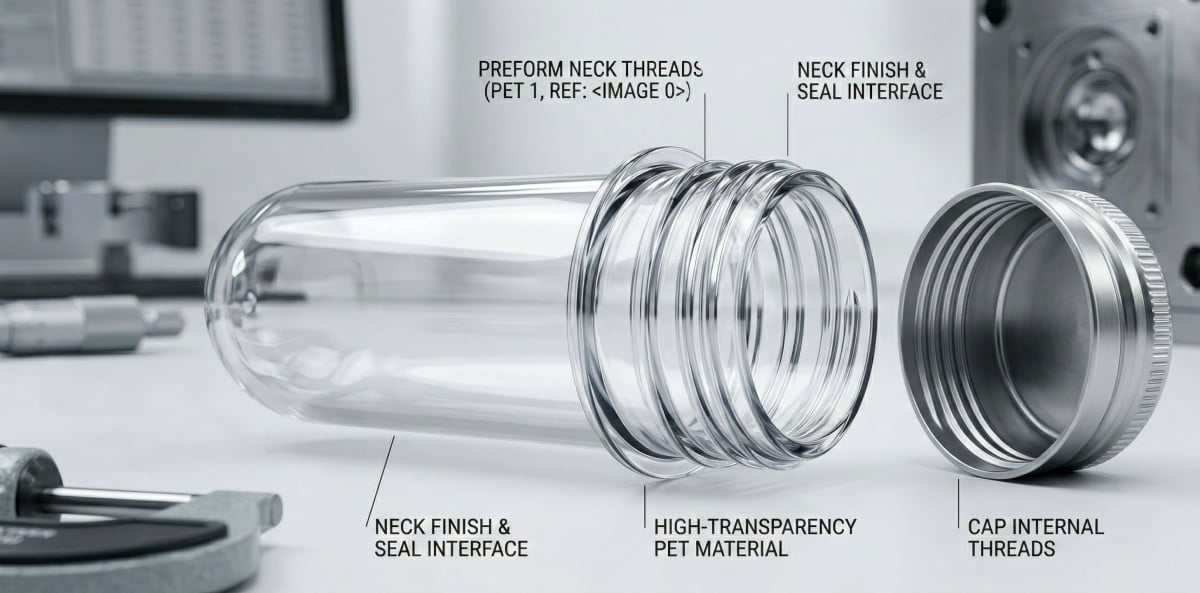
5. Step 4: Neck Finish Verification – Calipers, Cap Fit, and Factory Reports.
I heard from my client about leaking bottles. Bad neck finish dimensions cause leaks. You must test the neck with calipers and real caps to secure the seal.
You must verify the neck finish using digital calipers for T and E diameters. You must do a Cap Fit Test. Put a real cap on the preform. Check the torque and the tamper-evident ring. You must ask the factory for a Vision Measuring Machine report.
The neck finish is the most important part of the preform. The neck finish holds the cap. The neck finish seals the liquid. The neck finish does not change shape in the blowing machine. The neck finish must be perfect from the injection mold.
You do not have a big laboratory. You do not have expensive machines. You can still test the neck finish. You buy a good digital caliper. You take the T1 preform. You measure the T diameter. The T diameter is the outside thread diameter. You measure the E diameter. The E diameter is the inside thread diameter. You check the drawing. The numbers must match the drawing exactly.
You must do the Cap Fit Test. This is the most practical test. You take the actual plastic cap. You will use this cap for mass production. You twist the cap onto the preform. You feel the resistance. You feel the torque.
The cap must not be too tight. A tight cap stops the capping machine. The capping machine gets stuck. The cap must not be too loose. A loose cap falls off. A loose cap leaks liquid. The cap must twist on smoothly.
You must check the tamper-evident ring. The tamper-evident ring sits at the bottom of the cap. The ring must pass over the neck support ring. You twist the cap until it stops. You hear a click. The ring locks. You twist the cap off. The ring must break. The ring must stay on the preform. This proves the security seal works.
You do a simple leak test. You fill the preform with water. You twist the cap tight. You turn the preform upside down. You squeeze the preform. You look for water drops. No water means a good seal. Water drops mean a bad neck dimension. This is a mistake. Reject the mold.
You cannot measure every angle with a caliper. You must demand a factory report. The factory has a Vision Measuring Machine. This machine uses cameras and lasers. This machine measures every small curve on the neck finish. This machine checks the dimensional tolerance to 0.001mm.
The factory must give you this report. You read the report. You check the red numbers. Red numbers mean failure. You demand green numbers. Green numbers mean pass. You combine the digital caliper test, the cap fit test, and the Vision Measuring Machine report. You secure your neck finish. You stop leaking bottles.
6. Step 5: Flash Inspection – A window into Clamping Force issues.
In my workshop, we check the four corners of the mold. Flash on edge cavities means weak steel. You must check for flash to find clamping force issues.
You must check the four corner cavities of the 48-cavity mold for flash. Feel the parting line and the bottom of the threads. If center preforms are good but edge preforms have flash, the mold backing plate lacks rigidity. It has elastic deformation under high clamping force.
You must understand flash. Flash is extra plastic. Flash leaks out of the mold cavity. Flash looks like sharp paper. Flash happens on the parting line. The parting line is where the two mold halves meet. Flash happens under the neck ring. Flash is bad. Flash cuts your hand. Flash ruins the bottle shape.
You inspect the 48 preforms. You look at the center preforms. The center preforms are perfect. They have no flash. The parting line is smooth. You think the mold is good. Don't do this. You must check the corners.
You find the four corner preforms. These are the preforms on the far left, far right, top, and bottom edges of the mold. You touch the parting line. You feel a sharp edge. You see plastic flash. This is a very big problem. This tells you a secret about the mold steel.
The injection machine uses huge pressure. The machine uses hundreds of tons of clamping force. The mold halves push together. The hot plastic injects at high speed. The plastic tries to push the mold open.
A good mold uses strong steel plates. A good mold uses thick backing plates. The steel handles the clamping force. The steel stays flat. The mold stays closed. No plastic leaks.
A bad mold uses weak plates. A bad mold uses cheap metal. The machine pushes the mold. The center of the mold stays closed. The edges of the mold bend back slightly. We call this elastic deformation. The gap opens at the corners. The hot plastic leaks into the gap. The plastic cools. This creates flash on the corner cavities.
This is a structural failure. You cannot fix this with a file. You cannot fix this with sandpaper. The mold plate lacks rigidity. The factory must remake the mold plate. The factory must use stronger steel. The factory must make the plate thicker.
You must touch every edge. You must feel for sharp lines. You find flash on the edges, you reject the mold. You stop buying weak molds. You demand high rigidity. You secure a long mold life.
7. Step 6: The T1 Parameter Sheet – Did they run it at your required cycle time?
I saw factories cheat on cycle times. Slow cooling hides bad mold design. You must check the T1 parameter sheet to see the real cycle time and avoid slow molds.
You must check the T1 parameter sheet. Some factories use a 20-second cycle time to make samples look good. If you ordered a 15-second cycle mold, a 20-second test is a failure. You must demand a screenshot of the machine screen to verify the exact cooling time.
You order a fast mold. You read the contract. The contract says the cycle time is 15 seconds. 15 seconds means high production. High production means more money. You wait for the T1 samples. The factory sends the samples. The samples look beautiful. The weight is perfect. The concentricity is perfect. The gate is flat.
You think the factory did a great job. This is a mistake. You must ask one question. How long did it take to make these samples?
Many factories cheat during the T1 test. They know their mold has bad cooling channels. They know their mold cannot run fast. They put the mold in the machine. They change the machine parameters. They add 5 seconds to the cooling time. They run a 20-second cycle time.
Slow cooling fixes many problems. Slow cooling makes the gate flat. Slow cooling stops part deformation. Slow cooling hides the bad water channel design. The factory makes perfect samples slowly. They send you the perfect samples.
You approve the mold. You put the mold in your factory. You set the machine to 15 seconds. The machine runs. The preforms come out white. The preforms bend. The gates are long. The mold fails at 15 seconds. You must run it at 20 seconds. You lose 25% of your daily production. You lose a lot of money.
Stop accepting blind samples. You must demand proof. You must ask for the T1 parameter sheet. The factory must print the machine settings. The factory must take a picture of the injection machine screen.
You look at the screen picture. You check the cycle time number. You check the cooling time number. You check the injection pressure. You check the water temperature. The numbers on the screen must match your contract. If the screen says 20 seconds, you reject the mold.
You force the factory to run at your speed. You force the factory to fix their cooling design. You demand real speed. You protect your daily output.
8. Vivian’s FAT Protocol: The documentation you need before paying the balance.
I heard from my client about paying for bad molds. Missing documents lead to blind payments. You must demand Vivian's FAT protocol before you pay the balance.
Before paying the balance, you must get two things. First, demand a Vision Measuring Machine full dimension report. Second, demand the injection machine parameter sheet. You need these real data points to accept the mold safely.
You finish the visual inspection. You finish the weight test. You finish the concentricity test. You finish the gate test. You finish the cap fit test. You check the flash. You think you are ready to pay. Wait. Do not pay the balance yet.
A professional mold exporter provides turnkey service. We do not just send plastic samples. We send data. We send proof. You must demand my FAT protocol. You must get two important files.
First file: The Vision Measuring Machine Report. We talked about this. This report shows the neck finish dimensions. The report shows the thread angles. The report proves the dimensional tolerance is correct. The report proves the mold matches the drawing. You need this paper.
Second file: The Injection Machine Parameter Sheet. We talked about this too. This sheet proves the cycle time. This sheet shows the cooling time. This sheet shows the heating temperatures. You use this sheet in your own factory. Your operator copies these numbers. Your operator starts the machine faster. This saves setup time.
The factory sends you these files. You review the Vision report. The numbers are green. You review the parameter sheet. The cycle time is 15 seconds.
Now you know the truth. The mold is strong. The cooling is fast. The dimensions are correct. The hot runner is balanced. You sign the paper. You pay the balance. You wait for the shipment. You sleep well at night. You use this protocol. You win.
FAQ: 5 Core Questions About Preform Mold Inspection
1. Why do large preforms (110g-150g) have a bigger weight tolerance than small preforms?
In my workshop, I see large preforms use much more plastic. The thick walls hold more heat. The cooling process creates larger microscopic variations in shrinkage. Therefore, a ±1.0g tolerance does not impact the final 5L bottle strength, whereas a ±0.1g tolerance is mandatory for small 16g water preforms.
2. What happens if I ignore the Cap Fit Test and only use digital calipers?
I saw clients make this mistake. Calipers only measure two points (T and E diameters). They do not measure thread pitch angles or the full circumference of the tamper-evident ring. Ignoring the real Cap Fit Test means you might accept a mold that measures correctly on paper but fails to seal the actual cap on your filling line.
3. How does S136 stainless steel prevent concentricity problems?
In my workshop, we use S136 because it has very high hardness and excellent rust resistance. Under massive injection pressure, soft steel bends, pushing the core off-center. S136 maintains its rigid structure, keeping the core perfectly centered and ensuring the wall thickness difference stays below 0.1mm.
4. I ordered a 16.0g preform mold. Can I change it to 15.5g in the future?
I hear this question from clients often. Yes, you can change the weight. You do not need to buy a completely new mold. You only need to remake the mold cores. A new, thicker core makes the inside space smaller. The plastic wall gets thinner. The total weight drops to 15.5g. This saves resin money. But do not do this if your bottle is already soft. A lighter preform means less top-load strength.
5. I see small bubbles inside the thick neck area of the T1 samples. Is the mold broken?
I saw this fear many times. Do not reject the mold immediately. Bubbles in the thick plastic are usually not a mold steel problem. This is a material or machine problem. PET resin absorbs water. You must dry the resin perfectly. If the resin is very dry, the machine operator must increase the holding pressure. The machine must push more plastic into the mold as it cools. Check your resin dryer and pressure settings first.
FAT Checklist Summary Table
| Inspection Step | Tool / Requirement | Core Parameter / Standard | Failure Consequence |
|---|---|---|---|
| Weight Variation | 0.01g Scale | Small: ±0.15g. Check Positive Tolerance. | Soft bottles, low top-load strength. |
| Concentricity | Saw & Micrometer | Wall thickness diff < 0.1mm. | Uneven blowing, thin bottle walls. |
| Gate Vestige | Visual / Touch | Flat and smooth. No strings. | Stretch rod slip, stacking issues. |
| Neck Finish | Caliper / Real Cap | Smooth torque, secure tamper ring. | Leaking bottles, capping jams. |
| Flash Check | Touch (4 Corners) | Clean parting line on edge cavities. | Plate bending, weak mold rigidity. |
| Cycle Time | Parameter Sheet | Matches contract (e.g., 15s). | Lost daily production output. |
Would you like me to translate this revised English version back into Chinese for your final review?