I am Vivian. I have 20 years of experience in PET preform and mold manufacturing in Zhongshan, China. Clients often bring me bad bottles from other suppliers. I always check the bottle base first. Inexperienced engineers often ignore physical base defects. Today, my technical team and I share our factory service experience to solve this common technical problem.
Cold stretch and premature contact during the blow molding process cause concentric rings on the PET bottle bottom. Sidel and Husky equipment manuals call them concentric stress rings or chatter marks. You fix this by increasing the oven bottom temperature exactly to 100 to 105 degrees Celsius and delaying the pre-blow trigger time.
1. The Phenomenon: Decoding Concentric Stress Rings in SBM
I often receive bad samples from overseas water plants. They ignore the small bottom rings. The bottles break during warehouse transport. You must understand polymer physics to fix this defect. In our QC lab, we use objective data only to decode this problem.
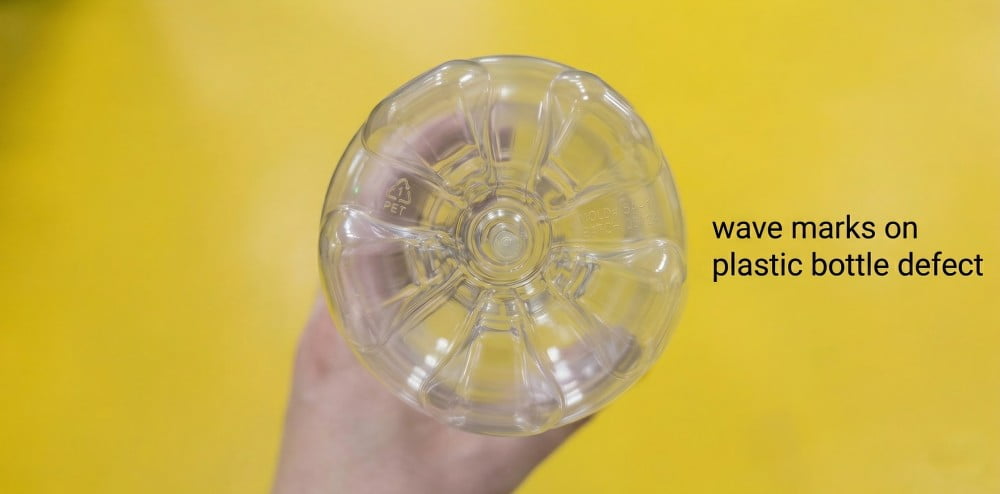
Concentric stress rings on a PET bottle bottom are clear circular wave marks around the center gate. Sidel and Husky process manuals call them chatter marks. A thermal-mechanical mismatch causes them during stretch blow molding. The PET material freezes under microscopic stress during bi-axial stretching because of abnormal local viscosity.
Stop ignoring these rings. This is a very serious mistake. Stop thinking these are just surface mold polish marks. The concentric stress rings show the exact physical locations of poor molecular chain orientation. We measure the dimensional tolerance of the base in our QC lab. We see severe thickness errors. The center is too thick. The ring area is too thin. This proves a complete failure of material distribution.
The heat distribution does not match the mechanical stretching force. The stretch rod pushes the plastic. The plastic must flow evenly. Abnormal local viscosity stops the continuous flow. The plastic stops and starts. This creates rings. We use strict quality control to measure this exact deviation. You must fix the heat profile to fix the flow.
| Defect Name | Visual Appearance | Physical Location | Technical Term |
|---|---|---|---|
| Concentric Rings | Circular wave marks | Around center gate | Chatter Marks |
| White Base | Milky white plastic | Bottom dome | Cold Stretch |
| Off-center Gate | Asymmetrical bottom | Base insert area | Misalignment |
2. The Mechanics of Stretching: Polymer strain hardening and stick-slip effect
I visit many overseas production plants. I see operators treat plastic stretching as a simple air blowing action. This is an amateur mistake. Bad mechanical stretching destroys the internal molecular structure completely. We must control the temperature window to guide the polymer extension safely.
PET stretches smoothly only when bi-axial orientation happens inside a specific temperature window. This triggers polymer strain hardening. Uneven local preform cooling causes the material to experience a microscopic stick-slip process. The plastic sticks to the mold cavity and then slips. This discontinuous movement leaves concentric wave marks.
PET plastic must absorb infrared heat to gain elasticity. Elasticity allows the material to stretch. The PET molecular chains align when the temperature is correct. This causes Strain Hardening. The physical strength of the material increases sharply.
The preform mold design dictates the initial plastic wall thickness. Thicker preforms need more heat penetration time. The plastic viscosity becomes too high if the plastic is too cold. The plastic stays stiff.
A microscopic Stick-Slip Phenomenon happens when the mechanical stretch rod pushes the stiff plastic. The plastic touches the metal and sticks instantly. The continuous push of the stretch rod forces the plastic to slide forward. Then it sticks again. This stop-and-go physical extension creates the wave marks.
Don't buy blow molding machines with poor stretch rod tolerance control. Bad mechanical alignment multiplies the stick-slip effect. The stretch rod must push the material absolutely smoothly.
3. Primary Cause 1: Cold Preform Base - The consequences of localized viscosity
I troubleshoot machine faults at client sites frequently. I often find them using completely wrong oven heating curves. A cold base creates thick, high-viscosity, stiff plastic. We fix this specific thermodynamic defect by adjusting oven zone 1 precisely.
A cold preform base is the primary cause of concentric stress rings. The bottom PET remains stiff and has high viscosity when oven zone 1 provides insufficient infrared lamp power. The stretch rod forces a cold stretch. The material cannot flow smoothly. This leaves instantly frozen microscopic stress marks.
The oven is the heart of the blow molding machine. Top equipment training manuals emphasize the bottom heating zone. We call this zone 1. Zone 1 heats the lowest part of the preform.
Cold PET has extremely high viscosity if the infrared lamp power in zone 1 is too low. The plastic refuses to stretch. The fast-falling stretch rod hits the cold base. The rod forces the stiff plastic to move mechanically.
This causes a severe Cold Stretch. The machine tears the material mechanically instead of stretching it naturally. The cold stretch creates severe internal microscopic stress. The cold base mold freezes the plastic instantly.
Stop heating the preform evenly from top to bottom. This is a basic mistake. The base is thicker. The base needs more heat input. You see a white base with rings on the production line. This means the base suffered severe cold stretch damage. You must increase the local heating curve.
4. Primary Cause 2: Pre-Blow Timing is Too Early - Creating premature contact
I saw a client ruin 10,000 bottles in one morning due to wrong air settings. They triggered the pre-blow solenoid valve too early. We check the PLC air valve delay strictly to solve this premature expansion problem entirely.
Early pre-blow pressure causes premature contact. High-pressure air inflates the preform before the stretch rod pins the center gate securely to the base mold insert. The inflated PET touches the cold steel early. The cold steel causes a local cold shock. The PET stops stretching and forms rolling chatter marks.
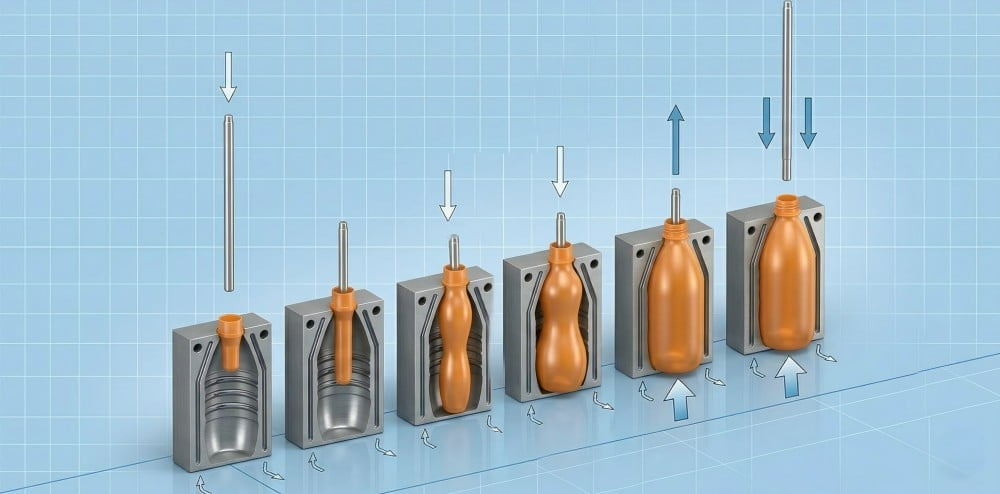
Advanced process tuning requires exact thermodynamics and extremely precise pneumatic-mechanical synchronization. The stretch rod must go down first. The rod must pin the preform center gate to the bottom mold surface. Then, the machine must trigger the pre-blow air. This is an unbreakable physical rule.
High-pressure air expands the preform into a balloon too early if the pre-blow triggers too soon. The stretch rod has not pressed the bottom yet. The inflated PET touches the base mold insert surface.
We use 7075 aluminum or S136 stainless steel to make base inserts. They contain cooling channels. They are very cold. A cold shock reaction happens instantly when hot PET touches cold metal. The plastic freezes. The trapped air forms rolling chatter marks.
Don't ignore the pre-blow delay milliseconds in the PLC. A 50-millisecond timing error causes this physical defect directly.
| Timing Error | Physical Action | Resulting Defect |
|---|---|---|
| Too Early | Air inflates plastic before rod pins gate | Concentric Rings or Chatter Marks |
| Correct Timing | Rod pins gate fully, then air inflates plastic | Smooth Base and Even Distribution |
| Too Late | Rod hits bottom, no air supports plastic tension | Base Tear or Pearlescent White Base |
5. Consequence: Hidden failure points and stress cracking risks
Inexperienced buyers bring samples with small rings to me. They ask to compromise and accept them. I tell them absolutely no. These stress rings hide fatal mechanical weak points. The bottle breaks under transport pressure.
Concentric stress rings are not just visual defects. Mechanical simulation tests show these concentric circles are the weakest mechanical points of the bottle. They often appear with white cold stretch areas. The molecular chains break easily under internal carbonation pressure, drop tests, or static warehouse stacking.
This directly causes stress cracking at the base. We focus on structural strength during bottle design. An excellent bottle base must carry heavy loads. Concentric stress rings destroy the base load-bearing structure completely. The wave marks become microscopic stress concentration points.
Internal gas pushes the base outward continuously when you fill the bottle with carbonated drinks. The weak stress rings cannot withstand this static pressure. The base buckles and cracks. This is Stress Cracking.
A vertical top-load pressure pushes down on the bottle body when you stack boxes in a warehouse. A base with chatter marks buckles easily. This becomes the starting point of a total structural collapse.
Stop accepting bottles with cold stretch rings on the base. They fail standard free-drop tests absolutely. The kinetic energy transfers to the weakest point instantly upon floor impact. The base shatters along the concentric lines. QC departments must reject these bottles immediately.
6. Troubleshooting Roadmap 1: Optimizing the Oven Bottom Heating Zones
We never guess temperature parameters during our own factory outgoing tests. Industrial production requires absolute rigor. We follow strict SOPs. We use precision instruments to calibrate the infrared lamp power step by step to eliminate cold stretch entirely.
You must optimize the oven bottom heating zones to eliminate cold stretch. Check the infrared lamp power in zone 1. You must increase the bottom power for thick PET preforms. The bottom PET temperature must reach exactly 100 to 105 degrees Celsius before blowing. This eliminates the stick-slip effect.
Step one of troubleshooting focuses on thermodynamic control. Look at the blow molding machine main control panel. Find oven zone 1. You must set a higher bottom power if you run heavy, thick-walled preforms.
Increase the power parameter in the PLC gradually. Wait for the oven heat field to stabilize. Use a high-precision infrared thermometer. Measure the actual surface temperature of the preform base.
The target temperature must fall exactly between 100 to 105 degrees Celsius. This is the golden thermodynamic window for PET bi-axial stretching. The local viscosity drops reasonably at this temperature. The plastic gets high elasticity and smooth ductility.
The stretch rod pushes the material easily. The stick-slip effect disappears. The concentric chatter marks vanish entirely. Don't use old infrared lamps on the machine. Old lamps cause severe infrared radiation decay and create local cold spots.
7. Troubleshooting Roadmap 2: Delay and Verify Pre-Blow Pressure Timing
I demand strict control of high-speed air valves when I commission a PET blow mold for clients. You must control every millisecond of the machine. We tune the PLC completely to eliminate premature contact with cold mold steel.
Increase the pre-blow delay time in the blow molding machine PLC. Ensure the stretch rod pins the preform center gate firmly to the base mold surface first. Then trigger the pre-blow air. Check the pre-blow flow valve. High flow disrupts stretch rod alignment. Perfect pneumatic timing eliminates premature contact.
Step two focuses on pneumatic troubleshooting. Enter the machine PLC. Increase the pre-blow delay time by +0.05 seconds. The stretch rod must push the gate all the way down to the base mold insert surface.
The PLC allows the pre-blow solenoid valve to open only after the sensor confirms a firm gate press. This prevents premature contact physically. The inflated plastic does not touch the cold S136 stainless steel base mold too early.
Next, check the pre-blow flow control valve. High-pressure air rushes in violently if the flow valve is too wide open. The asymmetrical violent airflow pushes the stretch rod away from the center axis. This causes severe misalignment.
Reduce the flow rate moderately. The pre-blow air must form a controlled soft bubble inside. This bubble guides the plastic to spread smoothly into all corners. The base forms perfectly without microscopic chatter marks.
| Troubleshooting Step | Action Parameter | Target Physical Result |
|---|---|---|
| 1. Oven Zone 1 Power | Increase IR setting percentage | Base Temperature reaches 100 to 105 degrees Celsius |
| 2. Pre-Blow Delay Timing | Add +0.05 seconds delay | Delay air inflation until rod hits bottom completely |
| 3. Pre-Blow Flow Valve | Reduce initial air flow rate | Prevent rod misalignment / achieve soft initial inflation |
8. Summary: Validating process parameters for structural integrity
I always tell overseas plant managers that shortcuts do not exist in precision blow molding. You need extremely strict engineering logic. We validate every data parameter to ensure absolute manufacturing success.
Eliminating concentric stress rings requires strict adherence to engineering logic from thermodynamic control to pneumatic timing. Production efficiency comes from absolute control over every millisecond and every degree Celsius. Mold processes tuned with objective data guarantee the structural integrity of the final bottle.
You absolutely cannot rely on intuition to guess process parameters. Objective data dictates the structural quality of the products. Use instruments to ensure the preform base reaches exactly 100 to 105 degrees Celsius at the start of every production shift.
Validate the pre-blow delay seconds in the PLC. Ensure the mechanical downward path of the stretch rod has zero deviation.
The bottle base presents a transparent and solid physical state after you fix the thermal-mechanical mismatch fundamentally. The polymer chains achieve perfect bi-axial orientation. The base stress cracking risk drops to zero physically.
Stop adjusting the machine randomly without theoretical support. Record the optimal process parameters as the standard SOP recipe. Train your operators to reverse-engineer machine status from physical defects. A smooth base means ideal polymer flow and highly reliable structural integrity.
5 Frequently Asked Questions (FAQ)
FAQ 1: Why do my PET bottles have circles marks at the bottom?
A technical defect called cold stretch causes this physical phenomenon. The material experiences a microscopic stick-slip effect during stretching because the base temperature is too low or the pre-blow timing is too early. The molecular chains freeze before full bi-axial orientation, forming concentric stress wave marks.
FAQ 2: How does localized viscosity affect concentric stress rings?
Material viscosity increases sharply when the preform base temperature is too low. The PET cannot flow outward smoothly under the force of the stretch rod. This stiff plastic vibrates against the cavity surface discontinuously. This leaves deep physical patterns called chatter marks.
FAQ 3: Can pre-blow timing adjustment eliminate bottom rings?
Absolutely. You ensure the stretch rod pins the preform center gate mechanically to the base mold surface first by delaying the pre-blow trigger time appropriately in the PLC. This eliminates premature expansion and rolling contact marks caused by early cold mold contact.
FAQ 4: How is a standard top-load test affected by base rings?
A bottle base with cold stretch marks has poor molecular orientation and extremely low physical strength. These concentric circles act as extremely fragile mechanical weak points during vertical top-load testing or static warehouse stacking. They suffer buckling deformation easily and start a mechanical collapse.
FAQ 5: How do top equipment brands recommend fixing this issue?
Engineers from top brands like Sidel and Husky use multiple strict methods. They calibrate the infrared heating power curves accurately. They use photoelectric sensors to verify exact pre-blow valve delays. They use high-precision tools to check the mechanical alignment tolerance of the stretch rod.
Final Core Parameters Summary Table
| Category | Core Physical Parameter | Engineer Action Required |
|---|---|---|
| Defect Identification | Concentric Stress Rings / Chatter Marks | Inspect area around center gate for clear wave marks and measure thickness. |
| Core Physics Mechanism | Thermal-mechanical mismatch / Stick-Slip | Balance infrared heat input power strictly with mechanical stretching force. |
| Temperature Control | Localized Viscosity / Cold Stretch | Increase oven zone 1 power; target exactly 100 to 105 degrees Celsius. |
| Pneumatic Control | Premature Contact / Pneumatic Timing | Add at least +0.05 seconds PLC pre-blow delay; ensure rod pins gate first. |
| Mechanical Result | Strain Hardening / Structural Integrity | Eliminate cold shock freezing on S136 stainless steel; pass all top-load tests. |