Last month, a Canadian client asked me for a PET blowing machine for a new high-end cosmetic bottle. When I asked for a photo of his current bottle base, he was confused. I saw a straight line across the bottom instead of a round dot. I had to explain that his current bottle was actually made of PE using a completely different method, and buying a standard PET blowing machine would be a huge mistake.
PET two-stage molding is a manufacturing method that separates bottle production into two distinct steps. First, an injection machine creates a small, test-tube-like "preform." Second, a blowing machine reheats this preform and stretches it into the final bottle shape. This method offers the highest production speed and lowest shipping costs.
Because this client was new to the industry, he thought all plastic bottle blowing was exactly the same. I explained the difference and offered to redesign his expensive PE process into a highly efficient PET two-stage process to save him massive costs. Many beginners make similar expensive mistakes because they do not understand the fundamental mechanics of the industry. Today, my team and I will provide a detailed introduction to the theoretical and practical knowledge of the PET two-stage production process. This guide will help you understand how a factory really works and how to choose the right path for your business.
What exactly is the "Two-Stage" PET Process? (A simple explanation)?
Are you confused by the technical terms used by machine suppliers? Let us strip away the complex chemical jargon and look at how we turn raw plastic pellets into a usable water bottle in two simple steps.
The "Two-Stage" process separates injection and blowing. Step one creates a thick plastic test tube called a preform using a PET preform mold. Step two takes that cold preform, reheats it, and blows it up like a balloon inside a separate machine to create the final bottle.
To understand the PET two-stage molding process, you need to understand the "Balloon Analogy." Think about how you blow up a rubber balloon. First, you have a small, thick piece of rubber. It is compact and easy to carry. When you are ready to use it, you blow air into it, and it expands to its final large shape.
The two-stage PET bottle manufacturing process works exactly the same way.
In the First Stage, we melt PET (Polyethylene Terephthalate) plastic resin pellets. We inject this melted plastic into a specialized mold. This mold cools the plastic into a small, thick-walled shape that looks exactly like a laboratory test tube with screw threads at the top. We call this item a "preform." This preform is the seed of the future bottle. It is completely cold, solid, and stable. You can store it in a warehouse for months, or you can ship it across the ocean.
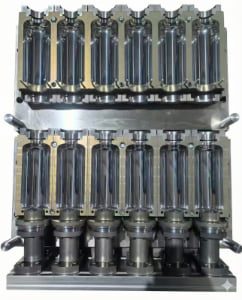
In the Second Stage, we take this cold preform and put it into a completely different machine, called a Stretch Blow Molding machine. Since the plastic is cold and hard, we cannot blow it up yet. If you try to blow high-pressure air into a cold plastic tube, it will just shatter like glass. So, the machine first passes the preforms through a heating tunnel. Once the plastic becomes soft and pliable, we clamp it inside a blow mold cavity. Then, we use a mechanical rod to stretch it down and high-pressure air to push it outward against the mold walls.
This separation of steps is why we call it the "two-stage" process. It is the dominant method for making water bottles, carbonated soft drink bottles, and cooking oil containers worldwide. Understanding this basic division of labor is the foundation for managing a successful plastics factory.
Stage One: How does the Preform Mold create the "Test Tube"?
Where does the bottle actually begin? It does not start with air; it starts with extreme heat and pressure as we force molten plastic into a precision steel cavity to form the preform.
During stage one, melted PET resin is injected under high pressure into the PET preform mold. This mold finalizes the shape of the neck and screw threads permanently. This stage requires extreme precision because the threads must perfectly match the cap to prevent any future liquid leakage.
Stage one is purely an injection molding process. It requires a heavy-duty injection molding machine and a multi-cavity preform mold. The process begins with drying the raw PET pellets. PET is hygroscopic, meaning it absorbs moisture from the air. If we melt wet PET, the molecular chains will break, and the final bottle will be weak and cloudy. We must dry the pellets for several hours until the moisture level drops below 40 parts per million.
Once the material is dry, the machine heats the plastic to around 280°C. At this temperature, the PET turns into a thick, honey-like liquid. The injection screw then acts like a giant syringe. It pushes the molten plastic under massive pressure (often exceeding 1,000 bar) into the closed steel preform mold.
This mold has two main jobs. The first job is to create the body of the "test tube," which has the exact weight needed for the final bottle. If the preform weighs 15 grams, the final bottle will weigh 15 grams.
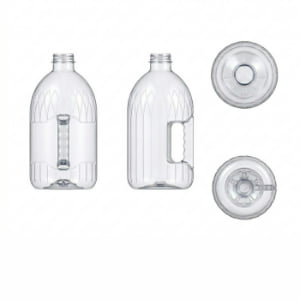
The second, and most critical job, is to form the Neck Finish. The neck finish includes the screw threads where the cap goes, the tamper-evident ring, and the neck ring that supports the bottle during the blowing process. The neck is fully formed and finalized at this stage. It will not change size or shape during the second stage. This requires microscopic precision in the mold design. If the threads are too small by just a fraction of a millimeter, the cap will screw on loosely, and carbonated gas will leak out. If the threads are too big, the capping machine on the filling line will jam. The injection stage creates the foundation for your entire product quality. At the bottom of this preform, you will always see a small round dot. This is the "gate," the point where the molten plastic entered the mold. This dot is the signature of the PET two-stage process.
The Business Secret: Why do we separate the process into two stages?
Why buy two different machines when you could do everything on one machine? The answer is not just about engineering; it is about smart business, logistics, and saving massive amounts of money.
Separating the process solves the problem of shipping air. Preforms are small, dense, and heavy, while bottles are large and full of empty space. You can pack millions of preforms into a single truck. By separating the stages, you drastically cut storage and transportation costs.
This is the area where my 20 years of export experience provide the most value to new factory owners. Many beginners ask me, "Vivian, why not just make the preform and blow the bottle inside the same machine immediately?" While that technology exists (and is called One-Stage molding), the Two-Stage method is the king of mass production because of the logistics advantage.
Let us look the business logic. A standard 500ml water bottle takes up a lot of physical space. It is 99% air. If you manufacture finished bottles in a central factory and ship them to a beverage filling plant 500 kilometers away, you are essentially paying trucks to transport empty air. One standard 40-foot shipping container can only hold about 100,000 empty 500ml bottles.
However, a preform for that same bottle is no bigger than a finger. It takes up very little space. That same 40-foot shipping container can hold over 1,000,000 preforms.
By separating the process, large beverage brands centralize the Stage One (Injection) process. They use massive 96-cavity molds running 24/7 to produce billions of preforms in a central hub. They then ship these compact, dense preforms to various local filling plants around the country. At the local plant, they install a Stage Two (Blowing) machine right next to the water filling line. They blow the preforms into bottles on-demand, just seconds before filling them with water. This eliminates the need to store giant mountains of empty bottles.
| Factor | Shipping Finished Bottles | Shipping Preforms (Two-Stage) |
|---|---|---|
| Container Capacity | ~100,000 pieces | ~1,000,000 pieces |
| Shipping Cost per unit | Very High | Extremely Low |
| Storage Space Required | Massive warehouses needed | Small corner of warehouse |
| Damage Risk in Transit | Bottles get crushed easily | Preforms are virtually unbreakable |
Furthermore, this separation allows financial flexibility for startups. If your budget is tight, you do not need to buy the expensive injection machine and preform mold at the beginning. You can just buy a relatively cheap blowing machine and purchase preforms from the open market. This lowers the entry barrier for new businesses.
Stage Two: Why must we "Reheat" the preform, but keep the neck cold?
How do we make a cold, hard piece of plastic soft enough to blow without melting it into a puddle? The secret lies in precise infrared heating and targeted cooling.
During the preform reheating phase, preforms pass through Infrared (IR) ovens. The body is heated to about 100°C to make it soft. Crucially, the neck area is shielded with cold water plates. If the neck gets hot, the screw threads will deform, ruining the bottle.
Now we move to the blowing machine for Stage Two. The preforms arrive at the machine cold. The first thing the machine does is load the preforms onto a rotating chain that carries them through a tunnel of Infrared (IR) lamps.
Why infrared? Infrared radiation penetrates the plastic wall and heats it from the inside out, rather than just burning the surface. As the preforms travel through the oven, they spin continuously. This spinning ensures that the preform absorbs the heat evenly around its entire circumference. If one side is hotter than the other, the final bottle will have uneven wall thickness.
Here is the most critical detail of the reheating process: The Temperature Barrier. We need to heat the body of the preform to approximately 100°C to 110°C. At this temperature, PET is in a rubbery, stretchable state. It is not fully melted liquid, but it is soft enough to shape.
However, we absolutely cannot heat the neck finish. Remember, the neck and screw threads were perfectly finalized in Stage One. If the neck reaches 100°C, it will become soft. When the high-pressure air hits it later, the threads will warp, the neck will stretch, and the cap will never seal.
To prevent this disaster, the blowing machine uses "Cold Water Shields" or cooling plates. These are metal plates with chilled water running through them. They sit directly below the neck ring inside the oven. They physically block the infrared light from hitting the neck and absorb any rising heat. This creates a sharp temperature boundary. The body is 100°C, but just a few millimeters above the neck ring, the plastic remains at a cool 30°C. This targeted heating is the foundation of the stretch blow molding process.
The Stretch Rod: The hidden secret that makes PET bottles unbreakable.
Most beginners think the machine just blows air into the hot preform. That is incorrect. There is a hidden mechanical step that completely changes the physical properties of the plastic.
Before the high-pressure air enters, a metal Stretch Rod pushes the preform down to the bottom of the mold. This mechanical stretching aligns the PET molecules vertically and horizontally, creating biaxial orientation PET. This turns soft plastic into a super-strong structure.
This is the magical step in how PET bottles are made. Once the preform is hot, it transfers into the closed blow mold cavity.
At this exact moment, you might think the machine blasts air into the preform. If we did that, the plastic would blow out randomly, creating a weak bottle with thick sides and a paper-thin bottom. Instead, the machine uses a mechanical steel rod called the "Stretch Rod."
The Stretch Rod drops down from the top, enters the neck, and physically pushes the bottom of the hot preform all the way down to the base of the mold.
Why do we do this? This action performs "Mechanical Stretching."
As the rod pushes down, the tangled, random molecules of the PET plastic are forced to line up parallel to the direction of the rod. Immediately after the rod stretches the preform vertically, the air pressure pushes it horizontally.
This creates a phenomenon called Biaxial Orientation. The molecules are stretched and locked into a grid-like structure. This is the superpower of PET. Before stretching, PET is brittle. After biaxial orientation, the tensile strength of the plastic increases dramatically. It becomes clear as glass, impact-resistant, and serves as an excellent barrier against gas escaping (which is why it holds carbonation). Without the stretch rod, a plastic bottle would shatter if you dropped it on the floor. With the stretch rod, it bounces. This is why the correct technical term for the entire process is Injection Stretch Blow Molding (ISBM).
High-Pressure Blowing: Forcing the plastic against the Blow Mold.
How does a simple round tube transform into a complex bottle with your company logo embossed on the side? It takes immense air pressure to force the plastic into every tiny detail of the mold.
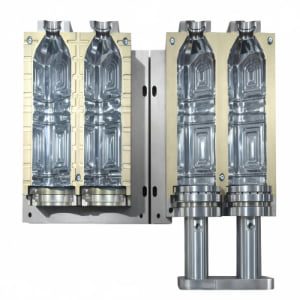
After stretching, 35 to 40 bar of high-pressure air is blasted into the preform. This massive force expands the plastic outward until it hits the cold wall of the custom blow mold. The mold wall gives the bottle its final shape, logos, and structural ribs.
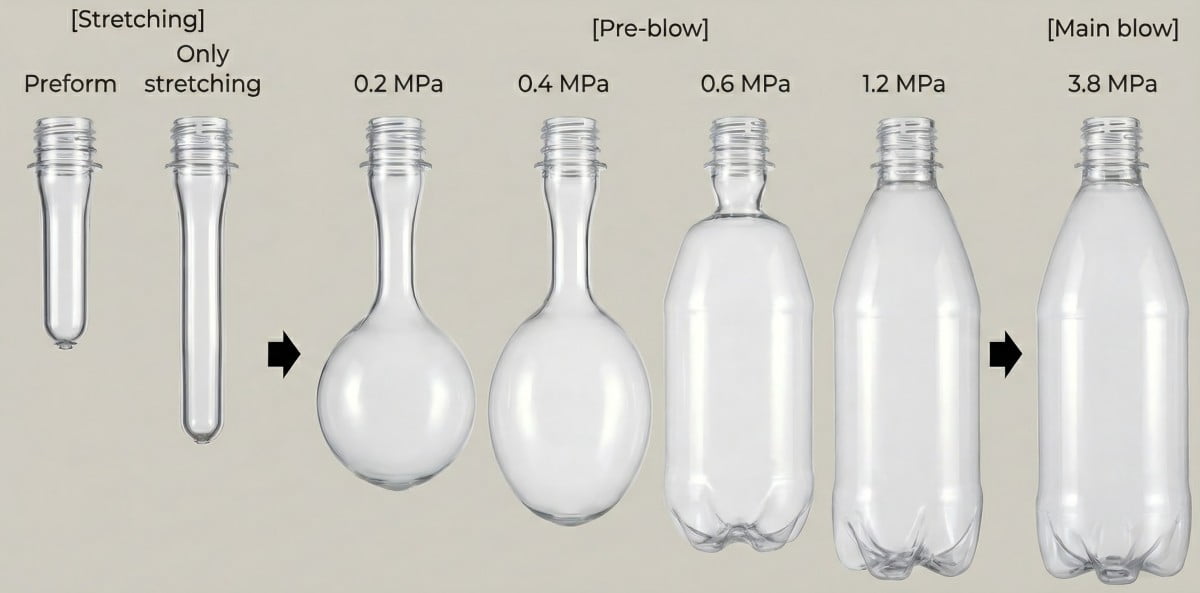
Once the stretch rod has reached the bottom, the blowing phase begins. This is not a single blast of air. It actually happens in two distinct steps to control the plastic flow.
- Low-Pressure Blow (Pre-blow): Around 8 to 12 bar of air is introduced while the stretch rod is still moving down. This creates a small air bubble, keeping the hot plastic from sticking to the stretch rod and preparing the material to expand.
- High-Pressure Blow: Once the rod hits the bottom, the main valve opens. A massive blast of air, usually between 35 and 40 bar (for carbonated bottles), enters the preform. For context, 40 bar is over 580 psi. This is an immense amount of pressure.
This pressure forces the soft PET skin outward in all directions simultaneously. It pushes the plastic hard against the aluminum or steel walls of the blow mold cavity. The mold cavity is shaped exactly like your final bottle, but in reverse. If you want ribs for strength, the mold has grooves. If you want your logo to pop out, the mold has the logo engraved into it. The plastic acts like liquid wallpaper, sticking to every detail of the mold surface.
As the plastic expands outward at high speed, the air that was already inside the mold cavity must escape. If the air gets trapped, it creates an air cushion. The plastic will not be able to touch the mold wall, resulting in a deformed bottle with soft, unclear edges. This is why we machine microscopic vents (about 0.05mm wide) into the parting lines and base of the mold. These vents let the air out instantly but are too narrow for the plastic to enter.
The Freeze: How cooling channels set the final bottle shape in milliseconds.
You cannot take a hot, soft bottle out of the mold. If you did, it would collapse instantly. The final step is an ultra-fast freezing process that locks the shape permanently.
The blow mold cavity has chilled water channels running inside the metal. As soon as the hot, expanded plastic touches the cold aluminum wall, it freezes instantly. This rapid cooling locks the molecular structure in place and allows the bottle to be ejected quickly.
The physical molding is complete, but the cycle is not over. The plastic touching the mold wall is still around 90°C. If the mold opens now, the internal air pressure will drop, and the soft plastic will shrink and collapse.
To fix the shape, the mold itself is kept very cold. We drill water channels inside the blow mold blocks and base. We connect these channels to an industrial chiller that pumps 10°C to 12°C water through the mold continuously. Aluminum is an excellent conductor of heat.
The moment the hot plastic skin is pressed against the cold aluminum wall by the 40-bar air pressure, a rapid thermal transfer occurs. The heat leaves the plastic and enters the mold. The plastic temperature drops below its Glass Transition Temperature (Tg) of about 75°C in fractions of a second. It "freezes" into a hard, rigid state.
The speed of this cooling process determines your factory's output capacity. A poorly designed mold with bad cooling channels might take 3 seconds to cool the bottle. A high-performance mold with optimized cooling channels can cool the bottle in 0.8 seconds. When you produce 50,000 bottles per hour, saving 2 seconds per cycle means millions of extra bottles per year. Once the plastic is cold and rigid, the high-pressure air is exhausted, the mold opens, and the finished bottle drops out.
One-Stage vs. Two-Stage: Which one is right for your startup factory?
Should you buy one machine that does everything, or two separate machines? Choosing the wrong technology at the start can trap your business in an expensive, inflexible system.
One-Stage molding (making and blowing on one machine) is ideal for specialized cosmetics or very small production runs where neck finishes change often. Two-Stage molding is the King of Mass Production for water and beverages because of its high speed, flexibility, and lower machine costs.
Let us return to my Canadian client. He wanted to make a premium cosmetic bottle. His original bottle was made using PE (Polyethylene) Extrusion Blow Molding. This is a process where a tube of hot plastic drops down, and the mold clamps it directly (leaving a pinch-off line at the bottom). He wanted to upgrade to PET for better clarity.
For PET, you must choose between One-Stage and Two-Stage.
One-Stage (ISBM):
In One-Stage, the preform is injected and immediately transferred to the blowing station while it is still hot.
- Pros: Perfect for luxury cosmetic bottles with unusual neck shapes. No risk of preform scratching during transport.
- Cons: Very slow production. If the injection part breaks, the blowing part stops. The molds are incredibly expensive and complex.
Two-Stage (The Factory Choice):
This is the process we just detailed.
- Pros: Incredible speed. High flexibility (you can buy preforms instead of making them). Much cheaper blow molds. If you want to change bottle shapes, you just change the blow mold; you keep using the same preforms.
- Cons: Not suitable for non-standard neck finishes.
For the Canadian client, I analyzed his volume. Because he wanted high production efficiency and lower mold costs, I designed a solution to convert his PE bottle into a PET Two-Stage design. We standardized the neck to a common preform size, which allowed him to buy cheap preforms from the market and only invest in a blow molding machine and a custom blow mold. This saved him over $100,000 in injection machine investments.
| Feature | One-Stage Process | Two-Stage Process |
|---|---|---|
| Best For | Luxury Cosmetics, Pharma | Water, Soda, Edible Oil, Mass Cosmetics |
| Production Speed | Low to Medium | Very High |
| Startup Capital | High (Injection + Blowing system) | Low (Just buy Blow machine & preforms) |
| Flexibility | Low (Tied to one machine cycle) | High (Separate machines) |
| Mold Cost | Very High (Combined tooling) | Moderate (Separate tooling) |
Conclusion
PET two-stage molding transforms a simple plastic test tube into a durable, crystal-clear container through precision reheating, mechanical stretching, and high-pressure blowing. By separating the process, manufacturers achieve maximum production efficiency and drastically reduce logistics costs, making it the ultimate solution for modern plastic packaging. If you are planning to set up a new PET production line or want to optimize your existing process for better ROI, please contact me and my team at petmold.com for a free engineering consultation.
FAQs
Q1: Can I blow any preform into any bottle shape?
A: No. The preform weight must match the final bottle weight. Also, the preform stretch ratio must be correct. If you try to blow a very small preform into a giant bottle, the plastic will stretch too thin and burst.
Q2: How do I know if a bottle is made by the Two-Stage process?
A: Look at the very center of the bottom of the bottle. If you see a distinct, small round dot (the gate), it is a PET bottle made by the two-stage process. If you see a straight line across the bottom, it is an Extrusion Blow Molded bottle (usually PE or PP).
Q3: Can I recycle the rejected bottles?
A: Yes, absolutely. PET is 100% recyclable. Rejected bottles can be ground up into flakes, re-melted, and mixed with new material to make new preforms.
Q4: Why are the necks of carbonated bottles different from water bottles?
A: Carbonated bottles need a heavier, stronger neck (like PCO1881) to hold the gas pressure and create a tight seal. Water bottles use lighter, shorter necks (like 29/25) to save plastic costs since there is no internal pressure.
Q5: What is the most common cause of bottle defects in the blowing stage?
A: Poor preform reheating. If the infrared lamps are set incorrectly, the preform will be too cold (making it cloudy and hard to stretch) or too hot (making it melt and stick to the mold). Mastering the oven temperature profile is the key to success.
Summary Table
| Process Step | Action Performed | Key Equipment | Critical Quality Factor |
|---|---|---|---|
| 1. Injection | Melt PET and form the preform. | Injection Machine, Preform Mold | Neck finish dimensions, moisture control. |
| 2. Logistics | Store or transport preforms. | Pallets, Shipping Containers | Prevents scratching, saves space. |
| 3. Reheating | Soften preform to 100°C. | Infrared (IR) Ovens | Shielding the neck from heat. |
| 4. Stretching | Mechanically align molecules. | Stretch Rod | Biaxial orientation for strength. |
| 5. Blowing | Expand plastic into final shape. | 40-bar Air Compressor | Mold venting and pressure control. |
| 6. Freezing | Lock the final bottle shape. | Chilled Blow Mold | Cooling channel design and water temp. |