I am Vivian. I own a PET mold factory in Zhongshan, China. I have 20 years of experience in PET mold and preform manufacturing. Yesterday, I received a video call from my client in Saudi Arabia. They showed me a bottle on the screen. The neck area was very white. They used a new preform from a new supplier. They tried to fix the machine for one hour. They failed. They asked our engineers for help. We looked at the photos. We found the root cause fast. We gave them the correct machine settings. The bottles became clear again. Today, my technical team and I write this guide. We provide our solutions to you. We want to help you fix PET bottle neck whitening.
PET bottle shoulder whitening happens because of localized cold stretching. The thick PET material under the neck ring does not reach the 90°C to 100°C stretching temperature. Machine stretch rods pull the cold material. This breaks the molecular chains. You fix this by adjusting cooling shields, heating zones, and pre-blow settings.
1. The "Shoulder Halo": Why pearlescence happens right under the neck ring.
I saw this defect on a fast production line last month. The white shoulder halo ruins the bottle appearance. The factory wastes raw material. You must understand the physics to solve this problem.
The shoulder halo is a localized cold stretching defect. The transition zone under the support ring has thick walls. This area stays cold near the water cooling shield. It misses the 90°C to 100°C target. The rod stretches cold PET. This breaks molecular chains and causes stress whitening.
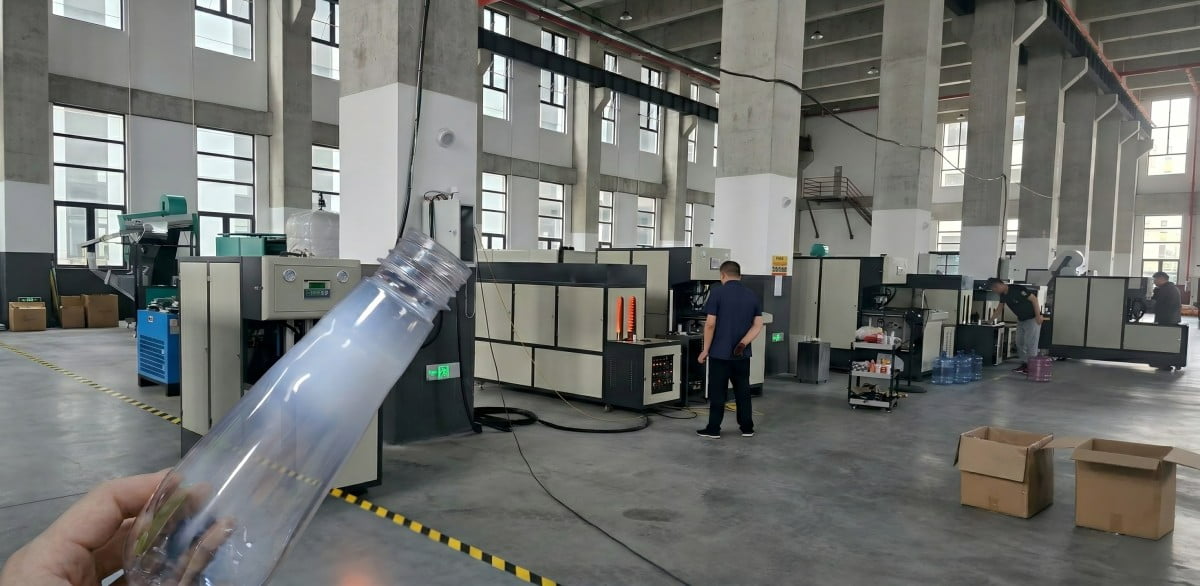
We see this problem in many water plants. The PET blow mold shapes the final bottle. But the process starts in the heating oven. The PET material has a glass transition temperature. The glass transition temperature is around 70°C. The best stretching temperature is between 90°C and 100°C. You must heat the preform to this exact range.
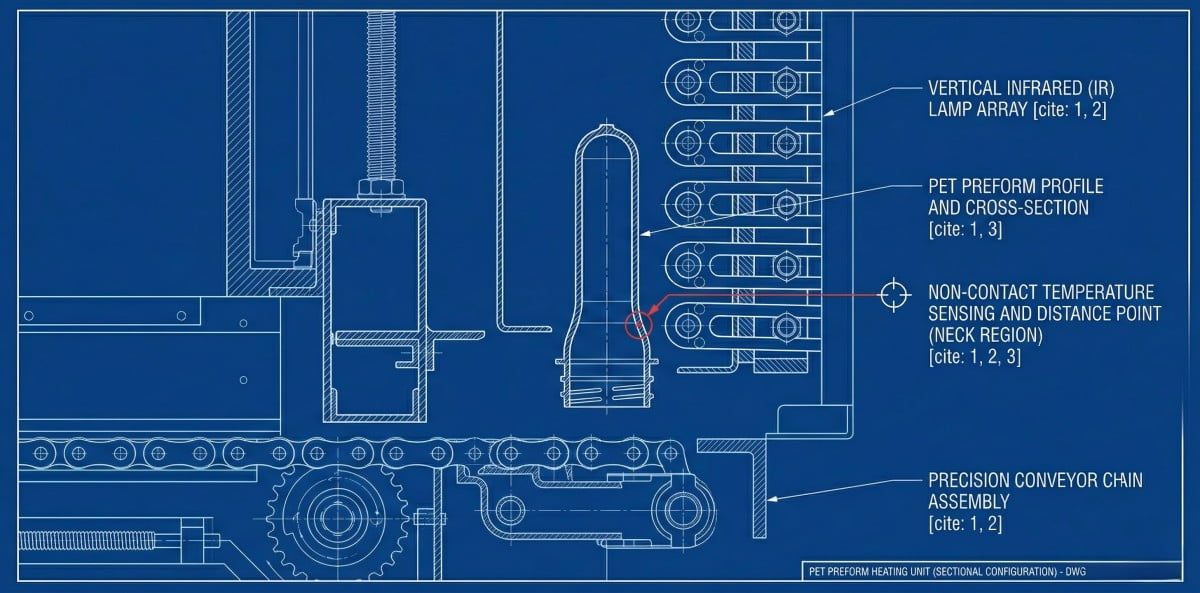
Look at the preform neck. The neck has threads. The threads must stay cold. If the threads get hot, they deform. The capping machine will fail. So, machines use cooling shields to protect the threads. But the area right below the neck ring is the transition zone. The transition zone connects the thin neck to the thick body. This area has a large wall thickness.
The cooling shield water cools the threads. The cold air also cools the transition zone. The transition zone stays below 90°C. The stretch rod moves down. The stretch rod pushes the material. The cold PET does not stretch well. The mechanical force tears the molecular chains. This is a physical break. The break reflects light. Human eyes see this as a white pearl color. We call this pearlescence.
Do not ignore the transition zone thickness. This is a mistake. Many operators look at the bottle body. The bottle body is clear. They think the heating is good. Stop doing this. You must check the shoulder area. The shoulder area needs more heat than the body. The thick wall resists infrared light. The infrared light cannot penetrate the thick plastic. The inner wall stays cold. The outer wall gets warm. The stretch rod hits the cold inner wall. The material fails.
I test preforms in my factory. We cut the preform. We measure the wall thickness. A standard water preform has a 2.5mm body wall. The transition zone wall is often 3.0mm. The 3.0mm wall needs more energy. You must supply this energy. If you do not supply the energy, you get the shoulder halo.
We check the dimensional tolerance of the stretched bottle. The white area always shows uneven thickness. The white area is too thick. The material did not flow. The cold stretching stops the material flow. You lose mechanical strength. The bottle fails the drop test. You must stop the machine. You must adjust the process.
2. Step 1: The Cooling Shield Gap – Are you over-protecting the threads?
I heard from my client about constant neck whitening. They changed the oven temperatures ten times. The bottles still looked bad. We checked the cooling shield gap. We fixed it in five minutes.
The cooling shield protects the neck threads from heat. A small gap blocks the infrared light from the transition zone. The cold water freezes the shoulder PET. You must set the shield gap between 1.5mm and 2.5mm. This allows heat to reach the thick shoulder wall.
The cooling shield is a metal rail. Cold water flows inside the rail. The rail sits near the preform threads. The rail absorbs the heat from the oven lamps. This keeps the threads cold. This is a good design. But operators make mistakes. They push the rail too close to the preform. They push the rail too low.
Stop lowering the cooling shield too much. This is a mistake. When the shield is too low, it covers the transition zone. The first oven lamp cannot hit the plastic. The shield absorbs all the energy. The thickest part of the preform stays completely cold.
We use a simple tool to check the gap. We use a 2.0mm metal feeler gauge. We place the preform on the heating mandrel. We insert the feeler gauge between the preform support ring and the cooling shield. The gauge must slide smoothly. If the gauge gets stuck, the gap is too small. If the gap is 0.5mm, you will get a white shoulder. The cold radiation from the shield freezes the PET.
You must adjust the physical bolts on the shield rail. Move the rail up. Create a 1.5mm to 2.5mm space. This space allows the infrared light to hit the transition zone directly. The light penetrates the thick wall. The PET absorbs the heat. The temperature rises to 95°C. The stretching becomes easy.
I see operators fear thread deformation. They over-protect the threads. Don't do this. Thread deformation only happens if the oven exhaust is bad or the lamps are too high. The 1.5mm gap is safe. It saves your shoulder quality.
| Shield Gap Size | Heat Penetration | Thread Safety | Result |
|---|---|---|---|
| 0.5mm | Very Bad | Very Safe | Severe Shoulder Whitening |
| 1.0mm | Bad | Safe | Slight Pearlescence |
| 1.5mm - 2.5mm | Good | Safe | Clear Bottle Shoulder |
| 3.0mm+ | Very Good | Unsafe | Thread Deformation |
You must inspect the entire rail. The oven is long. The rail spans the whole oven. Sometimes the entry gap is 2.0mm, but the exit gap is 0.5mm. The rail bends. The misalignment causes inconsistent heating. You get white shoulders on some bottles, but not all. Use a caliper. Measure the gap at the start, middle, and end of the oven. Make the rail perfectly straight.
3. Step 2: Lamp Zone 1 & 2 – Supplying enough heat to the thickest wall.
In my workshop, new operators make a classic error. They see a white bottle shoulder. They increase the total oven power. The shoulder improves, but the bottle body becomes too thin. This wastes material.
You must supply heat only to the transition zone. Keep the bottle body lamps at normal power. Increase the Zone 1 or Zone 2 lamp power. Set these top lamps to 80% or 90% power output. The intense infrared light penetrates the thick plastic wall.
The PET heating oven has multiple heating zones. Each zone has a horizontal infrared lamp. Zone 1 is the top lamp. Zone 2 is below Zone 1. Zone 1 and Zone 2 heat the preform neck and shoulder. The lower zones heat the preform body.
The transition zone is the thickest part of the preform. It requires the most energy. The body is thinner. It requires less energy. If you increase the overall oven temperature, you overheat the body. The body reaches 110°C. The plastic becomes too soft. The bottle becomes foggy. The material distribution fails.
Don't touch the lower lamps. Stop changing the master temperature. This is a mistake. You must isolate the problem. The problem is localized cold stretching. You need localized heating.
Go to the machine control panel. Find the heating profile screen. Look at Zone 1 and Zone 2. Usually, operators set these at 60%. This is too low for a thick preform. Change Zone 1 to 85%. Change Zone 2 to 80%. Watch the preforms exit the oven.
We use a thermal camera in our factory. We measure the preform surface temperature. The body reads 95°C. The transition zone reads 85°C. This 10-degree difference causes the white shoulder. We increase Zone 1 power. The infrared light hits the thick wall. The light goes deep into the plastic. The inner wall gets hot. After adjustment, the thermal camera shows 95°C on the whole preform. The white shoulder disappears.
| Lamp Zone | Target Area | Recommended Power % | Reason |
|---|---|---|---|
| Zone 1 | Support Ring / Transition | 80% - 90% | Overcome thickest wall and shield cooling |
| Zone 2 | Upper Shoulder | 75% - 85% | Assist radial expansion |
| Zone 3 | Mid Body | 50% - 60% | Maintain normal stretch temperature |
| Zone 4 | Lower Body | 40% - 50% | Prevent over-thinning |
| Zone 5 | Preform Tip | 30% - 40% | Avoid tip explosion |
Sometimes the Zone 1 lamp sits too low. The physical position is wrong. The light hits the body, not the shoulder. You must open the oven. You must move the lamp bracket up. Align the center of the Zone 1 lamp with the thickest part of the transition zone. Physical alignment is very important.
4. Step 3: Oven Exhaust Ventilation – Is the fan stealing your shoulder heat?
I saw a machine run perfectly in the morning. In the afternoon, the bottle shoulders turned white. The factory opened the windows. The wind changed the oven airflow. The cooling fans stole the heat.
Oven exhaust fans remove excess surface heat. High fan RPM pulls cold air down the preform neck. This airflow steals heat from Zone 1. The transition zone temperature drops. You must lower the exhaust fan inverter frequency. Balance the airflow to maintain shoulder heat.
Infrared lamps heat the preform from the outside. The outer surface gets hot very fast. The inner surface stays cold. We use exhaust fans on top of the oven. The fans pull air through the oven. The air cools the outer surface of the preform. This prevents the outside from burning while the inside heats up.
But air flows like water. Air takes the path of least resistance. The cooling shields create a gap. Cold air rushes through this gap. The cold air blows directly over the preform transition zone.
Stop running fans at maximum speed. Don't do this. This is a mistake. If the exhaust fan RPM is too high, the cold air flow is too strong. The fan pulls heat away rapidly. The Zone 1 lamp pushes heat in. The fan pulls heat away. The fan wins. The transition zone stays cold. The stretch rod causes pearlescence.
You must check the inverter drive for the exhaust fans. The inverter controls the fan speed. If the frequency is set to 50 Hz, the fan runs at full speed. Lower the frequency to 35 Hz. Wait for 10 minutes. Check the bottle shoulder. If the whitening stops, the fan was the root cause.
We check the air baffles inside the oven. The baffles direct the air. Sometimes operators remove the baffles. The air flows directly down the preform neck. You must install the baffles correctly. The baffles guide the air behind the lamps, not over the preforms.
I always tell my clients to close the factory doors near the blowing machine. Strong wind from outside disrupts the oven balance. The oven needs a stable environment. A sudden draft of 20°C air will freeze the preform shoulder. You lose 10°C on the preform skin in two seconds. The bottle shoulder turns white immediately. Control your factory air flow. Save your production.
5. Step 4: Pre-Blow Timing – Don't let the stretch rod move too early.
I heard from my client about an impossible defect. The heating profile was perfect. The preform temperature was 98°C. The gap was 2.0mm. But the shoulder was still white. We checked the mechanical timing. We fixed the pre-blow delay.
Pre-blow timing controls when the air enters the mold. If the timing is late, the stretch rod pushes the thick shoulder down without air support. This dry physical pulling causes stress whitening. You must trigger the pre-blow cam 0.05 to 0.1 seconds earlier.
Blow molding has two forces. The stretch rod provides axial force. The high-pressure air provides radial force. These two forces must work together.
The machine cycle starts. The mold closes. The stretch rod moves down. The rod touches the preform tip. The rod pushes the tip down. At a specific moment, the pre-blow valve opens. Low-pressure air enters the preform. The air pushes the plastic outward against the mold walls.
Do not let the stretch rod move alone. This is a mistake. If the pre-blow air enters too late, the rod does all the work. The transition zone is thick and heavy. The rod pulls this heavy plastic downward. The plastic experiences severe axisymmetrical deformation. The cold stretching effect happens even if the temperature is 95°C. The mechanical strain rate is too high. The molecular chains break.
You must open the pre-blow valve earlier. Go to the machine interface screen. Find the blowing parameter page. Locate the "Pre-blow delay" or "Pre-blow cam" setting. Decrease the value. Trigger the air 0.05 seconds to 0.1 seconds earlier.
The early air enters the preform. The air pressure pushes the transition zone outward immediately. The material moves away from the stretch rod path. The air helps thin out the thick wall. The axial force and radial force balance. The plastic stretches smoothly. The white halo disappears.
| Pre-Blow Timing | Rod Action | Material Flow | Result |
|---|---|---|---|
| Too Late | Pure Axial Pull | High Strain Rate | Severe Shoulder Whitening |
| 0.05s - 0.1s Early | Balanced Pull & Push | Smooth Flow | Clear Bottle Shoulder |
| Too Early | Pure Radial Push | Rod Misses Center | Off-center Gate / Explosion |
I watch the machine run. We observe the pre-blow shape. If the timing is perfect, the pre-blow shape looks like a smooth bubble. If the timing is late, the pre-blow shape looks like a long tube. A long tube means the shoulder was stretched badly. Adjust the timing until you get the perfect bubble shape.
6. Step 5: Pre-Blow Pressure – Pushing the thick material to the mold wall.
In my workshop, I test different bottle volumes. A 5-liter bottle needs high pressure. A 500ml bottle needs low pressure. We used 5 Bar pressure for a thick preform. The shoulder turned white. We increased the pressure to 7 Bar. The bottle became perfect.
Pre-blow pressure expands the preform. Low pressure cannot push the thick transition zone outward. The material stays near the center. High-pressure blowing then rips the material apart. You must increase the pre-blow pressure by 1 to 2 Bar. Push the thick material to the mold wall.
The pre-blow air must overcome the plastic resistance. The hot PET has elasticity. The thick transition zone has high elasticity. It fights the air pressure.
If your pre-blow pressure is below 6 Bar, the force is weak. The weak air pushes the thin body easily. The thin body expands. But the thick shoulder does not move. The shoulder waits in the center. Then, the high-pressure valve opens. 40 Bar of air hits the plastic instantly. The high pressure rips the thick shoulder open. The sudden violent expansion breaks the micro-structure. You see pearlescence.
Stop using low pre-blow pressure on thick preforms. Don't do this. This is a mistake. You must give the thick material enough force to move.
Check your pre-blow regulator valve. Read the pressure gauge. If it says 5 Bar, increase it. Turn the knob. Set the pressure to 6.5 Bar or 7.0 Bar. Add 1 or 2 Bar.
The higher pre-blow pressure pushes the thick transition zone outward early. The material stretches slowly and evenly. The material touches the cold mold wall. The material freezes in the correct shape. When the 40 Bar high pressure arrives, the shoulder is already in position. No violent ripping happens. The bottle stays clear.
You must monitor the bottle base. If you increase the pre-blow pressure too much, the base material thins out. The pre-blow pressure pushes too much material out of the base. The base fails the pressure test. You must find the balance. Increase the pressure slowly. Watch the shoulder clear up. Check the base thickness. Lock the valve when both are good.
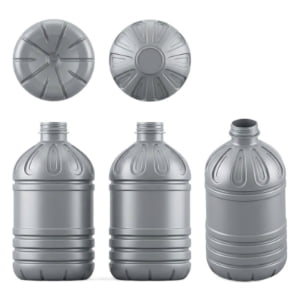
7. Step 6: Preform Transition Design – A word on Injection Molding.
I saw a factory adjust blow molding parameters for three days. Nothing worked. The machine was fine. The heating was perfect. We measured the unblown preform. The transition zone was terrible. The wall thickness jumped from 1.5mm to 3.5mm instantly. We changed the preform mold. The problem vanished.
Bad preform design causes permanent blowing defects. A steep taper in the transition zone blocks heat. You must optimize the injection mold. Use a gradual taper design. The wall thickness should increase smoothly from the neck to the body. This allows even infrared heating.
If you adjust the oven, the timing, and the pressure, but the shoulder remains white, the problem is not the blow molding machine. The problem is the preform shape. The problem comes from the injection molding machine.
Take a digital caliper. Measure your preform. Measure the neck wall. Then measure the wall right below the support ring. Then measure the main body wall. Look at the difference. If the wall jumps from 1.5mm to 3.5mm in a 2.0mm length, the taper is too steep.
A steep taper creates a massive physical barrier. The infrared light hits this thick wall. The light stops. The inner plastic never gets hot. The blow mold stretch rod hits this cold thick wall. It causes stress whitening. No oven setting can fix a badly designed preform. You cannot cheat physics.
Stop buying cheap preforms with bad designs. Don't do this. This is a mistake. You must control your bottle design from the very beginning. We use 3D simulation software in our factory. We design the preform transition zone with a gentle slope. The thickness changes gradually over a 10mm length. The infrared light penetrates the gradual slope easily. The heat spreads evenly.
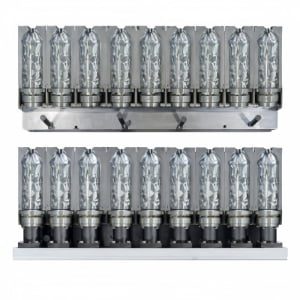
The quality of the injection mold determines the preform quality. We manufacture preform molds. We use high-quality steel. We compare materials.
| Mold Steel Type | Hardness | Thermal Conductivity | Polishability | Use Case |
|---|---|---|---|---|
| P20 Steel | Low | Average | Poor | Cheap toys, avoid for PET |
| 7075 Aluminum | Low | Excellent | Good | Prototype molds only |
| S136 Stainless Steel | HRC 48-52 | Good | Mirror Finish | Standard PET Preform Core/Cavity |
We use S136 stainless steel for the core and cavity. S136 allows a mirror polish. The smooth surface prevents material drag during injection.
We design excellent cooling channels inside the injection mold. If the cooling channels are bad, the preform cools unevenly inside the injection mold. The preform develops internal stress. When you reheat this preform in the blow molding oven, the internal stress releases. The shoulder turns white easily. Good cooling channels in the S136 cavity ensure uniform preform crystallization. A good preform makes a clear bottle.
8. Summary: Achieving the Delicate Balance Below the Neck Ring.
In my workshop, we teach operators a strict troubleshooting sequence. Do not guess. You follow the steps. Fixing bottle shoulder whitening is a game of balance. You must protect the threads, but you must bake the shoulder.
You solve localized cold stretching through a strict sequence. Check the cooling shield gap first. Then increase Zone 1 and 2 lamp power. Verify the exhaust fan speed. Finally, adjust the pre-blow timing and pressure. This sequence solves 95% of shoulder halo defects.
We fix this defect every week. The solution is always physical. The PET material requires heat and gentle force.
First, look at the machine physically. Measure the 1.5mm gap. If the gap is wrong, fix it. Do not touch the control screen until the physical gap is correct.
Second, look at the heat. Give Zone 1 the 80% to 90% power it needs. Stop the exhaust fan from stealing the heat.
Third, look at the air and rod. Give the rod a 0.05-second early air assist. Push the thick PET to the wall with 7 Bar pressure.
If all these fail, reject the preform batch. Tell the injection mold supplier to fix their taper design.
We save factories thousands of dollars using these exact steps. The PET material behaves predictably. You control the heat. You control the air. You get a perfect transparent bottle. The mechanical strength will pass every test.
Frequently Asked Questions (FAQ)
Q1: Why does the bottle body look clear, but only the shoulder is white?
The bottle body has a thinner wall and receives direct infrared heat. The shoulder is the thickest part (transition zone) and is shielded by the cooling rail. It stays below the 90°C stretching temperature, leading to localized cold stretching.
Q2: Can I just increase the overall oven temperature to fix the white shoulder?
No. Don't do this. Increasing the overall oven master temperature will overheat the thin bottle body. The body will become foggy, soft, and fail material distribution tests. You must only increase Zone 1 and Zone 2 lamps.
Q3: What happens if I set the pre-blow pressure too high to fix the shoulder?
If you increase the pre-blow pressure too much (e.g., above 10 Bar), the air will push too much plastic out of the preform base. The bottle bottom will become too thin and fail the burst pressure test. You must balance the pressure.
Q4: How do I know if my cooling shield is too low?
Use a 2.0mm metal feeler gauge. Slide it between the bottom of the preform support ring and the top of the cooling shield rail. If the gauge gets stuck or cannot enter, your shield is too low and is freezing the transition zone.
Q5: The machine parameters are perfect, but the shoulder is still white. What next?
Measure the preform transition zone with a digital caliper. If the wall thickness jumps sharply (e.g., 1.5mm to 3.5mm over a short distance), the injection mold design is bad. The steep taper blocks heat. You need a preform with a gradual taper.
Article Summary Matrix
| Step | Component | Target Value / Action | Defect if Incorrect | Solution Result |
|---|---|---|---|---|
| Step 1 | Cooling Shield Gap | 1.5mm - 2.5mm | Freezes transition zone | Allows IR heat penetration |
| Step 2 | Lamp Zone 1 & 2 | 80% - 90% Output | Insufficient thick wall heat | Reaches 95°C target temp |
| Step 3 | Exhaust Fans | Lower Inverter Hz | Cold air steals Zone 1 heat | Stabilizes oven air flow |
| Step 4 | Pre-Blow Timing | 0.05s - 0.1s Earlier | Rod dry-pulls cold plastic | Smooth radial expansion |
| Step 5 | Pre-Blow Pressure | Increase 1 - 2 Bar | Sudden high-pressure rip | Material touches mold early |
| Step 6 | Preform Design | Gradual Wall Taper | Physical barrier blocks heat | Even infrared absorption |