Hello. I am Vivian, the founder of PETmolder.com. I have worked in mold manufacturing in Zhongshan, China for 20 years.
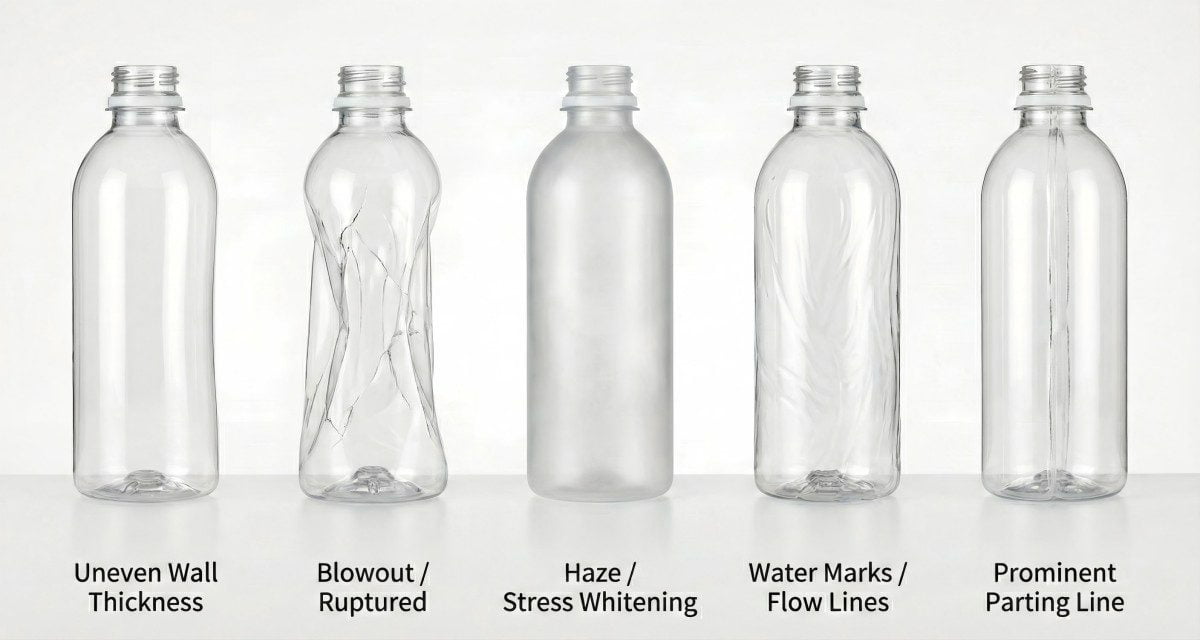
PET bottle defects have many causes. You must check the preform, the mold, the blowing machine, and the auxiliary equipment. You cannot blame just one thing.
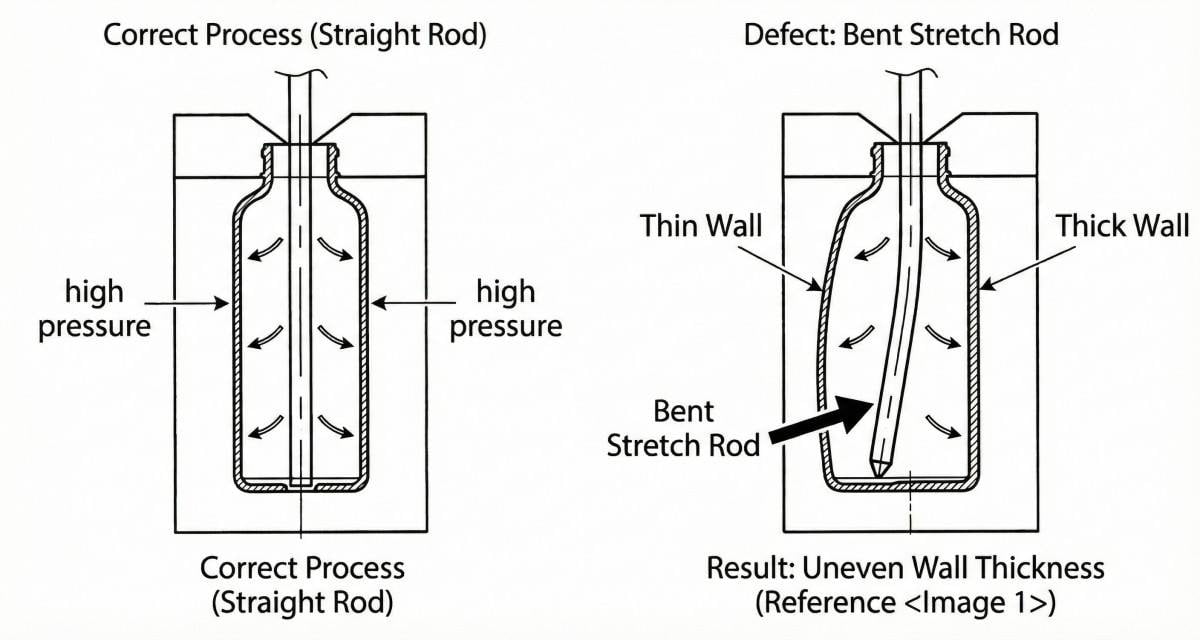
I have a client in Thailand. He bought a 48-cavity preform mold from me. He also bought 10 sets of blowing molds. He tried to produce a new 500ML bottle. The bottle wall thickness was uneven. He got angry. He blamed my molds. He said my molds could not make good bottles.
I understood his feeling. My team and I held a video conference with him. First, I told him to cut the preform. We measured it. The preform wall thickness was perfect. There was no core shift. A bad PET blow mold does not cause uneven thickness.
Next, I told him to check the blowing machine stretch rods. His workers removed the rods. They found the problem. The operator bent two stretch rods by mistake when changing the molds. They replaced the stretch rods. The machine blew perfect bottles.
I see cases like this every day. You must analyze every step of the blowing process. Stop guessing. My team and I wrote this guide. We will show you the exact causes of these hidden defects.
1. [Preform] Why does "Pearlescence" mean you pushed the PET stretch ratio past its natural limit?
I saw a factory full of white bottles. The bottles cracked when squeezed. The operators increased the oven heat. Do not do this. This is a mistake. You must fix the stretch ratio.
"Pearlescence" (stress whitening) happens when the preform stretches beyond its natural limit. The preform weight or design does not match the bottle volume. The PET chains break under extreme tension. This creates white spots. You cannot use high heat to fix this. You must use a correctly designed preform.
Deep Dive: Respect the Stretch Limit
In my workshop, I calculate preform stretch ratios daily. PET plastic is strong. But it has limits.
When you blow a bottle, the preform stretches in two directions. It stretches down (axial). It stretches out (hoop). We call this bi-axial orientation. This creates "Strain Hardening." Strain hardening makes the bottle strong.
But you cannot stretch PET too much. If a preform is too short or too thick for a large bottle, the stretch ratio gets too high. The plastic molecules pull apart. The physical chains break. The clear plastic turns white. It looks like a pearl. We call this Pearlescence.
This is a huge mistake. A pearlescent bottle is weak. It will burst.
The Mistake You Are Making:
Many factory workers see white spots. They think the preform is too cold. They turn up the oven temperature. Stop doing this. High heat masks the problem. High heat degrades the PET. The bottle still has too much internal stress.
The Physics of the Limit:
PET has a natural maximum stretch ratio.
- Axial Stretch limit is around 3.0.
- Hoop Stretch limit is around 4.5.
- The total Area Stretch Ratio should be between 8 and 10.
If you force the plastic to stretch to a ratio of 12, the plastic fails.
How to Fix It:
You cannot fix this on the blowing machine. You must change the bottle design and the preform specification. You need a heavier preform. Or you need a longer preform.
Preform Stretch Ratio Guide
| Bottle Volume | Wrong Preform Length | Correct Preform Length | Stretch Ratio | Result |
|---|---|---|---|---|
| 500ML | 70mm | 85mm | 12 (Too High) | White/Pearlescence |
| 500ML | 85mm | 85mm | 9 (Perfect) | Clear & Strong |
| 1500ML | 85mm | 115mm | 13 (Too High) | Bursts |
| 1500ML | 115mm | 115mm | 9.5 (Perfect) | Clear & Strong |
Stop using small preforms to blow big bottles. You are wasting money making scrap.
2. [Heating] How do aging IR lamps create invisible "Cold Spots" in your preform wall thickness?
In my workshop, I saw crooked bottles. One side was thick. One side was thin. The Infrared (IR) lamps looked bright. But they were bad. Rotate your lamps today.
Aging Infrared (IR) lamps lose their correct wavelength over time. They heat the outside of the preform, but the inside stays cold. This creates invisible "Cold Spots." During blowing, cold plastic does not stretch. Hot plastic stretches too much. You must rotate and replace old lamps regularly.
Deep Dive: Bright Does Not Mean Hot
Heating a preform is hard. Preform walls are thick. You must heat the outside and the inside at the same time.
New Infrared (IR) lamps emit a specific wavelength. This wavelength passes through the PET. It heats the inside wall and the outside wall simultaneously.
Old lamps change. After 3000 hours, the filament degrades. The light looks the same to your eyes. But the wavelength shifts. The new wavelength cannot penetrate the thick PET wall.
The Result of Aging Lamps:
The outside of the preform gets very hot (maybe 110°C). The inside of the preform stays cold (maybe 80°C). We call this a "Cold Spot." You cannot see it. But the plastic feels it.
When the 30-bar high-pressure air hits the preform, the hot outside stretches easily. The cold inside resists stretching. The material distribution becomes uneven. You get thin shoulders and thick bases.
Do Not Just Increase Voltage:
Factory operators always increase the lamp voltage. Stop doing this. High voltage on a bad lamp only burns the outside of the preform. The inside is still cold. You just create more scrap.
Vivian's Maintenance Rule:
You must track lamp hours. You must rotate lamps.
- Mark the date on every new lamp.
- Put new lamps in the critical zones (neck and base).
- Move older lamps to the body zone.
- Throw away lamps after 5000 hours.
A $20 lamp can ruin a $1000 order. Change your lamps.
3. [Blow Mold] Why do clogged base vent holes cause your bottles to fail the drop test?
My client told me his bottles broke during shipping. The bases cracked. His mold vents were dirty. Trapped air ruined the base strength. Clean the vents every day.
Clogged venting slots in the blow mold base insert trap air. Trapped air acts as a cushion. It prevents the hot PET from touching the cold metal base. The plastic stays hot and amorphous (soft). It does not crystallize properly. This weak base cracks easily. Precision blow molds need self-cleaning vents.
Deep Dive: Let the Air Escape
The base of a PET bottle is complex. It has feet. It has valleys. To form this shape, high-pressure air pushes the plastic into the base mold.
There is air inside the mold cavity. This air must escape. The base insert has tiny vent holes.
The Trapped Air Problem:
Dust, oil, and PET flakes clog these vent holes. When the vent is blocked, the air inside the cavity cannot escape. It gets trapped in the valleys of the base.
Trapped air is a big problem. The hot PET plastic pushes down. The trapped air pushes up. The plastic cannot touch the cold aluminum mold. A tiny air gap forms.
Why the Base Fails:
The mold is cold. Its job is to cool the plastic instantly. This instant cooling gives the PET base its strength.
If the plastic sits on an air cushion, it cools very slowly. Slow cooling keeps the PET in an amorphous state. Amorphous PET is soft and brittle.
You fill the bottle with water. You drop it on the floor. The weak base cracks. Water leaks out.
The Solution:
Stop ignoring mold maintenance.
- Inspect base vents daily.
- Use ultrasonic cleaning baths for base inserts weekly.
- Buy high-quality blow molds with smart venting design.
Good molds use micro-vents. The gaps are small (0.05mm). They let air out but keep plastic in.
4. [Blow Mold] Why do unbalanced cooling channels and cavity mismatch weaken your bottle structure?
In my workshop, I saw a 6-cavity blowing machine. Cavity 1 made perfect bottles. Cavity 4 made bottles with a thick, ugly parting line. The bottle crushed easily. This is caused by bad water cooling design. Buy molds with balanced cooling and identical precision.
Cheap blow molds have bad water channel design and low CNC precision. Uneven cooling overheats parts of the mold. The PET shrinks unevenly. This makes the parting line thick, ugly, and structurally weak. If multi-cavity sizes mismatch, bottle thickness changes. Premium molds must have balanced cooling channels and perfect cavity consistency.
Deep Dive: Thick Parting Lines and Cavity Mismatch
On a multi-cavity blowing machine, the biggest challenge is making every bottle exactly the same. Cheap blow molds cannot do this.
Mistake 1: Bad Cooling Causes Thick Parting Lines
It is hard to put water channels near the parting line (split line) of the blow mold. Cheap molds skip cooling this area. When the 30-bar air blows the hot PET against the mold, the parting line area gets too hot. The plastic there cools slowly. Slow-cooling PET continues to shrink.
The result is a thick, wide, ugly parting line on the bottle body. This is not just a cosmetic issue. A thick parting line means the plastic molecules stretched and crystallized differently. When you do a drop test or a pressure test, the bottle often splits exactly at this thick parting line.
Mistake 2: Cavity Mismatch
Cheap mold factories use manual polishing. Hand strength varies. Cavity 1 might be 500.0ML. But the worker polished Cavity 4 too much, making it 501.5ML.
This tiny difference is deadly. The blowing machine uses the same preform and the same air pressure to blow into different-sized cavities. A larger cavity means the PET plastic must stretch thinner. Ultimately, the bottle from your Cavity 4 has thinner walls, a weaker structure, and fails the test.
The Solution:
Stop buying poorly made molds. You must control the internal consistency of the mold.
- Conformal Cooling: Water channels must follow the bottle shape, including the parting line, to ensure 100% even cooling.
- CNC Precision: Never allow manual cavity polishing. You must use high-precision CNC machining to keep cavity-to-cavity error below 0.02 mm.
Blow Mold Quality Comparison
| Feature | Cheap Blow Mold | Premium Blow Mold |
|---|---|---|
| Water Layout | Simple straight holes (many hot spots) | Conformal cooling channels |
| Parting Line Look | Thick, rough to the touch | Smooth, almost invisible |
| Cavity Size Error | > 0.1mm (Hand polishing) | < 0.02mm (CNC Machining) |
| Bottle Test Result | Some pass, some fail | 100% pass on all cavities |
Consistency equals profit. An ugly parting line caused by bad water cooling will destroy your brand's premium image.
5. [Blowing Machine] Why is the conflict between Stretch Rod speed and Pre-blow timing causing off-center gates?
In my workshop, I saw off-center bases. The bottles fell over on the conveyor. The stretch rod hit the base too late. Fix the millisecond timing today.
Pre-blow air and stretch rod movement must sync perfectly. If Pre-blow starts before the rod reaches the bottom, the air blows the plastic randomly. If Pre-blow is too late, the rod punches the base. This millisecond-level mismatch causes the gate to drift off-center. You must calibrate your machine cams.
Deep Dive: The Millisecond War
Blowing a bottle happens in two steps. Step one is axial stretch. The stretch rod pushes the preform down. Step two is radial stretch. Air blows the preform out.
These two steps happen at almost the same time. The timing is critical.
Mistake 1: Pre-blow is too early.
The rod starts moving down. Before it hits the bottom, the pre-blow air turns on. The air creates a bubble. The bubble moves freely. It swings left or right. The stretch rod cannot control it. The bottom gate lands off-center.
Mistake 2: Pre-blow is too late.
The rod pushes all the way down. The pre-blow air is off. The rod punches the thick preform base directly. It stretches the base mechanically without an air cushion. This creates white stress marks and moves the gate.
The Solution:
You need perfect synchronization.
The pre-blow air should start exactly when the stretch rod has covered 80% to 90% of its distance. The air and the rod must work together.
Do not guess the settings. Put the machine in slow-motion mode. Watch the stretch rod. Adjust the pre-blow delay timer. A perfectly centered gate means a bottle that stands straight.
6. [Blowing Machine] Why does valve-block "Dead Volume" prevent your custom logo from forming completely?
My client told me his new bottle logo was flat. The corners were round. The air pressure dropped too fast. You must shorten the air path.
"Dead volume" is the distance between the blowing valve and the mold cavity. A long distance causes a pressure drop. The PET cools down before the high-pressure air can push it into sharp corners or logos. This leaves unformed details. You need compact valve-blocks and aggressively vented molds to fix this.
Deep Dive: Push the Plastic to the Wall
Custom bottles have logos, ribs, and sharp edges. To form these, the plastic must hit the mold wall while it is still hot. It needs instant high pressure.
Air travels from the blowing valve block, through a nozzle, into the preform. The space inside this path is called "Dead Volume."
The Physics of Pressure Drop:
If your blowing machine has a bad design, the valve is far away from the mold. The dead volume is large.
You open the 40-bar valve. The air must fill this large dead space first. By the time the air reaches the preform, the pressure has dropped.
It takes an extra 0.2 seconds to reach peak pressure. In 0.2 seconds, the thin PET wall hits the cold mold and freezes.
Frozen plastic does not move. The low pressure cannot push the frozen plastic into the tiny letters of your logo. Your logo looks soft and unformed.
Advice for Sharp Logos:
You cannot redesign your machine easily. But you can do two things:
- Shorten Air Path: Inspect the nozzle seal. Ensure no leaks.
- Mold Compensation: Add extra venting holes exactly behind the logo area. This lets air out faster. The plastic moves faster.
For complex bottle designs, contact a factory service expert. We know how to vent a mold for sharp details.
7. [Auxiliary] Can microscopic oil vapor from your 30-bar compressor chemically degrade your bottle clarity?
I smelled bad bottles in my workshop. The preforms turned yellow. They looked cloudy. The air compressor leaked oil. Change your high-pressure filters immediately.
Many clients ignore the Air Compressor. If the high-pressure filter fails, microscopic oil vapor enters the hot preform. Oil mixed with hot PET causes a chemical reaction. The plastic turns yellow, becomes cloudy, and emits a terrible smell. Clean, dry, oil-free air is as important as a good mold.
Deep Dive: Invisible Poison
Blowing air comes directly into contact with food packaging. It must be clean.
Most factories use oil-lubricated high-pressure compressors. This is fine if the filters work. But filters degrade.
When a 30-bar oil filter fails, it creates a mist of microscopic oil vapor. This mist enters the blowing machine. It sprays inside the hot preform.
The Chemical Reaction:
PET plastic is sensitive to heat and chemicals. The preform is 100°C. The oil vapor hits the hot plastic. It bakes into the surface.
This causes chemical degradation. The clear plastic turns a dirty yellow color. A cloud of haze appears inside the bottle.
The worst part is the smell. The burned oil stays inside the bottle. You cap the bottle. Later, the consumer opens it. The drink smells like machine oil. Your brand is dead.
Do Not Ignore Filters:
Stop saving money on compressor maintenance.
- Use activated carbon filters for the blowing air line.
- Install oil-moisture traps at the machine inlet.
- Check filter gauges daily.
If your air is dirty, your best mold is useless.
8. [Auxiliary] Why is low water flow rate (not just temperature) causing your bottles to shrink post-ejection?
I saw bottles shrink on the belt. They jammed the packaging machine. The chiller was at 10°C. But the flow rate was too slow. Buy a high-flow water pump.
Setting the chiller to 10°C is useless if the flow rate is too slow. Low flow creates "Laminar Flow," which traps heat. You need high speed to create "Turbulent Flow" for proper heat transfer. Slow water means the bottle ejects too hot and shrinks on the conveyor belt. Use high-flow pumps.
Deep Dive: Turbulence is Good
Cooling the blow mold is not just about temperature. It is about speed.
You set your chiller to 10°C. You think the mold is cold. But the bottles come out warm. They shrink as they travel down the conveyor belt. They do not fit into the boxes.
Why? Because your water flow is too slow.
Laminar vs. Turbulent Flow:
Slow water moves in straight layers. We call this Laminar Flow. The water touching the hot steel gets hot. The water in the center stays cold. The heat does not transfer well.
Fast water crashes around inside the pipe. We call this Turbulent Flow. It mixes the hot and cold water instantly. It rips the heat away from the mold.
The Mistake:
Cheap factories buy small water pumps. The pressure is too low. Calcium builds up in the pipes. The flow drops.
The mold stays hot. The plastic exits the machine at 60°C instead of 40°C. The PET continues to shrink outside the machine.
The Solution:
Stop looking only at the temperature gauge. Look at the flow meter.
You need minimum 5 bars of water pressure for the mold lines. You need oversized hoses. You need descaling maintenance. Turbulent flow gives you cold, stable bottles.
FAQ: 5 Core Questions About PET Bottle Blowing Defects
Q1: Why does my PET bottle have a thick neck and a thin base?
This happens when the preform oven is too hot at the bottom and too cold at the top. The hot base stretches first and becomes thin. The cold neck resists stretching and stays thick. Adjust your lamp profile.
Q2: What causes "Drop Impact Failure" in my bottles?
Drop failures usually come from poor base cooling. If the mold base insert is warm, or if vents are clogged, the base does not crystallize correctly. It stays amorphous and brittle.
Q3: Can a bad preform mold cause my bottles to tip over?
Yes. If the injection preform mold has "Core Shift," the preform wall is uneven. The thin side stretches faster than the thick side. The bottle shape warps, and the base tilts.
Q4: Why does my blowing machine make a loud popping noise?
A loud pop usually means a blown bottle burst inside the mold, or the high-pressure exhaust silencer is blocked. Check your preform stretch limit and clean the machine silencers.
Q5: How often should I check my stretch rods?
Check your stretch rod alignment every time you change molds. A bent rod will scratch the preform or punch the base off-center.
Summary Table: Blowing Defects, Causes, and Solutions
| Defect Symptom | Root Cause Category | Vivian's Factory Solution |
|---|---|---|
| Pearlescence (White spots) | Preform Design | Use a heavier or longer preform. Stop overheating. |
| Uneven Wall Thickness | Heating System | Rotate aging IR lamps. Fix invisible cold spots. |
| Base Cracks (Drop test fail) | Blow Mold Base | Clean base vent slots daily to stop air cushion. |
| Thick Parting Line & Weak Body | Blow Mold Cooling & Precision | Use conformal cooling. Ensure CNC cavity precision. No hand polishing. |
| Off-Center Base Gate | Machine Sync | Calibrate Stretch Rod speed with Pre-blow air timer. |
| Unformed Logo / Round edges | Machine Air System | Reduce valve dead volume. Add venting behind logos. |
| Yellow Tint & Bad Smell | Auxiliary (Compressor) | Replace high-pressure oil filters. Dry the air. |
| Post-Ejection Shrinkage | Auxiliary (Chiller) | Upgrade to high-flow pumps to create turbulent cooling. |
Would you like my team to analyze your bottle defect and find the hidden cause? Contact Vivian for factory service today.
-3-300x300.jpg)