I am Vivian, the Overseas Manager and factory founder of petmolder.com, with 20 years of experience in mold manufacturing in Guangdong, China. Last week, I received an urgent message from an overseas client in Nigeria. He was operating a 4-cavity linear blow molding machine, and his bottles were deforming severely right off the production line. Because PET deformation is triggered by dozens of intersecting mechanical and thermodynamic variables, I did not guess the cause. I demanded specific engineering data regarding his heating zone percentages, chiller output temperatures, and stretch rod gap clearances.
After analyzing the physical evidence and the machine parameters, the root cause was entirely mechanical: one of the stretch rods inside the machine was slightly bent, pushing the material off-center. Many overseas factory managers do not know how to diagnose these issues because a blow molding line involves continuous, high-speed physics. Operators often randomly adjust heating lamps or blowing pressures, which only creates more scrap. Stop guessing and adjusting machine parameters blindly. This is a fatal error in production management that wastes raw materials and destroys your profit margins.
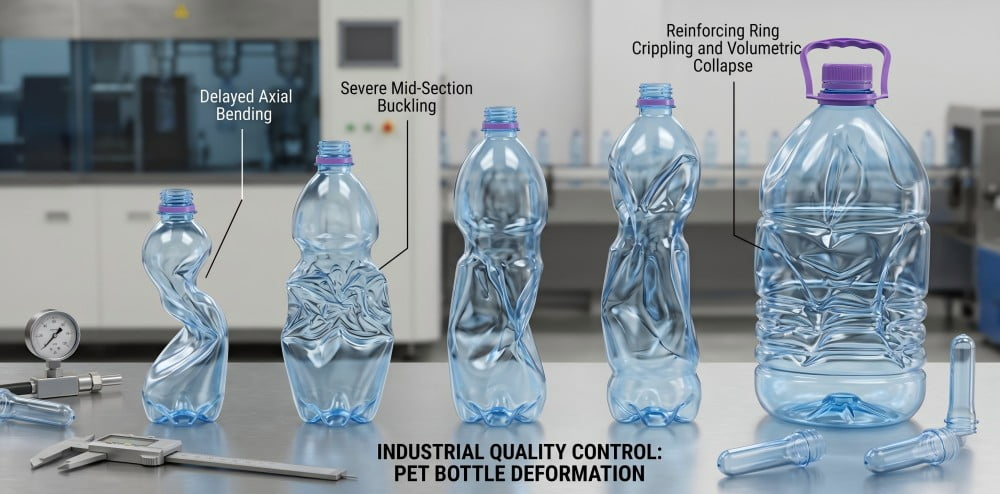
Today, my engineering team and I will dissect PET bottle deformation using a strict "Timeline of Deformation" logic. By tracing structural defects from the exact moment they appear—immediate ejection, delayed conveyor bending, or post-filling shrinkage—we provide overseas engineers with a highly detailed, data-driven diagnostic guide to stabilize their PET blow mold production lines.
1. Understanding the Root Cause: PET Physics and Thermodynamic Deformation
PET deformation is fundamentally a thermodynamic and molecular failure. PET plastic features a glass transition temperature (Tg) of roughly 70°C to 80°C. If a bottle is ejected before sufficient cooling, or if localized heat exceeds the mold's cooling capacity, internal residual stress releases, causing immediate visible geometric distortion.
To successfully troubleshoot deformation, you must first understand the material science of Polyethylene Terephthalate (PET). During the two-stage blow molding process, a cold, amorphous preform is heated in an infrared oven to approximately 100°C to 110°C. At this precise temperature window, the plastic becomes highly elastic. High-pressure blowing air (typically 25 to 30 bar) then forces this soft material against the cold steel walls of the mold cavity, inducing bi-axial molecular orientation.
The mold's primary job is not just to shape the plastic, but to instantly freeze this molecular orientation. The chilled water running through the mold must rapidly drop the plastic's temperature well below its Tg point (70°C). If the plastic remains above this temperature threshold upon mold opening, the molecular chains retain mobility. The residual stress—created when the material was violently stretched—will force the plastic to contract back towards its original preform shape.
Do not ignore the Intrinsic Viscosity (IV) of your resin. Standard bottle-grade PET has an IV of 0.78 to 0.84. If your preforms absorb moisture during storage, the IV drops during heating, altering the Tg point and making the bottle highly susceptible to thermal deformation. Stop processing preforms that have been exposed to high humidity without proper climate control.
2. Immediate Deformation: The Balance of Mold Cooling Time and Water Channel Efficiency
Immediate deformation upon mold ejection indicates a critical cooling failure. Aggressively shortening cycle times prevents the plastic core from solidifying. Inadequate conformal cooling channels, mineral scale blockages, or chilled water temperatures exceeding 12°C prevent necessary heat dissipation, causing the soft bottle to warp instantly upon release.
The first scenario on our diagnostic timeline occurs the instant the mold opens. The bottle drops onto the chute and immediately shrinks, twists, or exhibits severe axial deflection. This is a direct physical symptom of inadequate heat transfer.
Many overseas factory managers attempt to artificially inflate their daily output by reducing the cooling time parameter on the PLC (Programmable Logic Controller) interface. Stop sacrificing cooling time for machine speed. If the cooling time is too short (e.g., reduced from 1.5 seconds to 0.8 seconds on a thick-walled bottle), the outer skin of the bottle may feel rigid, but the core thickness of the plastic remains above 75°C. Once the physical clamping force releases, the bottle warps instantly.
Furthermore, the issue frequently lies within the mold's internal engineering. Standard cheap molds utilize straight-drilled water lines. For complex shapes, these are mathematically insufficient. We engineer conformal cooling channels that closely follow the 3D contour of the bottle, ensuring uniform heat extraction.
You must also verify the fluid dynamics of your cooling system.
- Water Temperature: Industrial chillers must supply water at 8°C to 12°C. I saw an overseas factory supplying 18°C water because their chiller was undersized; their bottles warped continuously.
- Flow Rate (Turbulence): The water must flow fast enough to achieve a turbulent state (Reynolds number > 4000). Slow-moving water forms an insulating boundary layer inside the channel, stopping heat transfer.
- Maintenance: Mineral scale builds up inside the channels over time. A 1mm layer of scale reduces cooling efficiency by 30%. Flush your molds with descaling acid every six months.
3. Neck and Thread Distortion: Thermal Isolation Failure in the Heating Oven
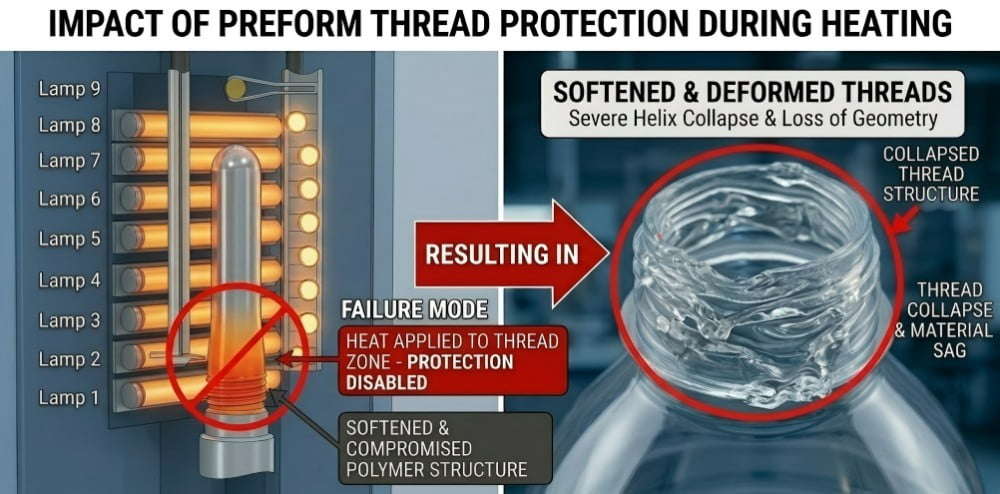
Neck and thread distortion causes fatal downstream leaking and capping failures. This occurs when thermal isolation fails in the infrared heating oven. If neck shields lack sufficient chilled water flow, ambient heat transfers to the threaded area, causing the mechanical transfer grippers to permanently crush the softened threads.
The threaded neck of the bottle is fully formed by the preform mold during the injection molding phase. During the stretch blow molding process, the neck must strictly maintain its original dimensional tolerance. It must never be heated, and it must never be stretched.
When bottles exhibit oval-shaped necks, crushed threads, or capping failures on the filling line, the root cause is entirely located in the infrared heating oven. The oven utilizes continuous water-cooled neck shields (cooling rails) to protect the threaded area while the body of the preform absorbs intense infrared radiation.
If the chilled water flow to these shields is restricted, or if the oven's exhaust ventilation fans fail, ambient oven heat migrates upward. Once the neck temperature surpasses 70°C, the PET softens. When the mechanical transfer arms grab the neck with high clamping force to move it into the mold, they physically crush the geometric tolerance of the threads.
Expert Warning: Do not process preforms that have been sitting in the oven during a machine stoppage. If the machine halts for even 60 seconds, the residual heat in the oven will bake the necks. Always purge the oven and discard those preforms before resuming production.
4. Delayed Deformation: Release of Residual Stress and Uneven Wall Thickness
Delayed deformation on the conveyor belt is caused by uneven wall thickness. Incorrect infrared heating profiles cause asymmetrical material distribution. Thicker sections retain heat longer and cool slower than thinner sections. This thermodynamic differential creates internal pulling forces, gradually bending the bottle over several minutes.
The second scenario is delayed deformation. The bottle looks structurally perfect and straight when it drops from the mold. However, after sitting on the conveyor belt for three to five minutes, the bottle begins to curve slightly to one side, exhibiting axial deflection.
This delayed bending is entirely dictated by asymmetrical material distribution. The heating oven utilizes vertically stacked infrared lamps (typically 6 to 8 zones). If your heating profile is configured incorrectly—for example, setting zone 3 to 85% intensity and zone 4 to 30%—the temperature gradient is too steep. One side of the rotating preform will stretch more than the other during blowing. The resulting bottle will have a thick wall on the left (e.g., 0.45mm) and a thin wall on the right (e.g., 0.15mm).
In thermodynamics, thicker plastic masses retain more thermal energy. As the bottle travels down the conveyor at ambient factory temperatures, the thick side takes significantly longer to cool and shrink than the thin side. This cooling time differential creates immense internal stress. The solidifying material physically pulls against itself, bending the structure.
| Defect Symptom | Physical Mechanism | Root Cause Identification | Engineering Solution |
|---|---|---|---|
| Delayed Axial Bending | Differential cooling rates causing internal stress | Asymmetrical wall thickness | Re-calibrate specific infrared heating lamp percentages; verify preform rotation. |
| Localized Flattening | Hot spots releasing residual stress | Specific lamp intensity too high | Lower voltage percentage on the corresponding heating zone. |
| Cloudy/White Patches | Cold stretching (Stress whitening) | Preform core temperature too low | Increase overall oven temperature; verify the stretch ratio limits. |
Do not assume a straight bottle out of the mold guarantees a passed QA check. You must implement strict sectional wall thickness measurements using an ultrasonic thickness gauge. A standard 500ml water bottle should maintain a uniform thickness of approximately 0.25mm on the shoulder and 0.35mm on the main body.
5. Base Roll-Out and Instability: Stretch Rod Alignment and Pre-blow Timing
Base roll-out and standing instability stem from mechanical misalignment or incorrect pre-blow timing. If the stretch rod is bent or off-center, or if pre-blow air deploys too early, un-crystallized material is pushed away. The base cannot form properly, bulging outward under internal high pressure.
A bottle that cannot stand completely flat on a table is a rejected product. Base deformation, commonly referred to as "base roll-out," "convex bottom," or "rocking base," is a frequent and highly disruptive failure.
In my workshop, we use dial indicators to calibrate the exact mechanical zero-point of the stretch rods. The stretch rod must descend perfectly aligned with the central axis of the mold. It must push the preform gate to the absolute dead-center of the mold base. The mechanical gap between the tip of the fully extended stretch rod and the bottom of the mold cavity must be precisely 1.5mm to 2.0mm.
If the stretch rod is bent, vibrating, or mechanically misaligned, it pushes the thick, un-crystallized plastic off-center. When high-pressure air (upwards of 30 bar) is injected, this off-center, thick material fails to cool at the same rate as the surrounding plastic. Upon ejection, internal air pressure forces this weak, warm spot outward.
Additionally, pre-blow timing is a critical variable. Pre-blow introduces a low-pressure air volume (usually 5 to 10 bar) to separate the soft plastic from the stretch rod before the final high-pressure blow. If the pre-blow solenoid valve is triggered too early or at too high a pressure, it prematurely balloons the plastic, tearing material away from the base area. The petaloid "feet" of a carbonated bottle will fail to form completely. Adjust your pre-blow cam parameters and delay the timing before blaming the mold structure.
6. Post-Filling Deformation: Vacuum Pressure in Hot Filling and Cooling Tunnel Management
Post-filling deformation, known as paneling, occurs during hot-fill processes. When 85°C liquid cools inside a sealed bottle, volume contraction creates a massive internal vacuum. Preventing this requires specialized S136 stainless steel heat-set molds and specific vacuum absorption panels engineered into the bottle geometry.
The third scenario occurs outside the blow molding machine, during the downstream liquid filling process. When producing juices, teas, or sports drinks, factories utilize hot-filling processes, injecting liquid at temperatures between 85°C and 92°C to ensure commercial sterilization.
After the hot liquid is sealed with a plastic cap, the bottle travels through a long cooling tunnel. As the liquid temperature drops from 85°C to ambient levels (e.g., 25°C), the fluid volume contracts. This physical contraction creates a massive negative vacuum pressure inside the sealed container. If the bottle design is merely a smooth cylinder, the vacuum force will violently suck the sidewalls inward, collapsing the bottle. This structural failure is known as paneling.
You cannot fix paneling by adjusting the blow molding machine parameters. It requires foundational structural engineering.
- Material & Mold: Hot-fill bottles mandate the use of specialized S136 stainless steel molds and a machine equipped with a heat-setting process. The mold is heated with circulating hot oil (usually around 120°C) to increase the PET crystallinity, preventing the bottle from shrinking when hot liquid hits it.
- Structural Geometry: The bottle structure must integrate engineered "vacuum panels"—specific flat or ribbed sections designed to safely flex inward, absorbing the vacuum without destroying the bottle's overall vertical geometry.
Alternative Solution: If marketing refuses to incorporate vacuum panels into the design, you must utilize liquid nitrogen dosing. Injecting a precise drop of liquid nitrogen into the headspace immediately before capping pressurizes the bottle to approximately 2 bar, physically preventing vacuum collapse.
7. Environment-Induced Deformation: High-Temperature Storage and Top-Load Failure Analysis
Environmental deformation occurs when empty bottles are stored in high-temperature warehouses approaching the PET glass transition point. Furthermore, if structural rigidity is insufficient, top-load failure occurs during palletizing. Engineers must optimize bottle shoulders and incorporate strengthening ribs to withstand minimum vertical compression forces.
Do not ignore your logistics and storage environments. Even if your stretch blow molding process operates flawlessly, extreme external environmental factors will deform PET bottles.
If an overseas factory stores empty, thin-walled PET bottles in an unventilated tin-roof warehouse during summer, ambient temperatures can easily exceed 55°C to 60°C. Prolonged exposure to temperatures approaching the Tg point will cause the oriented PET molecules to relax. This leads to generalized volumetric shrinkage and distortion before the bottle ever reaches the filling line.
Furthermore, filled bottles must endure severe vertical compression during palletizing and transportation. This metric is called top-load pressure. A standard 500ml water bottle must withstand a minimum of 15kg to 20kg of top-load force before collapsing. If the bottle's shoulder angle is too shallow, or if the main body lacks structural strengthening ribs, the base of the bottle above will crush the neck of the bottle below.
Overseas buyers must demand top-load physical testing data during the mold design phase. Adding precise horizontal ribs and steepening the shoulder angle significantly increases the vertical crush resistance of the container without adding raw material weight.
8. Correction and Prevention: A 4-Step Standard Procedure to Stabilize PET Blow Molding Quality
Stabilizing PET blow molding quality requires a strict 4-step diagnostic procedure. Factory managers must verify chiller fluid dynamics, calibrate the stretch rod mechanical zero-point, utilize sectional weight analysis to monitor thickness, and consistently clean mold venting slots to prevent localized thermal insulation.
Troubleshooting deformation requires a systematic, data-driven approach. Stop altering multiple machine parameters simultaneously; you will lose your baseline data. Implement this strict 4-step Quality Assurance procedure in your facility to isolate and eliminate the variables causing deformation.
| Procedure Step | Specific Action Required | Target Engineering Metric | Expected Defect Prevention |
|---|---|---|---|
| 1. Thermal Verification | Audit industrial chiller and mold channels | Water supply at 8°C-12°C, pressure >4 bar, turbulent flow | Prevents immediate ejection warping and base roll-out. |
| 2. Mechanical Calibration | Check stretch rod alignment and base gap | Rod absolutely centered, gap at base exactly 1.5mm | Prevents off-center gates and rocking bases. |
| 3. Material Distribution | Conduct Sectional Weight Analysis | Shoulder/Body/Base weight ratio meets rigid specifications | Prevents delayed conveyor bending and thin-wall bursting. |
| 4. Mold Maintenance | Clean parting lines and micro-venting slots | Zero trapped air inside cavity corners | Prevents incomplete forming and localized thermal insulation. |
If a mold's micro-venting slots (typically 0.1mm deep) are clogged with PET dust or machine grease, the trapped air cannot escape during the high-pressure blow. This trapped air creates a severe thermal insulation barrier. The hot plastic cannot physically touch the chilled steel, resulting in localized heat retention and deformation upon ejection. Maintain your industrial tools, rely on strict mechanical data, and your deformation issues will be systematically eliminated.
Frequently Asked Questions (FAQ)
Q1: Why does a PET bottle warp immediately after it drops from the mold?
Immediate warping is a direct sign of inadequate cooling. The bottle is ejected while the PET material core is still above the glass transition temperature (Tg). This can be resolved by increasing the cooling time on the PLC, lowering the chilled water temperature to 8°C, or chemically descaling the mold's water channels to remove insulating blockages.
Q2: How can I prevent the bottle base from bulging outward (base roll-out)?
Base bulging indicates that the material at the bottom was not properly stretched and cooled. Ensure the stretch rod is mechanically aligned with the exact center of the mold and the tip gap is 1.5mm. Additionally, verify that the pre-blow pressure is not set too high or deployed too early, which prematurely pushes un-crystallized material away from the base.
Q3: Why do my bottles collapse or suck inward after capping?
This defect, known as paneling, frequently occurs during hot-fill processes. As the 85°C hot liquid cools to room temperature, it volume contracts and creates a massive vacuum inside the sealed bottle. To solve this, the bottle design must structurally include specific vacuum panels that flex to absorb this negative pressure, and the mold must be a heat-set type.
Q4: Can storing empty PET bottles in a hot warehouse cause deformation?
Yes. If the storage environment reaches temperatures close to the glass transition temperature of PET (typically above 60°C to 70°C in unventilated spaces under a metal roof), the residual stress within the thin plastic walls will release. This causes the empty bottles to visibly shrink or warp before they are ever used.
Q5: Does an uneven wall thickness contribute to delayed bending?
Absolutely. If a bottle has uneven wall thickness due to an incorrect infrared heating profile, the thicker side cools slower than the thinner side while traveling on the conveyor. This thermodynamic temperature differential creates internal pulling forces as the material solidifies, causing the bottle to gradually curve towards the thicker side.
Article Summary Matrix
| Deformation Timeline | Defect Symptom | Core Engineering Cause | Targeted Corrective Action |
|---|---|---|---|
| Immediate (Ejection) | Overall warping/shrinkage | Core temperature > Tg point; inadequate mold cooling | Increase cooling time; audit chiller temp (8°C-12°C); clean water channels. |
| Immediate (Ejection) | Oval neck / Thread damage | Oven neck shields failing; ambient heat softening threads | Increase chilled water flow to oven neck rails; improve oven exhaust ventilation. |
| Delayed (Conveyor) | Axial bending | Uneven wall thickness causing differential cooling rates | Re-calibrate specific infrared heating lamp intensity to distribute material evenly. |
| Delayed (Conveyor) | Base roll-out / Rocking | Bent stretch rod; incorrect pre-blow timing/pressure | Mechanically align stretch rod to dead center; delay pre-blow cam trigger. |
| Post-Filling | Sidewall paneling (Collapse) | Fluid contraction creating vacuum pressure in hot-filling | Redesign bottle with physical vacuum absorption panels; use S136 heat-set mold. |
| Logistics/Storage | Top-load crushing | Insufficient structural rigidity under vertical pallet pressure | Optimize shoulder angles; add horizontal strengthening ribs to bottle design. |
| Logistics/Storage | Empty bottle shrinkage | Warehouse ambient temp approaches PET Tg point (70°C) | Improve warehouse ventilation; avoid storing empty bottles in extreme heat. |
Related Articles for Further Reading:
- Caps Won't Seal? A 6-Step Protocol to Fix PET Bottle Neck Deformation & Ovality
- PET Bottle Volume Shrinkage Analysis: Why Did Your 500ml Bottle Drop to 498ml Overnight?
- PET Bottle Base Rollout Analysis: A 6-Step Guide to Fixing Center Gate Bulging and Rocker Bottoms
- Why Are Stubborn PET Bottle Defects Draining Your Blowing Line Profits?
- PET Blow Mold Design Guide: Preventing Bottle Stress Cracking via Base Geometry
-4-300x300.jpg)