Resolving PET bottle scratches requires reverse-tracing the production line. Scratches originating from the preform appear blurred after blowing, while mold-induced scratches possess sharp edges and precise locational repeatability. Mechanical scratches on the neck indicate gripper misalignment, whereas downstream conveyor friction causes random exterior scuffing.
Yesterday, I received an urgent technical inquiry from a client operating a beverage plant in Morocco. He reported severe longitudinal scratches on his 500ml premium water bottles. Because the photographic evidence was optically distorted, remote diagnosis was challenging. I instructed him to halt production and execute a systematic reverse-tracing protocol: isolating the preform, the blow mold, the stretch blow molding machine, and the downstream air conveyors. Through systematic elimination, we identified mechanical misalignment in the transfer grippers, resolved the friction issue, and restored optimal production.
In my 20 years of managing PET mold manufacturing at petmolder.com in Guangdong, China, this scenario is exceedingly common. When a defect appears, factory operators often instinctively blame the blow mold, assuming the tooling cavity dictates all surface finishes. However, a scratch is an abrasive physical phenomenon influenced by multiple mechanical variables. Today, my engineering team and I will outline the precise diagnostic framework to identify the true origin of PET bottle scratches.
What is a PET Bottle Scratch Defect?
A PET bottle scratch is a physical abrasion or optical distortion on the polymer surface caused by mechanical friction, tooling defects, or handling damage. These surface imperfections disrupt the bi-axial molecular orientation, compromising the visual clarity and structural integrity of the final packaging.
In industrial blow molding, a scratch is not merely an aesthetic flaw; it represents localized structural damage. Polyethylene terephthalate (PET) is an amorphous polymer that achieves clarity and strength through bi-axial stretching. When the surface of a PET preform or a blown bottle encounters kinetic friction against a harder material—such as unpolished steel guide rails, misaligned aluminum grippers, or abrasive dust—the polymer chains are physically displaced.
For clients transitioning high-end cosmetics or premium water lines, surface clarity is non-negotiable. As discussed in our analysis on From Glass to PET: 4 Crucial Mold Design Rules for Your Premium Packaging Conversion, any deviation in surface refraction immediately signals a quality failure to the end consumer. A deep mechanical scratch introduces a stress concentration point, which lowers the overall burst pressure threshold of the container. To eliminate these defects, operators must understand that scratches can be introduced at four distinct nodes in the production cycle: the preform injection phase, the heating and transfer phase, the stretching and blowing phase, and the downstream ejection phase.
How to Troubleshoot PET Bottle Scratches: The Golden Rule of Reverse Tracing
Do not arbitrarily adjust blow molding machine thermodynamic parameters when scratches appear. Implement a strict reverse-tracing protocol: inspect the finished bottle prior to the air conveyor, evaluate the mechanical transfer grippers, verify the mold cavity surface, and examine the unheated preform inventory.
A fatal mistake in factory operations is attempting to resolve a mechanical abrasion by altering the heating profile or blowing pressure. A scratch is a physical gouge; thermodynamic adjustments will not heal damaged polymer. When surface defects appear, stop the machine immediately and follow the "Golden Rule of Reverse Tracing."
You must physically walk backward through your production line. Assume every component is innocent until proven guilty through physical evidence.
- Node 1 (Ejection): Intercept the bottle immediately as it leaves the mold cavity, before it contacts any downstream handling equipment.
- Node 2 (Blowing): Examine the interior and exterior of the intercepted bottle to determine if the abrasion occurred during the high-pressure stretching phase.
- Node 3 (Transfer): Inspect the preform heating mandrels and the mechanical grippers that transfer the heated polymer into the mold.
- Node 4 (Source): Retrieve unheated preforms directly from the supply hopper or shipping carton to check for pre-existing transit damage.
By isolating each node, you eliminate variables. Do not replace tooling or order spare parts until the exact point of friction is confirmed.
Preform Scuffing vs. Mold Cavity Defects: Analyzing Stretch Marks
Preform scuffing results in blurred, elongated marks on the final bottle due to bidirectional stretching. Conversely, mold cavity defects produce sharp, distinct scratches that exhibit strict locational repeatability, appearing in the exact same coordinate on every bottle produced from that specific cavity.
Differentiating between a damaged preform and a damaged blow mold requires analyzing the visual geometry of the scratch.
Suspect 1: The Preform (Transportation and Handling)
Stop the machine and retrieve several unheated preforms from the hopper prior to the infrared oven. Inspect them under a direct light source. Preforms are frequently shipped in bulk octabins. During transit, the rigid PET bodies rub against each other, creating micro-scuffs. Furthermore, as they travel down the unscrambler rails toward the heating oven, friction can induce deeper longitudinal scratches.
When a preform with a 2mm surface scratch enters the blow mold, the mechanical stretch rod and 30-bar blowing air stretch the polymer axially and radially. The 2mm scratch expands accordingly, appearing on the final bottle as a hazy, whitened, or blurred streak. It lacks sharp edges because the physical gouge has been stretched over a larger surface area. If you observe blurred stretch marks, the abrasion occurred before the preform entered the mold. This highlights the importance of upstream quality control, a concept detailed in Why Do Hidden PET Preform Mold Defects Kill Your Factory Profits?.
Suspect 2: The Blow Mold Cavity (Tooling Damage)
If the scratch on the final bottle is sharp, distinct, and highly defined, the damage occurred after the polymer was fully stretched against the mold wall. To confirm mold damage, collect samples from multiple blowing cycles and record the cavity numbers.
If the deep scratch appears only on bottles ejected from Cavity #3, and the scratch is located at the exact same geometric coordinate on every sample, the mold is definitively at fault. Common causes include:
- The internal cavity polish was compromised by an operator using abrasive cleaning tools.
- Foreign particulate matter (like metallic dust) is trapped inside the cavity.
- A parting line mismatch. If the two halves of the mold do not align with a ±0.02 mm tolerance during the high-pressure clamping phase, a sharp microscopic edge is formed, which scrapes the bottle upon ejection.
To mitigate mold-induced scratches, we recommend utilizing S136 mirror-polished stainless steel for premium packaging molds, as it offers superior surface hardness compared to standard 7075 aluminum, resisting daily maintenance abrasions. For maintenance protocols, refer to PET Blow Mold Preventive Maintenance: A Complete Guide for Aluminum and Stainless Steel Tooling.
Table 1: Visual Diagnostic Matrix: Preform vs. Mold Scratches
| Diagnostic Feature | Preform-Induced Scratch | Mold-Induced Scratch |
|---|---|---|
| Edge Clarity | Blurred, hazy, or stretched | Sharp, precise, and highly defined |
| Surface Texture | Often feels smooth due to polymer stretching | Often feels sharp or indented to the touch |
| Locational Repeatability | Random placement on the bottle body | Exact same coordinate on every defective bottle |
| Cavity Correlation | Appears randomly across all mold cavities | Isolated to one specific mold cavity |
| Corrective Action | Audit unscrambler rails and shipping methods | Polish cavity; check clamping alignment |
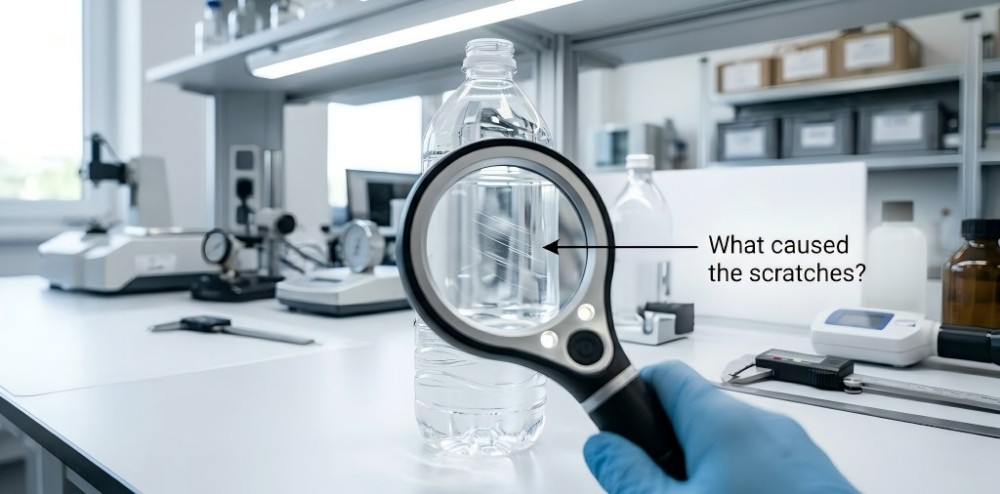
(Figure 1: Close-up analysis of a PET bottle body. Blurred, elongated marks indicate preform scuffing prior to the heating phase, while sharp linear indentations point to mechanical abrasion during or after the blowing cycle.)
Common Problems of PET Blow Molding: Grippers and Stretch Rods
Mechanical transfer grippers cause deep, localized scratches on the neck support ring when rotational misalignment occurs. Internal scratches are exclusively caused by stretch rod friction, occurring when a bent rod physically contacts the preform interior during the downward axial stretching phase.
If the preforms are pristine and the mold cavities are highly polished, the defect is occurring during the high-speed mechanical transfer or stretching operations.
Suspect 3: The Transfer Grippers (Neck and Shoulder Damage)
If the scratches are concentrated exclusively around the neck finish, the neck support ring, or the immediate upper shoulder of the bottle, the blow molding machine’s transfer mechanisms are the primary suspects.
In high-speed linear and rotary machines, mechanical grippers (or transfer arms) snatch the heated preform from the oven mandrels and load it into the mold cavity. After blowing, another set of grippers extracts the bottle. If these grippers are misaligned by even a fraction of a millimeter, or if the gripper springs have lost elasticity, the metal jaws will violently scrape against the softened PET polymer during insertion or extraction. This creates sharp, deep gouges near the thread and support ring. Regular calibration of transfer arms is mandatory to prevent this. Misalignment here often correlates with other issues, such as those discussed in Caps Won’t Seal: A 6-Step Protocol to Fix PET Bottle Neck Deformation (Ovality).
Suspect 4: The Stretch Rod (Internal Wall Scratches)
Run your finger over the scratched surface of the bottle. If the exterior feels entirely smooth, yet a scratch is clearly visible when held against a light source, the damage is internal.
Internal scratches are exclusively caused by the stretch rod. During the blowing cycle, the stainless steel stretch rod descends rapidly to provide axial orientation to the polymer. If the stretch rod is bent due to mechanical fatigue, or if the machine’s pneumatic timing is incorrect, the rod will deviate from the true center axis. As it descends, the metal tip will scrape against the internal wall of the heated preform, leaving a permanent internal gouge.
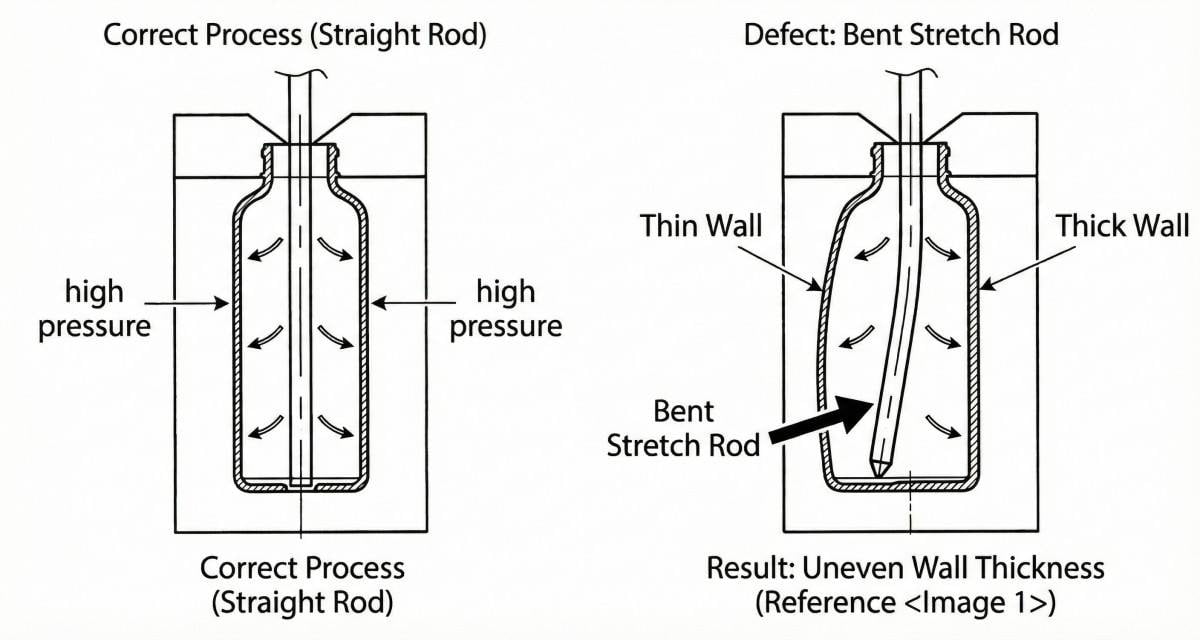
(Figure 2: A bent stretch rod deviates from the center axis during the downward stroke, generating kinetic friction against the interior wall of the heated preform, resulting in deep internal scratches.)
Table 2: Mechanical Tooling Defect Matrix
| Component | Defect Location | Physical Characteristics | Engineering Root Cause |
|---|---|---|---|
| Transfer Grippers | Neck finish, support ring, upper shoulder | Deep gouges, localized, external | Mechanical misalignment, worn springs, loss of center |
| Stretch Rod | Internal body wall, base center | Smooth exterior, visible internal abrasion | Bent rod, incorrect pneumatic timing, tip wear |
| Oven Mandrels | Internal neck finish | Micro-scratches inside the threaded area | Worn mandrel heads rotating inside the preform |
Cost of PET Bottle Scratches: Downtime and Downstream Friction
Identifying the precise origin of scratches minimizes the cost of unmarketable inventory and machine downtime. Execute the 5-minute interception test by retrieving a bottle immediately upon mold ejection; if flawless, the abrasive friction is localized to downstream air conveyor guide rails.
Operating a blow molding line while producing scratched bottles results in catastrophic financial waste. The cost of a scratch is not merely the wasted PET resin; it includes the energy consumed by the high-pressure compressors, the infrared heating arrays, and the labor required to sort and discard defective inventory.
Before dismantling the blow molding machine or returning the mold to the manufacturer, execute the ultimate 5-minute verification test: The Ejection Interception.
Stand at the ejection node of the blow molding machine. Before the newly formed bottle drops onto the exit conveyor or is caught by the air conveyor guide rails, manually intercept it mid-air (observing all safety protocols). Inspect this bottle under bright light.
- If the intercepted bottle is completely devoid of scratches, your preforms, your blow molding machine, and your mold are functioning precisely as engineered.
- If the bottles accumulating at the end of the line exhibit scratches, the defect is entirely downstream.
Suspect 5: The Air Conveyor (Downstream Scuffing)
In automated plants, bottles are transported via air conveyors where they are suspended by their neck support rings. High-velocity blowers propel the bottles forward. If the air pressure is too high, the bottles will violently collide with each other, causing mid-body scuffing. Furthermore, if the stainless steel guide rails supporting the neck are dirty, unpolished, or improperly spaced, they will induce continuous kinetic friction against the neck ring, creating a continuous scratch around the circumference. By proving the defect is downstream, you avoid costly and unnecessary machine downtime.
Table 3: Financial Impact Analysis of Misdiagnosed Scratches
| Diagnostic Error | Unnecessary Action Taken | Direct Financial Cost | Operational Consequence |
|---|---|---|---|
| Blaming the Mold | Returning mold for re-polishing | High logistics and tooling fees | 7-14 days of complete production stoppage |
| Blaming the Machine | Replacing stretch rods and grippers | High spare parts expenditure | 1-2 shifts of mechanical downtime |
| Correct Diagnosis (Conveyor) | Adjusting air pressure / polishing rails | Zero parts cost | 30 minutes of line adjustment; immediate recovery |
Case Study: Resolving Unidentified Neck Scratches for a Moroccan Beverage Plant
A Moroccan beverage facility experienced severe neck scratching on a 500ml premium water line. Reverse-tracing confirmed the mold cavities and preforms were structurally sound. Calibration of the transfer grippers, which exhibited a 1.2mm mechanical deviation, eliminated the abrasion without tooling replacement.
To contextualize this troubleshooting protocol, let us return to the client in Morocco. The facility was producing a 500ml premium still water bottle utilizing a 4-cavity linear blow molding machine. Quality control inspectors flagged deep, localized scratches specifically concentrated directly below the PCO1881 neck support ring.
The factory manager initially deduced that the mold’s neck inserts had contracted metallic burrs and requested a replacement set of tooling. We advised against immediate replacement and initiated the reverse-tracing protocol.
- Preform Audit: We inspected the 16g preforms prior to heating. No significant transit scuffing was present.
- Interception Test: The client manually intercepted bottles ejecting from all four cavities. The deep scratches were already present, eliminating the air conveyor as the source.
- Cavity Correlation: The scratches appeared on bottles from all four cavities, severely diminishing the probability of a localized mold defect.
- Mechanical Audit: The focal point shifted to the transfer grippers.
Upon detailed mechanical inspection, the maintenance team discovered that the primary transfer arm assembly, responsible for extracting the heated preforms from the oven and inserting them into the mold, had suffered a gradual mechanical deviation. The locking cam had loosened, allowing the grippers to misalign by 1.2mm off the center axis.
During the high-speed insertion phase, the hardened steel grippers were striking the softened PET polymer immediately below the neck ring, dragging against the material before fully seating the preform into the mold cavity. The solution required zero new parts. The engineering team recalibrated the transfer arm to a strict center-axis tolerance, secured the locking cam, and resumed production. The scratches were completely eliminated, saving the client thousands of dollars in unnecessary tooling replacement and extended downtime.
FAQ: PET Bottle Scratch Troubleshooting
FAQ 1: How can I visually tell the difference between a preform scratch and a mold scratch?
A scratch originating from a preform typically appears stretched, blurred, or cloudy because the physical defect expanded symmetrically during the bi-axial blowing process. A scratch caused by a defective mold cavity is sharp, distinct, and localized in the exact same geometric coordinate on every bottle produced from that specific cavity.
FAQ 2: Why do scratches only appear on the neck and shoulder of the PET bottle?
Scratches concentrated around the neck or shoulder are consistently caused by the blow molding machine’s transfer mechanisms. If the mechanical grippers are misaligned or the tension springs are fatigued, the metal components will abrasively rub against the softened plastic during cavity loading or ejection.
FAQ 3: Can the stretch rod inside the machine cause scratches?
Yes. If a bottle exhibits visual scratches but the exterior surface feels completely smooth to the touch, the damage is internal. This phenomenon occurs when a bent or misaligned stretch rod deviates from the center axis and scrapes the inner wall of the preform during the downward stretching phase.
FAQ 4: My bottles look optimal coming out of the mold but scratched at the end of the line. Why?
This indicates your mold and blow molding machine are functioning flawlessly. The origin of the friction is your downstream equipment. High air conveyor pressure causing bottles to violently collide, or abrasive, unpolished neck guide rails, will induce kinetic friction and scratch the bottles during transport to the filling block.
FAQ 5: How does a premium S136 stainless steel mold prevent scratches?
Standard aluminum molds possess lower surface hardness and can easily contract micro-scratches from operators wiping them down or from minor mechanical impacts. S136 stainless steel is a high-hardness tooling material that achieves a superior mirror polish. This flawless surface ensures the polymer releases smoothly without abrasive friction, mitigating mold-induced surface defects.
Are you experiencing persistent surface defects or structural failures on your PET blow molding line? Do not guess the root cause. Contact our engineering team at petmolder.com today. We provide rigorous, data-driven tooling analysis and precision CNC-machined S136 stainless steel molds to ensure maximum optical clarity for your premium packaging.
Further Technical Reading for PET Engineers:
- Why Do Hidden PET Preform Mold Defects Kill Your Factory Profits?
- PET Blow Mold Preventive Maintenance: A Complete Guide for Aluminum and Stainless Steel Tooling
- From Glass to PET: 4 Crucial Mold Design Rules for Your Premium Packaging Conversion
- Caps Won’t Seal: A 6-Step Protocol to Fix PET Bottle Neck Deformation (Ovality)
- PET Bottle Base Rollout Analysis: A 6-Step Guide to Fixing Center Gate Bulging and Rocker Bottoms