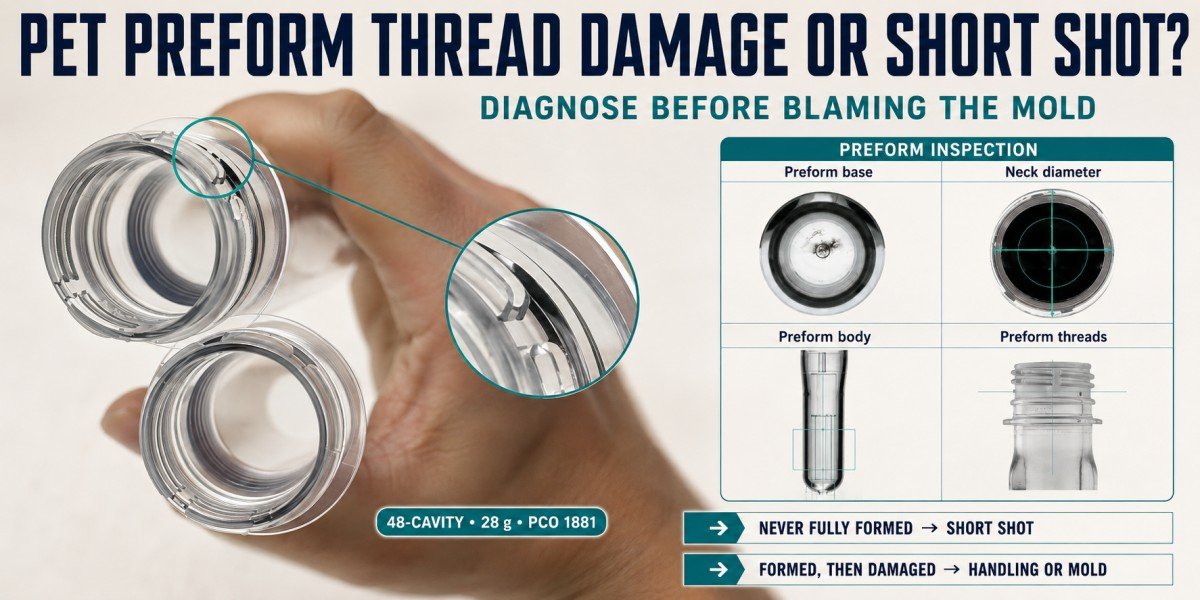
A missing section on a PET preform thread does not automatically mean the neck ring or preform mold has been damaged. A similar-looking defect can originate from incomplete filling during injection molding or from impact after the preform has already been formed.
When diagnosing a PET preform thread defect, the first task is to determine whether the thread was never completely formed or was formed correctly and damaged later. Only after that distinction should the team decide whether to adjust the process, improve handling, or inspect the mold.
This diagnostic order became important during the commissioning of one of our recent 48-cavity PCO 1881 preform mold projects in China.
Real Case: Thread Notches Appeared During Commissioning of a 48-Cavity PCO 1881 Preform Mold
PETMOLDER recently manufactured a 48-cavity, 28 g PCO 1881 PET preform mold for a customer in China. During the customer’s first production commissioning, several preforms showed missing sections around the thread. Instead of immediately blaming the mold, we first separated the possible causes into incomplete filling, post-ejection impact, and actual thread-forming component damage.
The customer had just entered the machine-adjustment stage when the production team noticed that some preforms had an obvious notch in the thread region.
They photographed the defective preforms and sent the images to us for evaluation.
From a single photograph, it would have been easy to assume that part of the neck ring or thread-forming surface had been chipped.
We did not make that conclusion.
At that stage, the injection molding process had not yet reached stable production conditions. In addition, the customer was not using a robot to receive the preforms during the early commissioning trial. After ejection, the preforms were falling directly into the collection area.
That meant at least three technically different failure paths had to be considered.
| Possible Cause During Initial Diagnosis | Why It Was Reasonable to Check | What Would Help Confirm or Exclude It |
|---|---|---|
| Incomplete filling during injection molding | Commissioning parameters were still being adjusted, so local neck-finish details might not yet be filling consistently | Check whether the defect improves after the injection process is stabilized |
| Impact after ejection | Preforms were free-falling without robotic take-out during the trial | Inspect the notch for fracture evidence and review the drop/collection path |
| Damage to the neck ring or thread-forming component | A damaged forming surface could reproduce a defect in the same position on repeated shots | Track the affected cavity and inspect the corresponding neck ring if the defect remains repeatable |
This distinction mattered because the corrective actions would be completely different.
If the defect came from free-fall impact, opening the preform mold would not solve it.
If the thread had never filled completely, polishing or replacing a neck ring would also be unnecessary.
Only a repeatable defect linked to a specific cavity and thread position would create stronger evidence that the thread-forming component itself needed inspection.
The customer continued commissioning and adjusted the injection process.
The final finding was that the thread notch resulted from incomplete filling during the initial process-adjustment stage. The corresponding thread geometry had not been fully formed; the mold component itself was not damaged.
That result confirmed why we had avoided making a repair decision from the first photograph.
For this project, delaying mold disassembly was the correct decision.
A missing piece on the thread does not automatically mean the preform mold is damaged. First determine whether the thread was never fully formed or was formed and damaged later.
The PCO 1881 thread itself is part of a defined neck-finish system rather than a decorative detail. Buyers who need a broader explanation of its relationship with preforms, closures, and bottles can refer to our What Is PCO 1881 Neck Finish? A Complete Guide to Preforms and Blow Molds.
Was the Thread Never Fully Formed—or Was It Damaged After Molding?
This is the most important diagnostic question because incomplete filling and post-molding damage may both look like a missing section of thread while occurring at completely different stages. A short shot exists before the mold opens, whereas impact damage occurs after the thread has already been molded.
A PET preform thread is created during injection molding.
Unlike the body of the preform, which is later reheated and stretched into the bottle, the neck finish is already formed to its functional geometry in the preform mold.
When a section is missing, the production team should reconstruct the defect timeline.
Did molten PET fail to occupy that part of the cavity?
Or did the thread form correctly and then lose material after ejection?
These two possibilities should not be combined into one generic category called “thread damage.”
| Diagnostic Question | If the Answer Suggests Incomplete Filling | If the Answer Suggests Post-Molding Damage |
|---|---|---|
| Did the PET reproduce the full thread contour? | A section appears never to have reached the final geometry | The thread may show evidence that it existed before breaking |
| When did the defect appear? | It was already present when the mold opened | It occurred during ejection, falling, transfer, collection, or later handling |
| Does process adjustment change the defect rate? | Improvement after stabilization supports a process-related cause | Handling damage may remain even when injection parameters are stable |
| Is the defect linked to a fixed cavity and position? | Can indicate a cavity-specific filling or mold issue | Random locations make handling more plausible |
| Are there visible fracture characteristics? | Often less obvious when material simply never filled the feature | Fracture, whitening, or impact evidence may support mechanical damage |
This timeline-based diagnosis is more useful than beginning with the question:
“Which mold component should we replace?”
The mold may not require any repair.
Why the Neck Finish Deserves Careful Diagnosis
The thread is a functional sealing and closure interface.
A cosmetic defect on the preform body may later disappear when the preform is stretched into the bottle, but a damaged or incomplete neck finish remains part of the final package.
For this reason, neck defects need to be treated seriously.
However, taking them seriously does not mean blaming the mold prematurely.
A good troubleshooting process protects both production quality and the tooling from unnecessary maintenance.
Our Ultimate Guide to Preform Neck Finishes explains why thread geometry, support structures, and closure compatibility need to be controlled as a complete neck system rather than judged only by nominal diameter.
How Can the Defect Shape Help Distinguish a Short Shot From Impact Damage?
The shape of the missing thread section can provide an initial diagnostic direction. A region that looks as though material never reached the full cavity contour may support an incomplete-filling diagnosis, while fracture surfaces, whitening, or mechanically broken edges can support impact damage. Visual appearance should still be combined with cavity tracking and production history before a final conclusion is made.
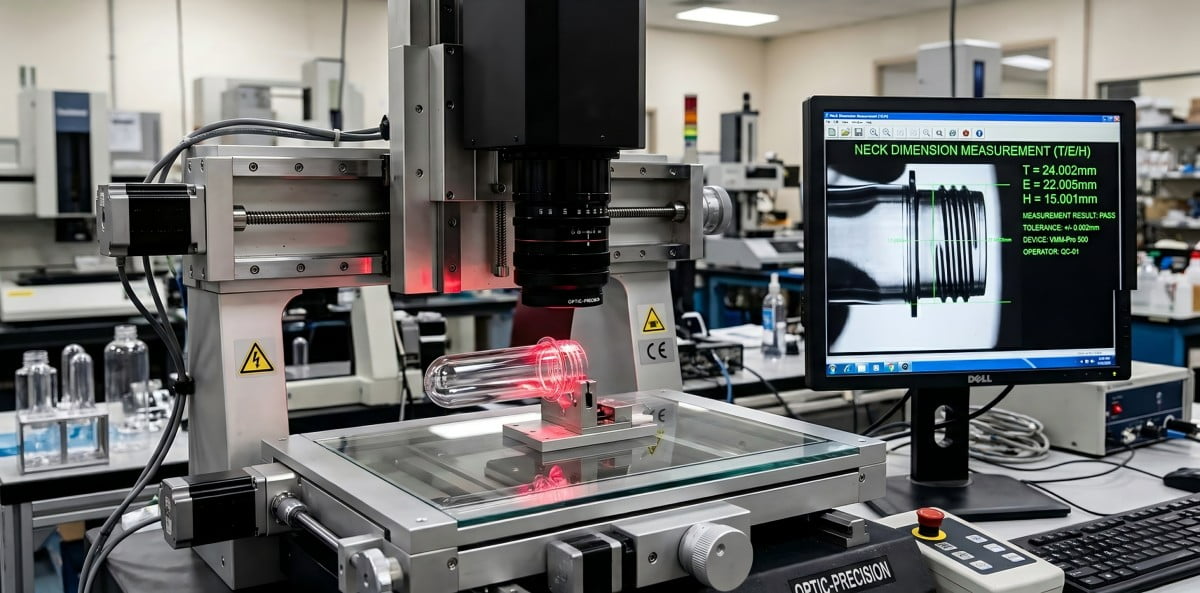
The defect surface often contains useful information.
If PET never completely fills a local feature, the geometry can look unfinished rather than fractured.
The missing region may transition into the surrounding molded surface without an obvious broken edge.
When an already-formed thread is struck and part of it breaks away, the remaining edge can look mechanically disturbed.
Depending on the exact condition, stress whitening or a more irregular fracture appearance may also be visible.
These are useful observations, but they should be treated as evidence rather than absolute rules.
| Defect Appearance or Pattern | More Relevant Initial Suspicion | Next Check |
|---|---|---|
| Thread appears incomplete and the missing region has no obvious fracture evidence | Incomplete filling | Review commissioning conditions and whether the defect improves after process stabilization |
| Edge looks fractured, whitened, or mechanically broken | Impact after molding | Inspect ejection, drop height, collection surfaces, and downstream handling |
| Same thread position repeatedly fails from the same cavity | Cavity-specific process or tooling factor | Identify that cavity and inspect its forming behavior |
| Defect appears at random thread positions | Handling damage becomes more plausible | Follow the preform after ejection and inspect contact points |
| Several cavities show similar incomplete details at the same stage of commissioning | Common process condition becomes more plausible | Stabilize injection conditions before dismantling individual cavities |
| One cavity remains defective after the rest of production is stable | Localized mold or cavity condition deserves closer inspection | Inspect the corresponding neck ring/thread-forming area |
Why One Photograph Is Not Enough
A close-up photograph can be extremely useful.
It can show the location, approximate shape, and severity of the notch.
It cannot reliably show every aspect of the production history.
A photograph normally does not tell us which cavity produced the preform, whether the part fell onto metal after ejection, whether the same defect was present on the previous shot, or whether the injection parameters had already stabilized.
This is why we frequently ask customers for both photographs and process context.
When possible, keeping several normal and defective samples from the same trial is also useful.
The goal is not to produce a more complicated diagnosis.
The goal is to avoid repairing the wrong thing.
Can Free-Fall Ejection Damage the PET Preform Thread?
Yes, post-ejection impact can damage a PET preform neck finish, particularly during commissioning when preforms may be allowed to fall directly into a collection area without the normal take-out or handling arrangement. The possibility depends on the drop path, contact surfaces, impact conditions, and whether preforms collide with each other.
This possibility was relevant in our 48-cavity case because the customer had not yet enabled robotic preform take-out.
The preforms were being released directly after molding and allowed to fall.
That made it reasonable to ask whether the thread notch had been created after ejection.
The neck finish is already dimensionally formed at this stage. It therefore needs to remain protected through collection and handling.
A preform can experience several types of mechanical contact before anyone inspects it.
| Handling Stage | Possible Risk to the Neck Finish | What the Technician Should Observe |
|---|---|---|
| Release from the mold | Uncontrolled movement can orient the preform unpredictably | Whether the neck contacts tooling or surrounding structures |
| Free fall | Greater drop distance increases impact opportunity | The actual height and landing condition |
| Collection bin | Preforms can strike a hard surface or each other | Whether the bin contains hard metal contact areas |
| High-volume accumulation | Preforms may collide repeatedly during collection | Whether defects increase as the collection area fills |
| Transfer to later handling | Guides or mechanical contact can damage a previously good neck | Whether the thread is intact immediately after ejection but damaged later |
The purpose of this inspection is not to argue that free fall always damages PET preforms.
Many factories use different temporary collection methods during commissioning.
The point is that handling becomes a legitimate diagnostic path when the defect could have occurred after molding.
Why Random Defects Make Handling Worth Investigating
If the notch appears on different thread positions from sample to sample, handling becomes more interesting as a possible cause.
A random impact is not tied to one fixed cavity surface.
The preform may fall at different angles and contact different areas of the neck.
By contrast, a damaged thread-forming feature in one neck ring would tend to reproduce a more consistent pattern associated with that cavity, although the complete production evidence still needs to be checked.
Our practical approach during commissioning is therefore to ask what happened to the preform after the mold opened before deciding that the mold itself is responsible.
How Can Injection Molding Conditions Cause an Incomplete PET Preform Thread?
A PET preform can appear substantially formed while a small section of the thread remains incomplete because the neck finish contains relatively fine geometry that still depends on stable cavity filling. During initial commissioning, an unstable filling condition can leave a local feature insufficiently reproduced even when most of the preform looks normal.
This was the confirmed cause in our 48-cavity project.
The important point is that incomplete filling does not always mean the entire preform is dramatically short.
A localized thread feature can be underfilled while the preform body appears sufficiently complete to an operator looking quickly at the part.
Why a Small Thread Feature Can Reveal an Unstable Process
The melt has to reproduce the entire cavity geometry during injection.
If the process has not yet reached a stable condition, some details can become sensitive before the larger, easier-to-fill areas show an obvious defect.
The exact process cause has to be determined from the machine and mold condition, so we do not recommend treating one generic parameter as the universal solution.
During commissioning, the investigation normally considers whether the overall filling and packing condition has stabilized and whether the material and machine are operating consistently.
| Commissioning Observation | Engineering Meaning |
|---|---|
| Defect appears while injection settings are still being adjusted | Final preform quality should not yet be judged as stable production |
| Several cavities show similar incomplete thread detail | A common process condition deserves attention before individual mold repair |
| Defect frequency decreases after the molding process is optimized | Supports a process-related diagnosis |
| Main preform body looks complete but one thread region does not | Local detail can still reveal incomplete cavity replication |
| One cavity remains abnormal after the overall process is stable | Cavity-specific filling or tooling inspection becomes more important |
| Stable parameters do not change a repeated fixed defect | Mold-component inspection becomes more justified |
This is why a multi-cavity preform mold should be evaluated only after the machine has reached a sufficiently stable process condition.
A commissioning sample and a stable production sample serve different purposes.
Do Not Turn This Into a Parameter-Adjustment Guessing Exercise
When a thread appears incomplete, it can be tempting to search for one number to change immediately.
That is not the purpose of this article.
Different injection machines, PET materials, mold structures, hot-runner systems, production conditions, and commissioning states can require different process settings.
The useful diagnostic principle is broader:
if the defect changes substantially as the injection process is stabilized, investigate the process before modifying the thread-forming steel.
For buyers evaluating a large preform mold before full production, our PET Preform Mold FAT Checklist: How to Inspect a 48-Cavity Mold Before Delivery explains why cavity consistency and stable trial conditions matter when accepting multi-cavity tooling.
When Should You Suspect the Neck Ring or Thread-Forming Area of the Mold?
The neck ring or thread-forming area deserves closer inspection when the defect continues after the injection process is stable and post-ejection handling has been excluded, especially when the same cavity repeatedly produces the same defect at the same thread location. Repeatability is one of the most useful clues that the cause may be localized in the mold.
This is the point where mold inspection becomes a stronger part of the diagnosis.
If one thread-forming edge has been damaged, chipped, scratched, or otherwise changed, the cavity can reproduce that geometry repeatedly.
The bottle manufacturer should therefore avoid dismantling the entire 48-cavity mold only because several mixed samples show thread notches.
The first objective is to identify whether a specific cavity is responsible.
Repeatability Helps Narrow the Investigation
A mold defect normally occupies a fixed physical location.
That makes repeatability useful.
| Production Pattern | What It Suggests | Recommended Direction |
|---|---|---|
| Same cavity, same thread position, repeated over multiple cycles | Localized cavity or forming-component issue becomes more likely | Inspect the corresponding neck ring/thread-forming region |
| Same cavity, but defect changes position randomly | A simple fixed cavity chip becomes less convincing | Recheck process and handling |
| Multiple cavities show a similar incomplete area during commissioning | Common molding condition may be involved | Stabilize process before replacing individual components |
| Defect disappears after process optimization | Mold damage becomes less likely | Continue controlled production verification |
| Defect continues after stable molding and controlled handling | Tooling inspection becomes justified | Inspect the identified cavity rather than the entire mold |
| Physical damage is visible on the thread-forming component | Mold repair or component replacement may be required | Compare with original geometry and determine the appropriate repair |
A useful diagnostic principle is:
A mold defect tends to repeat, while handling damage is often more random.
This should be treated as a direction, not an absolute law.
A process issue can also repeat.
A handling system can also create a repetitive contact point.
The complete production pattern still matters.
Why the Neck Ring Should Not Be Polished Automatically
If a technician suspects the neck ring, it can be tempting to polish the local thread surface immediately.
That is risky.
The thread-forming region contains functional geometry.
Uncontrolled material removal can change the thread profile rather than repair it.
The component should first be inspected and compared with the intended geometry.
If the surface is damaged, the repair method should preserve the neck finish required by the closure system.
This is another reason not to start mold repair until process and handling causes have been reasonably excluded.
Why Is Cavity Tracking So Important on a 48-Cavity Preform Mold?
Cavity tracking converts a mixed defect complaint into usable engineering evidence. On a 48-cavity preform mold, knowing whether the same defect comes from one cavity, several cavities, or random cavities can quickly separate localized tooling problems from common process conditions or downstream handling damage.
A 48-cavity mold produces many preforms at the same time.
If all samples are immediately mixed together, the troubleshooting team loses one of the most valuable pieces of information available: where each defective preform came from.
This can turn a localized problem into a much larger investigation than necessary.
One Defective Sample Does Not Represent 48 Cavities
Suppose the maintenance team finds ten defective preforms in a collection bin.
Without cavity identification, several possibilities remain open.
All ten may come from one cavity.
They may come from ten different cavities.
They may have been damaged after molding.
These three situations lead to completely different troubleshooting directions.
| Defect Distribution | More Useful Investigation Priority |
|---|---|
| One fixed cavity repeatedly produces the defect in the same thread location | Inspect that cavity’s molding condition and corresponding neck ring |
| A small number of fixed cavities show the same type of defect | Compare those cavities and check whether they share a local filling or tooling condition |
| Many cavities show similar incomplete thread detail during commissioning | Investigate common injection conditions before treating each cavity as damaged |
| Cavity numbers are random and defect locations are also random | Post-ejection handling becomes more relevant |
| Defect improves significantly after process adjustment | Injection molding condition becomes the stronger explanation |
| Defect does not improve and remains fixed to one cavity | Detailed tooling inspection becomes more justified |
Cavity Tracking Makes Multi-Cavity Troubleshooting Faster
The purpose is not paperwork.
It is to reduce the troubleshooting area.
If cavity identification immediately shows that the problem is coming from one specific position, the technical team can focus on that part of the hot-runner, cavity, core, neck ring, and related molding condition.
If the problem is widespread, dismantling one neck ring is unlikely to explain the complete pattern.
For a high-cavity preform mold, that distinction can save significant maintenance time.
Our article PET Preform Concentricity: Why Mold Precision Matters discusses another preform-quality issue where cavity consistency matters. Although concentricity and thread short shots are different defects, both demonstrate why multi-cavity production should be analyzed cavity by cavity rather than only from mixed samples.
Establish Traceability During Commissioning
Commissioning is the best time to establish a simple sample-identification method.
The exact method depends on the machine and factory.
The principle is simply that defective and reference preforms should remain linked to their source whenever troubleshooting requires cavity-level analysis.
This becomes particularly useful when communicating remotely with the mold manufacturer.
A photograph labeled “bad preform” contains limited information.
A photograph labeled “Cavity 17, same thread position, repeated on five consecutive cycles after process stabilization” gives the technical team a much stronger starting point.
What Should You Check Before Repairing the Preform Mold?
Before repairing a PET preform mold because of a thread notch, keep both defective and normal samples, identify the affected cavity where possible, review post-ejection handling, and repeat sampling after the injection process is stable. Mold repair should become the priority only when the defect remains repeatable after process and handling causes have been reasonably excluded.
The order of troubleshooting matters because modifying a good neck ring creates a new problem instead of solving the original one.
For our 48-cavity PCO 1881 project, not opening the mold immediately gave the commissioning team enough time to identify the actual cause.
A practical diagnosis can be organized as follows.
| Diagnostic Stage | What Should Be Confirmed | What the Result Tells You |
|---|---|---|
| Preserve samples | Keep normal and defective preforms from the same trial | Provides a direct physical comparison |
| Record production context | Note whether the machine is still in initial commissioning or already stable | Prevents unstable trial parts from being treated as final production quality |
| Identify cavity | Determine whether defects are linked to a fixed cavity | Helps separate local tooling issues from common or random causes |
| Inspect handling | Review ejection, free fall, collection, transfer, and contact surfaces | Determines whether the thread may be damaged after molding |
| Stabilize injection process | Repeat sampling after the molding condition is controlled | Shows whether incomplete filling disappears with process improvement |
| Compare defect position | Check whether the same location repeats from the same cavity | Strengthens or weakens the case for localized mold inspection |
| Inspect the mold only when justified | Examine the corresponding neck ring/thread-forming area | Avoids unnecessary disassembly of unaffected cavities |
| Verify after correction | Produce controlled samples again | Confirms that the actual root cause has been removed |
Why Normal Samples Matter
A normal preform from the same trial can tell us almost as much as the defective one.
If the same cavity produces normal and defective parts intermittently, a permanently damaged thread-forming edge becomes a less obvious explanation.
If one cavity repeatedly produces an identical defect while neighboring cavities remain normal, localized investigation becomes more valuable.
Comparative evidence is much more useful than looking at one defective part in isolation.
Why We Do Not Repair the Neck Ring From a Photograph Alone
A photograph is evidence.
It is not a repair instruction.
Before anyone grinds, polishes, or replaces a thread-forming component, we want to understand the production pattern.
This approach is particularly important for overseas customers, where unnecessary disassembly can create extra downtime and communication.
It is equally useful for domestic commissioning because the same logic prevents the technical team from changing tooling before the injection process has stabilized.
Our broader article How to Procure PET Preforms: A Guide to Avoiding 8 Critical Defects is useful for incoming preform inspection. The problem discussed here is different: this article focuses on diagnosing the defect at the production source before deciding whether the injection process, handling system, or mold requires correction.
What Our 48-Cavity Case Confirmed
In our 48-cavity, 28 g PCO 1881 project, the first photographs made several explanations possible.
The customer’s temporary free-fall collection method meant impact damage could not be ignored.
The initial commissioning state meant incomplete filling also had to be considered.
Actual mold damage remained a third possibility.
The final troubleshooting result showed that the missing thread region came from incomplete filling during commissioning.
Once the injection process was adjusted and stabilized, the diagnosis no longer supported repairing the thread-forming component.
That is why our conclusion from this project is simple:
In our 48-cavity PCO 1881 case, delaying the decision to repair the mold was the correct decision. The defect was eventually traced to incomplete filling during commissioning—not to mold damage.
The broader lesson applies to many preform-production problems.
Do not begin with the component that is easiest to blame.
Begin with the defect timeline.
Determine when the defect occurred.
Then use cavity repeatability and controlled process evidence to identify where the troubleshooting should go next.
Frequently Asked Questions
Does a Missing Section on the PET Preform Thread Always Mean the Mold Is Damaged?
No.
A missing thread section can result from incomplete filling during injection molding or from mechanical damage after the preform has already been formed.
The first diagnostic step is to determine whether the thread geometry was never completed or whether a previously complete thread was broken during ejection, collection, transfer, or other handling.
How Can I Tell if a PET Preform Thread Defect Is a Short Shot?
An incomplete-fill defect often looks as though part of the thread geometry was never fully formed rather than broken away after molding.
The diagnosis becomes stronger if the problem appears during unstable commissioning and improves after the injection process is stabilized.
Defect shape alone should not be used as the final proof; cavity tracking and process behavior should also be reviewed.
Can PET Preforms Be Damaged When They Fall After Ejection?
Yes.
During commissioning, preforms may sometimes be collected by free fall before the normal robotic take-out or handling system is in use.
Impact with hard surfaces or other preforms can damage the finished neck area.
If the notch position is random or shows mechanical fracture evidence, the ejection and collection path should be checked.
When Should the Preform Mold Neck Ring Be Inspected?
The corresponding neck ring should receive closer inspection when the injection process is stable, handling damage has been reasonably excluded, and the same cavity continues producing a repeatable defect at the same thread position.
This approach avoids dismantling a multi-cavity mold because of a small number of mixed defective samples.
Why Is Cavity Identification Important When Troubleshooting a 48-Cavity Preform Mold?
Cavity identification shows whether the problem is localized or widespread.
A fixed defect from one cavity points the investigation toward that molding position and its corresponding components.
Random defects across many cavities are more consistent with a common process or downstream handling issue.
Without cavity traceability, those very different failure modes can easily be confused.
Conclusion
A missing section of PET preform thread can look like a simple mold defect, but the same visual symptom can be created at different stages of production.
That is why the correct troubleshooting sequence begins with a timing question:
Was the thread never fully formed, or was it formed correctly and damaged afterward?
If the thread was incomplete before the mold opened, the investigation should focus first on injection molding and cavity filling.
If the thread formed correctly but was later broken, the ejection and handling path becomes more relevant.
If the same cavity continues producing the same defect at the same location after the injection process and handling conditions are stable, the corresponding neck ring or thread-forming area deserves detailed inspection.
Our recent 48-cavity, 28 g PCO 1881 project demonstrates why this sequence matters.
During initial commissioning, some preforms showed obvious missing sections in the thread. Because the customer was using free-fall collection and the injection process was still being adjusted, we did not immediately conclude that the mold was damaged.
The final diagnosis showed that the thread had not been fully filled during the early commissioning stage.
The mold component did not require repair.
For multi-cavity preform production, this is why process stabilization and cavity traceability should come before unnecessary mold disassembly.
If your PET preform production shows a recurring thread notch, you can send us clear defect photos, normal comparison samples, neck-finish specification, preform weight, mold cavity number, machine information, commissioning status, handling method, and information about whether the defect changes after process adjustment.
We can then help determine whether the next inspection should focus on injection conditions, post-ejection handling, cavity-specific behavior, or the corresponding thread-forming component.
Related PETMOLDER Articles
- How to Procure PET Preforms: A Guide to Avoiding 8 Critical Defects
- What Is PCO 1881 Neck Finish? A Complete Guide to Preforms and Blow Molds
- PET Preform Mold FAT Checklist: How to Inspect a 48-Cavity Mold Before Delivery
- PET Preform Concentricity: Why Mold Precision Matters
- The Ultimate Guide to Preform Neck Finishes: How to Choose the Right Standard for Your Bottle